It has become apparent to me, while trying to come up with a title for this post, that I have seen WAY to many Veggie-Tales episodes that feature Silly Songs with Larry; for I cannot seem to get the Homophone song out of my head......
I know a pear, pear, pear, pear
With a pair of really soft shoes.
He wears them to pare, pare, pare, pare
Bushes that easily bruise.
Homophones! Homophones!
Where the toads are towed out on the plane
Homophones! Homophones!
I need my kneaded biscuits plain
Whether, whether, whether whether,
Whether you like it or not.
Weather, weather, weather weather,
Weather is cold, warm and hot...
And something about rows of a bad smelling rose and a nose that knows. (sigh)
I guess I should be happy that I am not roasting a Cebu for dinner! (it's a bovine cousin, kind of like a water buffalo)
Homophones, talking cucumbers and cebu aside..... To me, a poached pear is a fundamental fall food. I'm not completely sure why, but I think it has to do with mom & dad canning pears every autumn when I was growing up. A lot of things were canned in the fall, for that was harvest time. If you wanted to eat fruit in the winter, you needed to can it in the fall. Let's face it, I am old enough to remember a time before refrigerated produce from Peru and Argentina made it's way to grocery store shelves. Thus, canning Applesauce, Pears, Apricots, Cherries & Peaches, as well as freezing Huckleberries, Raspberries, Marionberries and Gooseberries, ensured a plentiful supply of said fruits through the winter.
After all, there is nothing quite so delicious as a Peach Kuchen in January.
But getting back to pears. The scent of pears would permeate the kitchen while mom & dad were peeling, packing and finally pouring syrup into the jars before lidding them and throwing them in the water bath so the lids would seal. Yeah, I am pretty sure this is where my love of poached pears comes from.
But being me, I am not happy with a simple sugar syrup. I should rephrase that. I would still be happy, but I am happy-er when I get a chance to break out some flavor enhancements. And I can think of nothing so perfectly suited to enhance the flavor of a pear than Gewurztraminer. The spice floral aroma is intoxicating and the juicy lychee flavor with hints of grapefruit is heaven in a bottle. Add a little Lemon and some Ginger, and you have a winner! OK, I will admit that if you pour Butterscotch over just about anything, it increases it's awesomeness factor by 75%!
 6 medium Bosc Pears
1 Lemon
1 bottle Gewurztraminer (a spicy floral)
1 cup Water
1 cup Sugar
2 inches Ginger, sliced
1 Cinnamon Stick
1 Meyer Lemon, juiced
1 Mexican Vanilla Bean ("spicy" vanilla flavor as opposed to Tahitian which is more "creamy")
Butterscotch sauce
First you need some beautiful Bosc pears... These are my favorites for poaching. It's not just because they have the quintessential "pear" shape, although that is part of it, it's mainly because these pears maintain their shape during poaching and their texture actually improves. They do not become all mushy and disgusting. Bartletts, I have been told, do this too, but not as well as the Bosc pears do.
 Before peeling the pears, you need to fill a bowl with cold water and squeeze the juice from a lemon into the water. Heck, throw the lemon halves in as well. This will keep the pears from browning once they have been peeled.
 Gently peel the pears with a vegetable peeler, carefully following the pear's voluptuous curves, flatten the bottom just a little with the peeler, and place it in the Lemon water.
 After you are finished peeling all the pears, let them just hang out in the lemon water while you make the Gewurztraminer syrup.
 Grab a medium stock pot, that is just big enough to hold the pears, combine Gewurztraminer, Water, Sugar, Ginger, Cinnamon stick, Meyer Lemon Juice and a split Mexican Vanilla Bean.
 Bring this to a boil, then reduce the heat to a simmer.
Remove the pears from the Lemon water and plunge them into the simmering liquid, stem up, then cover the surface of the simmering syrup with a tea towel to keep the pears weighed down to ensure even poaching. (if the pears are not completely covered with liquid, add some of the Lemon water)
 Let the pears simmer for about 25-30 minutes, then remove the pot from the flame and let the pears cool in the poaching liquid.
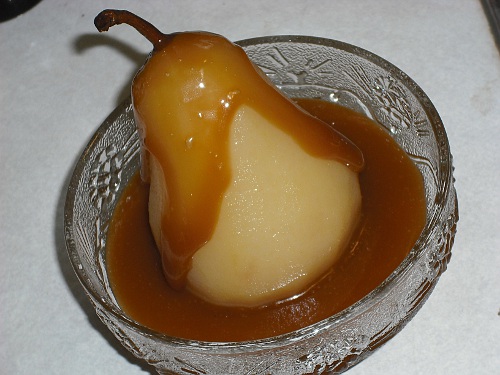
 When ready to serve, grab a bowl and spoon a pool of Butterscotch in the bottom.
 Remove a pear from the warm liquid,
 and place it in the center of the Butterscotch pool.
 Drizzle a heafty spoonful of butterscotch over the top near the stem and let it languidly run down the sides of the pear.
 Serve to your awestruck guests... :)
 Mangia!!
~~
I know a pear, pear, pear, pear
With a pair of really soft shoes.
He wears them to pare, pare, pare, pare
Bushes that easily bruise.
Homophones! Homophones!
Where the toads are towed out on the plane
Homophones! Homophones!
I need my kneaded biscuits plain
Whether, whether, whether whether,
Whether you like it or not.
Weather, weather, weather weather,
Weather is cold, warm and hot...
And something about rows of a bad smelling rose and a nose that knows. (sigh)
I guess I should be happy that I am not roasting a Cebu for dinner! (it's a bovine cousin, kind of like a water buffalo)
Homophones, talking cucumbers and cebu aside..... To me, a poached pear is a fundamental fall food. I'm not completely sure why, but I think it has to do with mom & dad canning pears every autumn when I was growing up. A lot of things were canned in the fall, for that was harvest time. If you wanted to eat fruit in the winter, you needed to can it in the fall. Let's face it, I am old enough to remember a time before refrigerated produce from Peru and Argentina made it's way to grocery store shelves. Thus, canning Applesauce, Pears, Apricots, Cherries & Peaches, as well as freezing Huckleberries, Raspberries, Marionberries and Gooseberries, ensured a plentiful supply of said fruits through the winter.
After all, there is nothing quite so delicious as a Peach Kuchen in January.
But getting back to pears. The scent of pears would permeate the kitchen while mom & dad were peeling, packing and finally pouring syrup into the jars before lidding them and throwing them in the water bath so the lids would seal. Yeah, I am pretty sure this is where my love of poached pears comes from.
But being me, I am not happy with a simple sugar syrup. I should rephrase that. I would still be happy, but I am happy-er when I get a chance to break out some flavor enhancements. And I can think of nothing so perfectly suited to enhance the flavor of a pear than Gewurztraminer. The spice floral aroma is intoxicating and the juicy lychee flavor with hints of grapefruit is heaven in a bottle. Add a little Lemon and some Ginger, and you have a winner! OK, I will admit that if you pour Butterscotch over just about anything, it increases it's awesomeness factor by 75%!
Spice Poached Pears in Butterscotch

1 Lemon
1 bottle Gewurztraminer (a spicy floral)
1 cup Water
1 cup Sugar
2 inches Ginger, sliced
1 Cinnamon Stick
1 Meyer Lemon, juiced
1 Mexican Vanilla Bean ("spicy" vanilla flavor as opposed to Tahitian which is more "creamy")
Butterscotch sauce
First you need some beautiful Bosc pears... These are my favorites for poaching. It's not just because they have the quintessential "pear" shape, although that is part of it, it's mainly because these pears maintain their shape during poaching and their texture actually improves. They do not become all mushy and disgusting. Bartletts, I have been told, do this too, but not as well as the Bosc pears do.


Remove the pears from the Lemon water and plunge them into the simmering liquid, stem up, then cover the surface of the simmering syrup with a tea towel to keep the pears weighed down to ensure even poaching. (if the pears are not completely covered with liquid, add some of the Lemon water)


~~


