Showing posts with label Corn Syrup. Show all posts

Wednesday, December 18, 2013

Seeing Red - Red Walnut Divinity

Nothing says the holidays quite like Walnuts.  They lend crunch to Fruit Cake and Brownies, speckle Divinity and Fudge and flavor Baklava and Nut Rolls.  In fact, it should be illegal to have Christmas without Walnuts. 

Historically, at least in the United States, we have had a choice between the mild transplanted "English" Walnut (which are really Persian) and the stronger flavored "native to the US" variety known as the "Black" Walnut.  But no more, for California has done it again.  They have successfully begun producing RED Walnuts.

Don't freak out, it's not a GMO, nor is it a gimmicky artificially colored food product.  The interior husk REALLY is Red.  From the outside, you would not be able to tell the difference between the standard English/California/Mission/Persian Walnut and the new Red Walnut (which is either a Livermore or a Yolo) developed at UC Davis by grafting a Persian red skinned variety to the more common English (insert litany of AKAs here) Walnut. 

Unlike "English" Walnuts, which take 2-3 years to begin producing, these red varieties can take as long as 8 before producing a significant crop.  Thus, those that were planted over a decade ago are now beginning to bear "fruit" as it were.

(Black Walnut, English/Mission/California/Persian Walnut, Red Walnut)

The harvest is still low, when compared to the massive quantities of English Walnuts produced by California. Heck, very low when compared to the copious amounts of nuts that are produced by California in general.  Texas, New Mexico and Georgia have their Pecans.  While Oregon and, to a lesser extent, Washington have their Hazelnuts.  Even though Hawaii is the land of the Macadamia nut.  It is California's harvest of Walnuts, Pistachios and Almonds along with a few Pecans, Macadamias and Hazelnuts as well, which culminates into 90% of the United States yearly nut crop.

Which only proves that California is seriously full of nuts.  I'm just sayin'

So what do "Red" Walnuts taste like?  To me, they taste more "nutty", almost like they have already been lightly toasted.  Here is the interesting thing though, they are lacking in that bitter tannic bite that English (AKA litany) and Black Walnuts have.  Thus, I think the "nut" flavor is more pronounced simply because they aren't as bitter as common Walnuts.  

I chose to use the few I was able to procure in a batch of Divinity.  I have covered Divinity several times before, both Lavender and with Black Walnuts, so I am not going to run through the procedure again in this post.

I am, however, going to show off my vintage Betty Furness "Westinghouse" thermometer set.  (I wonder if she's fictitious like Betty Crocker)


And show a picture of the addition of chopped Red Walnuts to the Candy mixture... Exciting, huh?

To be honest, though I was happy with the end result, I think I should have left my Red Walnuts in larger chunks.  They really didn't show up in the finished Divinity, which kind of bummed me out.  (and why I posted the picture of me adding them to the candy batch --  they really are in there)

I was hoping for a nice punch of red within the pristine whiteness of the candy. (sigh) Oh well.

The flavor was delicious and that is really the important thing.

So check them out and give them a try.

Mangia!!
~~

Saturday, July 2, 2011

Which side is YOUR Scotch Buttered on? - Butter Scotch Syrup

There is a lot of confusion out there regarding Butterscotch, Caramel, and Toffee, so hopefully this will help a little bit.

Butterscotch - Brown Sugar and Butter (sometimes cream) cooked to Soft Crack stage. (It's not from Scotland and doesn't necessarily contain Scotch whiskey either)

Caramel - White Sugar (sometimes with a tiny amount of water) that has been heated to 300 degrees and begins to "Caramelize" or Brown due to a Maillard reaction.

Toffee - White Sugar and Butter (sometimes cream) cooked to Hard Crack stage. (It really is English)

With regards to that ever delicious Caramel Candy and Caramel syrup....  well depending on how they are made, they may or may not be real Caramel.  Unless the Sugar is actually "caramelized" before the addition of other ingredients (Cream and Butter in varying amounts) then they are not really caramel.

Case in point - Evaporated Milk caramels - The proteins in the milk are browning at a much lower temperature than is necessary to caramelize the sugar, thus the sugar acts only as a sweetener, because the milk would scorch if cooked past 300 degrees.  This is also why cream is used when making real caramels, because it is much lower in milk proteins, being mostly fat.

But back to Butterscotch.  Being that Butterscotch is simply a mixture of brown sugar and butter, and not the caramelization of sugar, this leaves a whole gamut of dessert deliciousness at your disposal....  From syrup and sauce to soft, chewy bits all the way to it's original confectionery form which resembles a Werther's Original.  This leads me to WHY it's called Butterscotch.  "Scotching" is the name for the process of pre-scoring hard candy after it has been poured, allowing for easier cutting once the candy has completely cooled.  I know, it's as confusing as the "Swiss" steak not coming from Switzerland, but being the name of the process of repeatedly puncturing it (swissing) to tenderize it.

Geographic misnomers aside, making Butterscotch is ridiculously simple and a great addition to your dessert repertoire. I am forgoing the original hard candy form, and seeking a softer side of Butterscotch with a sauce/syrup.  Trust me, there is a madness to my method, which will become apparent later.  As a result I will be using a little corn syrup to ensure it does not become too hard as this would be detrimental for Phase II of my master plan.  But even if you don't take this syrup to the culinary extreme that I have planned for it, it's GREAT over ice cream.  :)

Butterscotch Syrup

1 cup packed (200g) Light Brown Sugar
1/2 cup packed (100g) Dark Brown Sugar (to offset my usage of corn syrup with a little extra molasses)
1/2 cup (118 ml) light Corn Syrup
1/4 cup (59 ml) Water
4 TB Unsalted Butter
1/2 tsp Kosher Salt
1/2 cup (118 ml) Heavy Cream
optional 1 TB Lemon Juice
optional 1 TB Scotch Whiskey

Combine Brown Sugars, Corn Syrup, Water and Salt in a heavy bottomed sauce pan set over medium flame.

When the Brown Sugar has dissolved, add the Butter and stir until melted.

Add the Heavy Cream and continue stirring until the mixture comes to a slow boil.

Boil for approximately 10 minutes (no thermometer) or until the syrup, dropped from the spoon, holds a short thread.

If you are using the optional Lemon Juice and Scotch, whisk them in now.

Pour the mixture into a heat proof container and allow to cool.

If refrigerating, sauce may need to be warmed slightly. (makes about 2 cups)

Mangia!!
~~

Monday, May 16, 2011

Just a Hunk, a Hunk of Burnin' Cake - Old Fashioned Burnt Sugar Cake

So I am finally blogging about the Burnt Sugar Cake recipe that I got from my Grandmother.  I promised a while back that I would get to this and I would hate to disappoint anyone who has been waiting breathlessly for it.  :)

Honestly, I should have blogged about it sooner cause this cake is positively delicious!  Though, how could it not be?  It's basically a Caramel cake with Caramel 7 minute frosting schmeared all over it.  If you love Caramel, you will LOVE this....  Thanks Grandma!!!!!

Burnt Sugar Cake

Burnt Sugar Syrup
1/2 cup (3.5 oz) (100g) Granulated Sugar
1/4 cup (2 oz) (60ml) Water

Burnt Sugar Cake
3 cups (11.3 oz) (320g) sifted Cake Flour (sift before measuring, if your using weight don't worry bout it)
1 TB Baking Powder
1 tsp Kosher Salt
1/2 cup (8 TB) (4 oz) (114g) Unsalted Butter
1 1/2 cups (10.6 oz) (300g) Granulated Sugar
3 large Eggs, separated
1 cup (8 oz) (237ml) Water, room temperature
1 tsp Vanilla Extract
1/2 of the Burnt Sugar Syrup

Burnt Sugar 7 Minute Frosting
3/4 Cup plus 2 TB (6.1 oz) (175g) Granulated Sugar; Divided
1 TB light corn syrup
2 TB water
3 Large Egg Whites
1/4 tsp Cream of Tarter
The remaining Burnt Sugar Syrup

First you have to make the syrup and let it cool.  So, place 1/2 cup (3.5 oz) (100g) sugar in a heavy bottomed pan and place over medium flame.

Once the sugar has melted and become dark brown, remove the pan from the flame and add the water

and continue stirring until all the lumps have dissolved.

You well end up with about 6 TB of syrup.

Set this aside to cool while you begin constructing the cake.

Grease the bottom ONLY, of 2 9-inch (23 cm) pans, then line with parchment or waxed paper, then grease and flour the paper....  and preheat the oven to 350 F (180 C) (GM 4) Degrees

Once you have sifted and measured the flour....

Add Baking Powder and Kosher Salt, then sift at least 3 more times to mix the ingredients together.

Set this aside for now and separate the eggs, setting the whites aside for a little later.

In the bowl of your mixer, beat the butter until light.

Add the Sugar and continue beating until fluffy.

Add the Egg Yolks one at a time, mixing well after each addition so the emulsion doesn't "break".

Add the Vanilla and 1/2 of the Burnt Sugar Syrup.

Now begin adding the Flour mixture, alternating with the Water, beginning and ending with the Water. (Basically, 1/4 cup Water, 1 cup Flour, 1/4 cup Water, 1 cup Flour, 1/4 cup water, 1 cup Flour, 1/4 cup Water)


Continue beating, after adding the last of the Water, for an additional minute or two until a nice smooth batter is formed.

In a clean bowl, beat the Egg Whites until firm peaks.

Fold the beaten Egg Whites into the batter.

Divide the batter between the 2 pans.

Bake the Cakes for 25-30 minutes or until a toothpick, inserted in the center, comes out clean (careful not to over bake or the cake will be REALLY dry due to the egg whites)

Let cool in the pan for 10 minutes before running a spatula around the edge and turning the cakes out onto a rack to finish cooling. (don't forget to remove the paper)

While the cakes are cooling you can make the Burnt Sugar 7 Minute Frosting.

In a small saucepan, combine 3/4 cup (150 g) Sugar, Corn Syrup and Water and boil over low heat.

Bring to a boil and cook until they syrup reaches 232 F (112 C) Degrees.

Meanwhile, in a grease free bowl, begin whisking or beating the Egg Whites with the Cream of Tarter until soft peaks form; then sprinkle in the remaining 2 TB (25 g) Sugar while continuing to beat until firm peaks form (this take about 3 minutes).


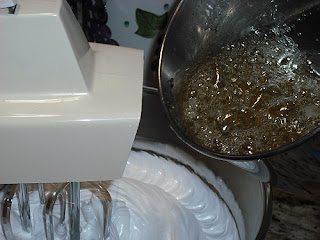
Remove the syrup from the flame and slowly pour it into the meringue, in a steady stream while continuing to beat the meringue on medium speed; being careful not to hit the whisk or beater with the syrup cause it will fling little shards of sugar into your frosting.

Once the syrup is completely added (do not scrape the pan) go ahead and add the remaining Burnt sugar syrup too.

Continue beating until the meringue cools down; somewhere between 5 - 10 minutes (7 Minutes on average).


OK, Now let's finally get this cake put together......

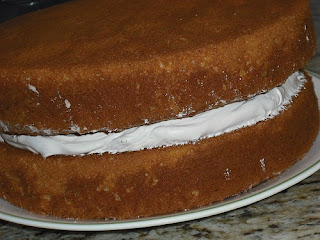
Apply 3/4 cup of the 7 minute frosting to one of the cake rounds then, of course, lay the other on top.

Schmear the remaining Burnt Sugar Marshmallowy goodness ALL over the cake....

Top with a few Pecans if you like, but they aren't really necessary. (For some reason, this cake screams pecans to me)

Then the best part... Cut into this puppy and have a BIG ol' Slice.

MMMMMMM  surprisingly "buttery" with a strong caramel flavor all wrapped in caramel marshmallow deliciousness.  Heaven!   Is it possible to swim in a cake?

Mangia!!
~~

Thursday, December 23, 2010

Back in Black - Black Walnut Divinity

Last year I played around with making Violet flavored divinity for a family friend who adores anything and everything of the violet persuasion.  This year I am making divinity for her again, though I am sticking with a flavoring that is reminiscent of her childhood.  Enter the Black Walnuts.  It's the way her Mom and Grandma made it when she was little.

Black Walnuts seem to be one of those odd ingredients here on the west coast.  Everyone knows about them because either Mom or Grandma or even Great Grandma had a Black Walnut Tree in the yard at some point.  We, even had a Black Walnut tree at one point.... we lost it in a really bad wind storm one winter.  They were a pain in the but to crack, cause the shells are so stinkin' hard, but many delicious homemade goodies, from desserts to candies, were made from said Black Walnuts, lending their distinctive flavor to the holiday spread.  To top it all off, according to Wikipedia, the largest known Black Walnut tree is HERE, on Sauvie Island just outside of Portland.

Image Courtesy of Wikipedia

Something strange has occurred with the walnuts available in the Mega-Marts though.  We have been inundated with the softer shelled, much milder flavored English Walnuts  (sometimes called Persian Walnuts or California Walnuts).  I mean, EVERYTHING is an English Walnut.  I see commercials on TV advertising Hammon's Black Walnuts.... Do you think I can find them?  Nope.  So I, as I so often do, went on an insane pilgrimage and hit just about every grocery store in Portland, from Albertson's to Zupan's, in an obsessive hunt for the elusive Black Walnut.  (I almost drove to Sauvie Island to go and pick them myself, then I realized that the season is over)  (sigh)

I was eventually successful, thank goodness.  There is nothing worse than when my obsessive behavior is all for naught.   Ah, the joys of being OCD.  LOL

But I have them, my lovely Black Walnuts... and I am making Divinity again.  Penny will be pleased with a childhood memory revisited.

Black Walnut Divinity

3 cups (21 oz) (600 g) Granulated Sugar
1/2 cup (4 oz) (120ml) Corn Syrup
1/2 cup (4 oz) (120ml) Water
2 Large Egg Whites
1/8 tsp Kosher Salt
a pinch of Cream of Tarter
1 tsp Vanilla extract
3/4 cup (5 oz) (140 g) Black Walnuts, chopped

Separate the egg whites and place them in the bowl of your mixer, along with salt and a pinch of Cream of Tarter.

Line to baking sheets with waxed paper and set aside, or just spread waxed paper over your counter top.
Place Sugar, Corn Syrup, and Water in a heavy bottomed saucepan over medium high heat and stir the mixture until it just comes to a boil.

Place the thermometer into the Sugar mixture

and begin beating the egg whites until stiff peaks form.

When the Thermometer reaches soft ball (238 F or 118 C), pour half the sugar syrup into the egg whites with the mixer running.

Return the syrup to the stove and continue boiling, also leave the mixer running.

When the syrup reached Hard ball (253 F or 125 C), it is time for the second pour.

Pour very carefully, because the egg whites will splatter a little bit before coming back together.

When you have incorporated all of the syrup, stop the mixer, move the bowl from the mixer base to the counter top where your waxed paper lined pans are located and stir with a wooden spoon.

Stir, Stir, Stir, Stir; add Black Walnut pieces and the Vanilla, then....Stir, Stir, Stir, Stir....

Until the mixture begins to stiffen (don't worry about the shine) and feels kind of like you are stirring Choux Paste after adding the last egg.

Once the candy can hold a peak and not "melt" back into the mass, it's ready.

Now, it's all about speed, so as quickly as possible begin scooping out the mixture, by teaspoon, onto your waxed paper.

Allow to sit for 30 minutes to cool and harden completely. (It will loose some of it's shine while drying)

Store in a Zip-Loc bag inside another air tight container and store at room temperature.

There, all packaged and ready to go... All it needs is a big Bow.

Mangia!!
~~

P.S. This will more than likely be my last post before the holidays are upon us (Though I am still debating on posting the Honey Egg Nog I am making on Christmas Eve, if there is time).

But I wanted to take a moment to wish you, and yours, a very Merry Christmas.