So I have a nephew... Actually I have 4 nephews, 2 nieces and a godson, but that's beside the point. My youngest nephew, Marshall, saw the October issue of Family Circle which just happens to be covered with cute Halloween cake pop characters. As a consequence, every time I have gone over to his house for a visit, since the beginning of September, I am asked the same question.......
"You make a cek pop Unca Sane?" (he's 3)
So, not wanting to disappoint such a young soul who is so excited over the coming of Halloween, I am making cake pops this year. LOL
Normally I am big on homemade desert type stuff. OK, I am big on homemade anything. But I have to admit that I am able to overcome this aversion to all things processed under certain circumstances. Thus, I am not making the cake from scratch... I know it's shocking and frightening, but hey, it IS Halloween after all.
A warning though... Not all cake mixes are created equal. It seems that some of the major brands have reduced the amount of "mix" in the mix. Duncan Hines has retained their 18.25 oz mixes, but Betty Crocker and Pilsbury have reduced the mix to a mere 15 oz. Not being particularly familiar with cake mixes in general, I don't really know how much this would effect the final outcome... Maybe they added more DATEM or some other strange binding/leavening substance that makes up for it. Maybe they found a way to harness Dark Matter, I don't know... But I am not taking any chances... So, I used my favorite cheating box mix. I will be honest, the fact that Dr. Oetker cake mixes are organic soothes my conscience a little bit as well.
Now, cake pops are held together with frosting... Everything I have read calls for tub frosting from the store. NO WAY... I may occasionally cheat on the cake mix, but I DO NOT cheat on frosting. After all, cake, as a general rule, is nothing more than a vehicle to get frosting in your face. I refuse to allow an opportunity to make delicious frosting go by and purchase store bought chalky frosting that has been sitting in a plastic tub on a store shelf for lord knows how long. Completely out of the question. Thus, I am making Cream Cheese frosting to bind the cake pops together... Just a standard Cream Cheese variety, nothing really all that fancy, but it will do the job. I have ulterior motives as well, I don't make Cream Cheese frosting very often, cause I don't make Carrot Cake that often. :)
As far as dipping goes, I am breaking my rules again... Oh, I could try to work with White Chocolate, but I am just going to have to dye it with Orange food coloring anyway. And I have to watch the temperature like a hawk, because white chocolate is the really finicky. So, in order to avoid a potential disaster at the 11th hour, I went and purchased the Wilton Candy melts... Orange and White (yes, I even bought the white ones)
OK, so now that I have come clean about how much cheating I have done, lets get on with it, shall we?
 1-18.25 oz Cake Mix (I chose Chocolate, but other flavors will work too)
8 oz (226g) Cream Cheese, room temperature
4 oz (113g) Unsalted Butter, room temperature
pinch of Kosher Salt
1 tsp Vanilla
optional - 1 tsp Orange Zest (to go with the chocolate)
1 3/4 cups (6.6 oz)(189g) Confectioners' Sugar
Lollipop Sticks
Candy Melts (your choice of colors)
Orange - Pumpkins
White - Ghosts, Mummies, and Skulls
Black - Bats, Black Cats (I am not covering these)
Green - Witches (I am not doing these either)
Assorted candies
Tic Tacs for Pumpkin Stems
Mix the cake according to the package directions.
 Pour into a 13x9 dish and bake for about 30-35 minutes (or according to the back of the box)

 Cut the cake into quarters and, working with 1 quarter at a time, begin tearing the cake into crumbs with a fork.
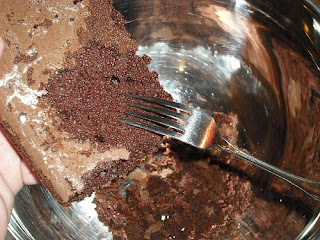 Continue in this fashion until you have a whole bowl full of fine cake crumbs.
 Cover with plastic and chill while you make the frosting.
 Beat Cream Cheese and Unsalted Butter in the bowl of an electric mixer, until fluffy.
 Add a pinch of salt and Vanilla, then beat a little longer.
 Reduce the speed of the mixer and add the Confectioners' Sugar in 4 additions, ensuring that the previous addition is completely incorporated before adding the next.
 When all the Confectioners' sugar has been added, continue beating for an additional 2 minutes to ensure that there are no lumps.
 Reserve about 1/4 cup of frosting in a small bowl for later (you will need it for the sticks)
 Remove the cake crumbs from the refrigerator and add the remaining frosting.
 Stir very gently until the frosting is completely incorporated
 (don't worry, it will mix in completely, just be patient)
 Cover with plastic and chill again, for about 2 hours. (the colder your mix is, the less likely you will be to have flat spots on your cake balls)
 Line a baking sheet with waxed paper or plastic wrap.
Remove the cake crumb mixture from the refrigerator and roll into walnut sized balls. (about 2 TB) using a medium-small cookie scoop.

 Place on the baking sheet, then cover with plastic wrap and return to the refrigerator for 2 hours.

 Remove the tray from the refrigerator, grab the sticks and the reserved frosting......
 Dip the end of each Lollipop stick in the reserved frosting and skewer each cake ball. (Melted Candy actually works better for this)

 This time, don't cover the cake balls with plastic wrap, simply place the pan in the refrigerator over night. (The frosting needs to be nice and hard or the cake pop will begin to spin while you are dipping)
 Melt your chosen color of candy melts over simmering water.
 Begin dipping each Cake Pop, allowing the excess to drain off. (There is an additive called "Paramount Crystals" that helps to smooth out the candy, but I could not find them)
 Stick the end into a hunk of Styrofoam and allow the candy coating to set.
Originally, I had intended on painting faces on the pumpkins and ghosts, but alas, I am out of time. Since I will be at work until 6pm on Halloween it just isn't going to happen this year. (Next year I will PLAN a little bit better now that I am fully aware of the amount of time this takes)
For Pumpkins... Place a Tic-Tac in the top, to form a stem, before the Orange coating sets....
 When the Coating has set completely you can paint faces with black food coloring, mixed with vodka. (Not exactly the smoothest dipping job, so I am calling these, "Heirloom Pumpkin Cake Pops") LOL
 For Ghosts.....
Dip in White Coating and let it set completely. (If you like, you can paint faces in black)
 For Mummies....
Once the coating has set completely
 Place a small amount of the coating in a squeeze bottle, and squeeze "bandages" across the cake pop.
 Allow this to set completely as well.
 Use a fine brush to paint little green "glowing" eyes with food coloring.
 There you have it...
 There are a lot more things you can do, but I decided to reign myself in at 3 different pops due to time constraints. Don't think for a second that I didn't toy with painting a hockey mask on one of them, but the kids don't have any idea who Jason Voorhees is, so it was kind of a "moo" point. (That's a "Friends" reference for my SIL)
Maybe next year, if I plan this out better, I will make witches, skulls, pirates, spiders, bats and black cats. Maybe even a couple zombies... LOL We'll see.
Mangia!!
~~
"You make a cek pop Unca Sane?" (he's 3)
So, not wanting to disappoint such a young soul who is so excited over the coming of Halloween, I am making cake pops this year. LOL
Normally I am big on homemade desert type stuff. OK, I am big on homemade anything. But I have to admit that I am able to overcome this aversion to all things processed under certain circumstances. Thus, I am not making the cake from scratch... I know it's shocking and frightening, but hey, it IS Halloween after all.
A warning though... Not all cake mixes are created equal. It seems that some of the major brands have reduced the amount of "mix" in the mix. Duncan Hines has retained their 18.25 oz mixes, but Betty Crocker and Pilsbury have reduced the mix to a mere 15 oz. Not being particularly familiar with cake mixes in general, I don't really know how much this would effect the final outcome... Maybe they added more DATEM or some other strange binding/leavening substance that makes up for it. Maybe they found a way to harness Dark Matter, I don't know... But I am not taking any chances... So, I used my favorite cheating box mix. I will be honest, the fact that Dr. Oetker cake mixes are organic soothes my conscience a little bit as well.
Now, cake pops are held together with frosting... Everything I have read calls for tub frosting from the store. NO WAY... I may occasionally cheat on the cake mix, but I DO NOT cheat on frosting. After all, cake, as a general rule, is nothing more than a vehicle to get frosting in your face. I refuse to allow an opportunity to make delicious frosting go by and purchase store bought chalky frosting that has been sitting in a plastic tub on a store shelf for lord knows how long. Completely out of the question. Thus, I am making Cream Cheese frosting to bind the cake pops together... Just a standard Cream Cheese variety, nothing really all that fancy, but it will do the job. I have ulterior motives as well, I don't make Cream Cheese frosting very often, cause I don't make Carrot Cake that often. :)
As far as dipping goes, I am breaking my rules again... Oh, I could try to work with White Chocolate, but I am just going to have to dye it with Orange food coloring anyway. And I have to watch the temperature like a hawk, because white chocolate is the really finicky. So, in order to avoid a potential disaster at the 11th hour, I went and purchased the Wilton Candy melts... Orange and White (yes, I even bought the white ones)
OK, so now that I have come clean about how much cheating I have done, lets get on with it, shall we?

8 oz (226g) Cream Cheese, room temperature
4 oz (113g) Unsalted Butter, room temperature
pinch of Kosher Salt
1 tsp Vanilla
optional - 1 tsp Orange Zest (to go with the chocolate)
1 3/4 cups (6.6 oz)(189g) Confectioners' Sugar
Lollipop Sticks
Candy Melts (your choice of colors)
Orange - Pumpkins
White - Ghosts, Mummies, and Skulls
Black - Bats, Black Cats (I am not covering these)
Green - Witches (I am not doing these either)
Assorted candies
Tic Tacs for Pumpkin Stems
Mix the cake according to the package directions.


Remove the cake crumb mixture from the refrigerator and roll into walnut sized balls. (about 2 TB) using a medium-small cookie scoop.


Originally, I had intended on painting faces on the pumpkins and ghosts, but alas, I am out of time. Since I will be at work until 6pm on Halloween it just isn't going to happen this year. (Next year I will PLAN a little bit better now that I am fully aware of the amount of time this takes)
For Pumpkins... Place a Tic-Tac in the top, to form a stem, before the Orange coating sets....


Dip in White Coating and let it set completely. (If you like, you can paint faces in black)

Once the coating has set completely


Maybe next year, if I plan this out better, I will make witches, skulls, pirates, spiders, bats and black cats. Maybe even a couple zombies... LOL We'll see.
Mangia!!
~~


