Showing posts with label Walnuts. Show all posts

Tuesday, July 30, 2013

Goin' Nuts for Blue Cheese - Gorgonzola & Walnut Tart

 Every once in awhile, I get a hankerin' for something SUPER cheesy.  Normally, when this happens, I turn to Macaroni & Cheese in all it's myriad permutations.  After all, what better way is there to showcase cheese than pouring it's rich, gooey and melty deliciousness over a mound of pasta? 

But if you are a blue cheese lover, as I am, this tart that will roll your cheese wheel right out the door.  It's so rich, creamy and cheesy that even I can only eat a small slice, to be accompanied by Watercress soup and a very VERY large salad, to break up the cheesiness. 

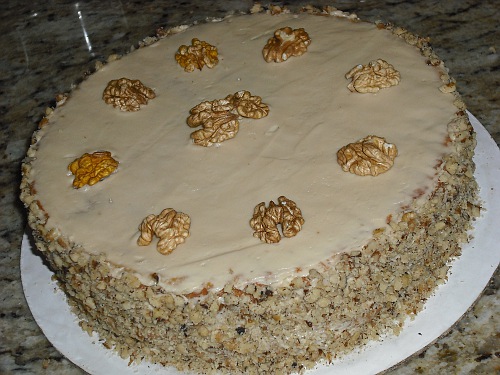
This is a French tart that has no equal.  You can consume your whole daily caloric intake in one fell swoop with this one.  But it's sooooooooo good.  The filling is simply a cheese laden custard (similar to a quiche) that is them sprinkled with toasty walnuts to add some crunch.

I actually prefer Gorgonzola for this one.  It seems to me that Gorgonzola melts a little smoother than some other crumbly Blue Cheeses.  I also think that it's flavor profile better pairs with toasted walnuts and the peppercorns in the pastry crust. Which reminds me.  It's not simply the tart filling that is rich and high in calories, the crust I like to use for this is my infamous Sour Cream/Peppercorn pastry dough that I usually reserve for certain quiches and my Asparagus / Gruyere Tart

Gorgonzola & Walnut Tart

1 recipe for Sour Cream Peppercorn Pastry Crust
1 cup (100g) Walnuts, toasted and chopped
1 cup (236ml) Heavy Cream
3 large Eggs
2 large Egg Yolks
6 oz (170g) Gorgonzola, crumbled (you can use Stilton, Saga, or Roquefort if you prefer)
Salt & Pepper

Preheat the oven to 400F (200C) degrees.
Meanwhile, prepare the Sour Cream Peppercorn Pastry dough; roll the pastry out to fit a 10 inch quiche dish or a fluted tart pan and chill while the oven continues to preheat.

When the oven comes to temperature, toast the walnuts for 5 minutes.

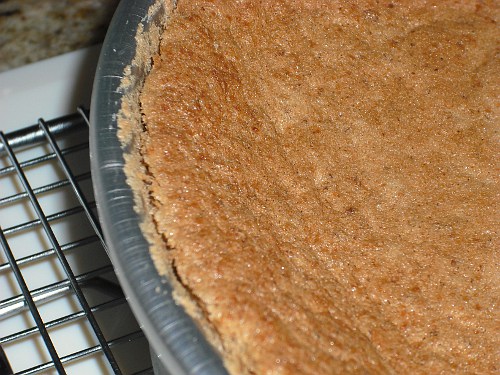
When the Walnuts are finished, remove the pastry from the refrigerator, line with foil or parchment and fill with beans or weights then bake for 10 minutes.

Remove the foil and beans/rice/weights and bake for an additional 5 minutes. (just until the crust is cooked, but still very pale)

Reduce the oven temperature to 350F (180C) degrees.
Whisk the Eggs, Egg Yolks and Heavy Cream together in a small bowl.

Add the crumbled Gorgonzola and stir.

Season with Salt and Pepper, then pour the filling into the warm tart shell.

Sprinkle with toasted Walnuts.

Bake for 25-30 minutes, depending on your oven, just until the top begins to brown.

Allow to cool for 5-10 minutes before attempting to cut.


Delightfully cheesy and UBER rich.  This is most definitely NOT a diet food, that is for sure.

Mangia!!
~~

Saturday, May 11, 2013

Going Nuts for Tillamook Vintage Cheddar - Cheddar & Walnut Wafers

So, Tillamook Cheese Factory, in Tillamook Oregon, has released a new product.  Vintage White Sharp Cheddar.

Not to be confused with the Vintage White "Extra" Sharp or the Vintage White "Medium" that has been available for several years now.  The Vintage White Sharp is aged for 9 months, as opposed to the Extra Sharp, which is aged for 2 years or the Vintage White Medium that is aged for only 100 days (~3 months).

Why am I so excited about this new product?  Well, I know that annatto seed is perfectly harmless, but it has always bugged me that cheddar cheese is dyed orange on the left coast.

Vermont doesn't dye their cheddar, New York doesn't dye theirs either.  So WHY on earth do the cheese companies on the Left coast dye the cheddar orange?  It just reminds me of processed American cheese (yuck!).  We are capable of discerning between Cheddar, dry Mozzarella and Monterey Jack, even if they are all the same basic color in their natural state.  The excuse that I hear the most often is that milk color varies slightly (depending on cow breed and time of year) and the annatto dye ensures that the cheese will always be the same color.  Poppy cock!  I say.  That is a silly excuse.  There is a natural variation in cheese color with Brie, Gruyere, Pecorino Romano, Saint Andre, Gouda, Emmentaller, Gorgonzola and so on. I think it's time that the cheese manufacturers built a bridge and got over it.

Luckily, Tillamook Cheese factory has done just that and finally decided to leave out the annatto dye and call it "Vintage" White.  Maybe, someday, we left coasters will get SO use to our cheddar being white that, 50 years from now, the orange dyed stuff will be considered "Vintage" instead.  One can only hope.  What makes me the most happy though, is that it's the same price as their "regular" orange Sharp Cheddar.  I finally get my blessedly WHITE cheddar cheese without having to darken the door of a specialty cheese shop and spend a small fortune. 

Woo Hoo! Ain't it purty?

To celebrate the mouthwatering deliciousness that is Tillamook Vintage White Sharp Cheddar, I have decided to go nuts, walnuts that is, and bake up some delicious cheddary wafers of utter decadence.   They are similar to a savory shortbread, but with a delicate crispy crunch that is truly satisfying.

Cheddar and Walnut Wafers


186g (6.5oz) (1 1/2 cups) AP Flour
60g (2.1oz) (1/2 cup) Walnuts, finely chopped
1/2 tsp Grey Salt
1/4 tsp Black Pepper
1/8 tsp Cayenne Pepper
113g (4oz) (1/2 cup) Unsalted Butter, cut into chunks
142g (5oz) (1 1/4 cups) Tillamook Vintage White Sharp Cheddar, shredded
1 large Egg Yolk
2 TB Heavy Cream

In the bowl of a food processor, combine Flour, Walnuts, Salt, Pepper, Cayenne and chunks of Butter.

Pulse until pea sized lumps still remain.

Add the shredded Sharp Cheddar and pulse again.

Until well combined and the mixture is like fine crumbs.

In a small bowl, whisk the Heavy Cream and Egg Yolk together.

Pour through the feeding tube of the food processor.....

Pulse until a soft dough begins to form.

Turn out onto a sheet of plastic wrap and flatten into a disc then wrap and refrigerate for 30 minutes to 1 hour.

Preheat the oven to 400 degrees while rolling the dough to 1/4 inch (~6mm) on a lightly floured surface.

Use a 1 1/2 well floured round cutter to cut out shapes.

Place about 1 inch apart on an ungreased, unlined baking sheet (please note that no parchment is needed)

Prick the circles with a fork in a cross pattern (to prevent a large bubble forming in the center)

Bake for 14-16 minutes, turning at 7 minutes, until they are golden brown.

Move to a rack immediately and allow to cool completely. (If you can)

Consume with delight!  and Wine! (a nice Cabernet Sauvignon or Shiraz/Syrah)

Mangia!!
~~

Tuesday, March 27, 2012

Flour Power - Grinding Almond Flour

Something has been tugging at my subconscious over the last week.  I am sure the seed was planted when I made Maple-Nut Macaron and, having Maple Butter-Creme remaining, Dios Torta.  Both of which contained Walnut "flour", though the Macaron could have just as easily utilized Almond Flour or Hazelnut Flour.  Thus, I began contemplating Nut Flour.

True, you can grind nuts fairly finely in a food processor, if there is enough sugar to prevent "butter" from forming as the oils are released and the nuts heat up.  The chopping of the blade and the swirling around the processor bowl causes a lot of friction which heats the nut's oils.  But what if your recipe is devoid of confectioners' sugar?  Well, there is the smashing method for the softer nuts, like Walnuts and Pecans, wherein you place nuts in a zipper bag and crush them, like cookie crumbs, with a rolling pin.  This too causes some friction and actually squeezes the oil out of the nuts leading to a slightly "sticky" nut flour/meal.

And that is the underlying problem... 

True nut flours are light and airy, just like wheat flour (thus the term "flour") and neither the crushing method nor the processor method make fine, fluffy "flour" out of nuts.  They really produce more of a "meal".  This is not really an issue for me, in most cases.  I tend to use nut meal a lot as a coating instead of bread crumbs, but sometimes you NEED the flour.  So how do you get it?

You can buy it, of course, if you can find it.  There's nut "meal" a plenty on the market, but the finer ground flour can be troublesome to track down.  It's available on the internet, but I get tired of having to "order" everything ALL the time simply because I cannot find a local distributor.  I am one of those people who needs to see, smell and touch what it is I am purchasing when it comes to food.  Nuts go stale fairly quickly after shelling & grinding, and I don't want to end up with a 15 lb bag of stale flour.

For the home cook who doesn't need 15 lbs of flour at a time, there are the nut graters... Not grinders, but graters.  (available on Amazon)  Composed of a fine grating cylinder ensconced in a plastic housing with a hand crank and a hopper for gravity feeding that can clamp to your counter.  You feed the nuts into the top, crank the handle and fine nut flour drifts out the side and into your bowl.  I decided that it was kind of a uni-tasker, as Alton puts it, so moved on to other pursuits.

Then, the other night, I awoke from a dream at 3:30 in the morning, completely gobsmacked by the implications of my subconscious nighttime revelation.  I've noticed that I often experience food related epiphanies in the middle of the night.  (yes, I do dream about food.... a lot... when I am not dreaming about computer geek stuff)  The point is, that I woke with a single thought in my head.

"HEY, I have a rotary grater for Parmigiano-Reggiano!"

Satisfied, that I had solved one of the "great mysteries of the baking universe" and restored peace to the kitchens of the world, I returned to my slumber.

Thus it was, the next morning, armed with raw almonds, a cheese grater and a lot of elbow grease, I manufactured my own Almond Flour.  (technically, I should have blanched them first, but Almonds don't have the extremely bitter skin that Hazelnuts have, so I didn't worry so much about it)

Almond Flour

What you need:
Almonds (or other nut of your choice)
Rotary Cheese Grater (with the fine cylinder attached)
Elbow Grease
Zipper Bag for storage

It helps if you know how much flour you are gong to need, by weight.  Since the whole almonds would weigh the same amount.  That is the nice part about weights in baking.  If your recipe is based on volume measurements, like most American recipes, you are going to have to kind of guess a little.  1 cup of whole almonds will be almost 1 3/4 cups of almond flour due to the amount of "air" you are incorporating into the finished product. (I need 200 grams or 7oz of flour, so I grabbed 200 grams of whole almonds)

Cold, not frozen, nuts work best, as there will still be some heat produced by the spinning grater drum. (it's primarily a precaution)

So, simply fit the smallest grater blade into your rotary grater.

Add almonds.

Press down gently on the arm and turn the handle. (and turn and turn and turn and turn and turn and re-fill the hopper, and turn and turn and turn)

Yes, it's a little bit of work, but it only took about 10 minutes of grating to produce 7 oz (200g) of Fluffy, Light, Finely ground Almond Flour!

As opposed to the much coarser "meal" you often find in the grocery store... (even though it is often labeled as "flour")

Since the flour will begin to go rancid quickly after being so finely ground/grated, I suggest moving it to a zipper bag and storing in the refrigerator or freezer until needed. (even if it's only overnight, 'cause fresh is always best)

Now I'm ready for another Torte.

Mangia!!
~~

Saturday, March 24, 2012

Hungry for Walnuts - Hungarian Walnut Torte

So what do ya do when you have left over Maple Butter-Creme?  Well, since I really didn't want to make a second batch of Macaron, I decided that I would make one of my favorite cakes.

OK, technically it's not a cake, which is a good thing, cause I am really not all that into cake.  It's actually a Torte; and like most tortes, it's made with nuts instead of flour.  Which I guess is why I like them, cause I am kind of nuts myself.  I think of cake primarily as a vehicle by which you get frosting into your mouth.  This is not true of tortes.  They are extremely flavorful and, if the nuts are ground properly and they are baked correctly, they are decadently moist and delicious in and of themselves with no assistance from any frosting.  Thus, as you will see, my frosting layers on this torte are very very thin.

This particular torte manifestation is based on the Hungarian Walnut Torte or "Dios Torta" (Yes, it looks like Spanish instead of Hungarian, but the "s" is pronounced like "sh")

Normally, it would be covered in either Whipped Cream or Coffee flavored Whipped Cream, but as I said, I made just a little TOO much Maple Butter-Creme when I was filling the Macaron.  My excuse? Well, it's really hard to make less than 2 egg whites worth of Italian Butter-creme.  At least I am getting to share this torte now.

Hungarian Walnut Torte

(Dios Torta)

Unsalted Butter, for the pans
1/3 cup (.75 oz) (22g) Panko, finely crushed
10 oz (285g) Walnuts (halves, pieces or any combination there of)
10 large Eggs, separated
6.2 oz (175g) (3/4 cup + 2TB) Granulated Sugar
Maple Butter-Creme, left over from making Macaron ;)

Preheat oven to 350°and crush the Panko with a rolling pin.

Grease 2 round 9" cake pans with butter,

line bottom of pans with parchment paper, then grease paper in each pan as well.

Coat cake pans with a thin layer of bread crumbs and set pans aside.

Shell your Walnuts, if necessary, and place them in a plastic bag.

Crush them finely with a rolling pin. (do not use a food processor, as you may end up with Walnut butter)

Place the bag of walnut crumbs in the freezer to chill and solidify the oils within the nuts. (you want the nut meal to be fluffy instead of pasty, this is why the food processor is a no-no)
Place Egg Yolks and Sugar into a large mixing bowl and beat with an electric mixer on high speed until they become pale.

Slowly sprinkle the sugar into the bowl and continue beating the yolks until thick and pale yellow, 6–7 minutes.  (this is "ribbon" stage)

Test the yolks by rubbing a small amount between your fingers to ensure the Sugar has dissolved.  If the yolks feel grainy, go ahead an beat them a little longer.

Sprinkle one-third of the ground nuts over yolk mixture and fold them in, just until combined.

Repeat the process twice to use up the remaining ground nuts. (The batter will be very thick)

Set aside.

With a clean whisk, beat egg whites in a medium mixing bowl until stiff peaks form, 2–3 minutes.

Gently stir one-third of the whites into nut mixture.

This will lighten the batter enough to facilitate easier folding of the remaining whites.

Fold the remaining whites into the nut mixture in 2 additions.

Divide batter between prepared pans.

Tap the pans on a flat surface to remove any air bubbles. (you can also stab the batter with a butter knife, just like you do for Angel Food cakes)

Bake until a toothpick inserted in center comes out clean, 30–35 minutes.

Just until the torte is pulling away from the sides of the pan...

Let tortes cool in pans for 15 minutes, invert onto a wire rack, peel off parchment paper, and let cool completely.

Bring your Maple Butter-Creme to room temperature, if it looks slightly lumpy or separated, simply throw it in the bowl of your mixer and begin beating it in until it becomes smooth and creamy (makes the "slapping" sound)

Once the layers are completely cooled, place one layer on a cake board and apply a VERY thin coat of Maple Butter-Creme.

Place the Second layer on top.

Give the whole torte a very thin crumb coat.

Chill briefly (only about 10 minutes) then apply a second thin coat of Butter-Creme to the top only.

Press Ground Walnuts around the outside of the torte and garnish with Walnut halves.


MMMM It's been so long since I have made a torte, I almost forgot just how much I love them.  Mainly because they are not as sweet as cake....  I will even hazard to say that they are better for you than cake, because even though they DO contain Sugar, they are devoid of the refined flour normally present in cakes.

Mangia!!
~~