Showing posts with label Pistachios. Show all posts

Thursday, February 14, 2013

Goin' Green; Spring Green That Is - Gremolata

Well, it's official - 12 days ago Punxsutawney Phil saw his shadow and spring is on the way.  Or at least, it is suppose to be.  I am beginning to think that Punxsutawney's predictive powers propose no promise of pacifying the North Pacific's propensity for protracting it's piercingly polar presence.  Then again, knowing that nefarious Nor'easter that nailed New England, it's fair to figure that Phil's forest floor forecast is faulty.

But even though it seems that Spring won't "spring" for another six weeks hence, there is no reason that you cannot "taste" springtime on a plate.  I am speaking of the infamous gremolata.  For nothing tastes quite as "green" as gremolata.  OK, Pesto tastes green too, but I have already posted about that.  :)

Gremolata recipes are fairly varied, but it's safe to say that they ALWAYS contain lemon zest.  Without the lemon zest, Gremolata looses it's sunny disposition and tastes more like a rainy day.  Which is sad indeed.  As far as other ingredients are concerned, there is a little more fluidity.  Usually it involves some combination of Garlic, Mint and Parsley; mainly because Gremolata is the key ingredient in Ossobucco alla Milanese (braised veal shank).  Tone down the Mint, or remove it completely, and Gremolata's verdant visage is a welcome addition to seafood and vegetables as well.

I take a little bit more of a pesto route when I make Gremolata and include nuts, pistachios in particular, but they are not necessary.  I do this because Gremolata is devoid of both cheese and olive oil, unlike Pesto Genovese, and the nuts give the "sauce" a little more body and substance without "pesto-izing" it too much.  But that is just my own personal preference.

My newest favorite vehicle for Gremolata conveyance is the Cauliflower "steak".  But as I stated earlier, it is also magically delicious over shrimp and fish.

Gremolata

1 bunch of Italian Flat-Leaf Parsley (none of that soapy tasting curly stuff)
2-3 cloves of Garlic
2 TB Pistachios
Pinch of Kosher Salt
Juice of 1/2 Lemon
Zest of whole Lemon

Normally I would break out my mega mezzaluna for something like this, cause I prefer the texture created by hand chopping, but I was in a hurry.  Luckily, Gremolata doesn't emulsify as easily as pesto does, since it contains no Olive oil.  Thus, you can cheat with a food processor and still retain some form of texture.

In the work bowl, add Garlic, Parsley and Pistachios and give it several pulses to break everything down.

Add a pinch of Salt, and pulse again.

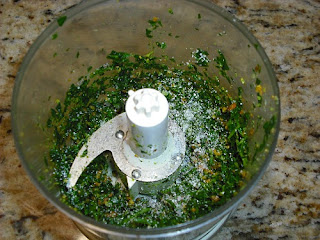
Add Lemon Juice, and pulse.

Add Lemon Zest and pulse briefly.

Serve over Cauliflower Steak or Shrimp.

mmmmmmm 

Fear not, my friends, though spring be late,
And Old Man Winter doth fulminate,
Your appetite may yet be sate,
With Springtide greetings on a plate.

Mangia!!
~~

Sunday, April 8, 2012

Moroccan Meringue - Pistachio & Orange Blossom Honey Macaron

There were several requests for the recipe to my last Wordless Wednesday post.  So, even though I did not document the process step by step, like I did when I made the Maple Nut Macaron, I figured I should go ahead and share it with everyone.

It is basically the same as the Walnut Macaron.  I simply substituted Pistachio "Flour" grated from some Dry Roasted Unsalted Pistachios that I found at Trader Joe's (I know...  I do a lot of free advertizing for them.  LOL)  I am sure you noticed that they are not nearly as "green" as "professional" Pistachio flavored Macaron usually are.  I have issues with synthetically dying my food, so I let the natural chartreuse-ness of the Pistachios speak for themselves.

The biggest difference for these was the Orange Blossom Honey Italian Butter-creme.   Honey is pretty potent stuff, being almost twice as sweet as table sugar, so I had to make some adjustments in my sugar syrup content.  Unlike the Maple Syrup, I could not just replace the sugar with honey.  The flavor would be a little too intense.  As a result, I had to combine the two, with a little Orange Blossom Water and some OJ.

So here goes......

Pistachio Macaron with Orange Blossom Honey Butter Creme

Pistachio Macaron

4.1 oz (115g) Pistachio Flour
8 oz (230g) Confectioners' Sugar 
5 oz (144g) Egg Whites
2.5 oz (72g) Caster Sugar
1/2 tsp Kosher Salt
1 tsp Vanilla Extract

Preheat the oven to 300° and have an 18” pastry bag, fitted with a plain tip ready.

Grab 2 half-sheet pans and lay down your template.

Lay down parchment sheets over the templates.

Pistachio Flour...

Place Pistachios into your Rotary Cheese Grater and apply some elbow grease, shaving them down into fairly fine "flour"

Combine this "flour" with the confectioners' sugar and pour the mixture into a sieve and sift it, reserving whatever bits don’t pass through.


If you still have left over chunky bits, measure it out.  If it's less than 2 TB go ahead and just add it the the Sugar/Walnut mixture.  If it's more than 2 TB, you need to grate a little more Pistachio flour and add it to the mix.

In the bowl of a stand mixer, combine the Egg Whites, Caster Sugar and Kosher Salt.

Fit the mixer with the whisk attachment and turn the mixer to medium (4 on a KA) and whip for 3 minutes (this gives you soft peaks)

Increase the speed to medium-high (7 on a KA) and whip another 3 minutes. (this gives you stiff peaks or bird beak or "bec d’oiseau" to use the French term)

Crank it up to high (8 on a KA)  and whisk for another 3 minutes.
Stop your mixer and add any extracts, flavorings or colorings.

Whisk on high speed for an additional minute to ensure they are well incorporated - streaky coloring will make your shells crack. You should have a very stiff, dry meringue; when you remove the whisk attachment, there will be a big clump of meringue in the center.

(If the meringue is not clumping in the center of the whisk, and is still forming a "beak" at the end, continue beating for another minute, or until it does so).
Now add the Pistachio/Confectioners' all at once.

Fold them in with a rubber spatula. (you are going to have to kind of press as well to incorporate the dry ingredients)

The whole point is to "deflate" the Meringue it takes about 40-45 strokes.  After 30 strokes, you need to start paying close attention... stroke by stroke.  You are looking for a "Lava" consistency. To check for this, drop a mound of batter and count how long it takes to sink back into the mass.

It should take 20 seconds, no more and definitely no less, or you have over-folded the batter and when you go to pipe them out, your "Lava" will be more of a "Pyroclastic" flow; which is BAD.

Transfer about half the batter to a piping bag. (Don't over fill the bag, or it will rush out of the tip)
Pipe the batter onto the parchment, following the template underneath.  Remember to stop just shy of the border, because the batter will spread a little, especially after the next step.

Grasp the sheet pan, and smack it hard against your counter. Rotate the pan ninety degrees and smack it on the counter another couple times.(This causes the air bubbles to rise to the surface, so they don't crack your macarons during baking)

One thing I still could not get past, was letting them set on the counter to form a "skin", but I only let them set for 15 minutes and then slipped the template out from underneath the parchment paper.
Bake for about 18 -23 minutes, or until you can peel the parchment paper away from a macaron. (if it splits just above the foot, it's not done)
If you are watching closely, at about the 8 minute mark, the macaron will begin standing up on their feet.
Remove them from the oven and allow to cool, completely, on the baking sheet.

Once they are completely cool, go ahead and peel them from the parchment.  Use a metal spatula if necessary.

Orange Blossom Italian Meringue Butter-creme

1/4 cup Orange Blossom Honey
1/3 cup Granulated Sugar
1/4 cup Water
1 TB Orange Blossom Water
optional - 1 TB Orange Juice
60g (2 large) Egg Whites, at room temperature
1/4 tsp Cream of Tartar
a pinch of Kosher Salt
2 TB Caster Sugar
1 cup (8 oz) (226 g) unsalted Butter, cut into tablespoon pieces

Place Orange Blossom Honey, Sugar, Water and Orange Blossom Water (and OJ, if using) in a medium sauce pan and place over medium flame. (it foams up, so use a larger pan than you think you need)


When it begins to boil, insert your candy thermometer, and cook to 236-240 F degrees.

While the syrup is boiling, begin beating your Egg Whites with Kosher Salt in the bowl of an electric mixer at medium speed until foamy.


Sprinkle in the Cream of Tarter and continue whipping until soft peaks form.
Sprinkle the Caster Sugar over the egg whites and continue whipping until stiff peaks form (Bird beaked).
Reduce the speed of the mixer to low, and keep them moving until the syrup is done.  When the syrup 236°F, remove the pan from the heat, remove the thermometer from the pan, and crank up to speed on the mixer.
Slowly pour the hot, foamy syrup in a slow stream down side of bowl into egg whites, beating constantly at high speed. (Be careful not to hit the whisk or you may have shards in your finished butter creme)

Continue beating the meringue, scraping down side of bowl occasionally with a rubber spatula, until the bowl is cool to the touch, about 7 minutes. (and yes, if this all sounds familiar, you have just made Maple 7 Minute frosting)

Change out the whisk and replace it with the paddle attachment. Turn the mixer to medium speed and begin adding unsalted Butter, 1 TB at a time. (make sure it is incorporated before adding the next chunk)
Towards the end, it will look like the butter creme is breaking and becoming sloppy, just keep beating it and it will come together.
When the paddle begins making a "slapping" sound, that means your Butter-creme is done.
Spoon the butter-creme into a pastry bag fitted with a round tip.

Assembly:
Match your Macaron by size and shape, as there will be some variations, even with a template.
Pipe a quarter sized dollop of Maple Butter-Creme on one half.
Place it's matching Macaron half over the Butter-Creme and press gently.


Mangia!!
~~

Tuesday, March 27, 2012

Flour Power - Grinding Almond Flour

Something has been tugging at my subconscious over the last week.  I am sure the seed was planted when I made Maple-Nut Macaron and, having Maple Butter-Creme remaining, Dios Torta.  Both of which contained Walnut "flour", though the Macaron could have just as easily utilized Almond Flour or Hazelnut Flour.  Thus, I began contemplating Nut Flour.

True, you can grind nuts fairly finely in a food processor, if there is enough sugar to prevent "butter" from forming as the oils are released and the nuts heat up.  The chopping of the blade and the swirling around the processor bowl causes a lot of friction which heats the nut's oils.  But what if your recipe is devoid of confectioners' sugar?  Well, there is the smashing method for the softer nuts, like Walnuts and Pecans, wherein you place nuts in a zipper bag and crush them, like cookie crumbs, with a rolling pin.  This too causes some friction and actually squeezes the oil out of the nuts leading to a slightly "sticky" nut flour/meal.

And that is the underlying problem... 

True nut flours are light and airy, just like wheat flour (thus the term "flour") and neither the crushing method nor the processor method make fine, fluffy "flour" out of nuts.  They really produce more of a "meal".  This is not really an issue for me, in most cases.  I tend to use nut meal a lot as a coating instead of bread crumbs, but sometimes you NEED the flour.  So how do you get it?

You can buy it, of course, if you can find it.  There's nut "meal" a plenty on the market, but the finer ground flour can be troublesome to track down.  It's available on the internet, but I get tired of having to "order" everything ALL the time simply because I cannot find a local distributor.  I am one of those people who needs to see, smell and touch what it is I am purchasing when it comes to food.  Nuts go stale fairly quickly after shelling & grinding, and I don't want to end up with a 15 lb bag of stale flour.

For the home cook who doesn't need 15 lbs of flour at a time, there are the nut graters... Not grinders, but graters.  (available on Amazon)  Composed of a fine grating cylinder ensconced in a plastic housing with a hand crank and a hopper for gravity feeding that can clamp to your counter.  You feed the nuts into the top, crank the handle and fine nut flour drifts out the side and into your bowl.  I decided that it was kind of a uni-tasker, as Alton puts it, so moved on to other pursuits.

Then, the other night, I awoke from a dream at 3:30 in the morning, completely gobsmacked by the implications of my subconscious nighttime revelation.  I've noticed that I often experience food related epiphanies in the middle of the night.  (yes, I do dream about food.... a lot... when I am not dreaming about computer geek stuff)  The point is, that I woke with a single thought in my head.

"HEY, I have a rotary grater for Parmigiano-Reggiano!"

Satisfied, that I had solved one of the "great mysteries of the baking universe" and restored peace to the kitchens of the world, I returned to my slumber.

Thus it was, the next morning, armed with raw almonds, a cheese grater and a lot of elbow grease, I manufactured my own Almond Flour.  (technically, I should have blanched them first, but Almonds don't have the extremely bitter skin that Hazelnuts have, so I didn't worry so much about it)

Almond Flour

What you need:
Almonds (or other nut of your choice)
Rotary Cheese Grater (with the fine cylinder attached)
Elbow Grease
Zipper Bag for storage

It helps if you know how much flour you are gong to need, by weight.  Since the whole almonds would weigh the same amount.  That is the nice part about weights in baking.  If your recipe is based on volume measurements, like most American recipes, you are going to have to kind of guess a little.  1 cup of whole almonds will be almost 1 3/4 cups of almond flour due to the amount of "air" you are incorporating into the finished product. (I need 200 grams or 7oz of flour, so I grabbed 200 grams of whole almonds)

Cold, not frozen, nuts work best, as there will still be some heat produced by the spinning grater drum. (it's primarily a precaution)

So, simply fit the smallest grater blade into your rotary grater.

Add almonds.

Press down gently on the arm and turn the handle. (and turn and turn and turn and turn and turn and re-fill the hopper, and turn and turn and turn)

Yes, it's a little bit of work, but it only took about 10 minutes of grating to produce 7 oz (200g) of Fluffy, Light, Finely ground Almond Flour!

As opposed to the much coarser "meal" you often find in the grocery store... (even though it is often labeled as "flour")

Since the flour will begin to go rancid quickly after being so finely ground/grated, I suggest moving it to a zipper bag and storing in the refrigerator or freezer until needed. (even if it's only overnight, 'cause fresh is always best)

Now I'm ready for another Torte.

Mangia!!
~~

Friday, July 23, 2010

You Catch More Aunts with Honey - Baklava

My aunts have been visiting over the last week. One from Texas and one from Seattle. It's been awesome seeing them after being in SoCal for so long. Somehow in our conversations, Greek food came up. As it turns out, both of my aunts are crazy for Greek food. So tomorrow I am preparing a Greek'ish Feast of things like Spanakopita, Hummus, Sopa Avgo Lemono and Kibbeh. But one should ALWAYS prepare a dessert.

Thus, Baklava arrived on the menu. Normally, I make this around the Holiday Season, but I had too many things on my plate last year. So it's the perfect time to finally get down to making a big pan. I find that I ALWAYS need to make a big pan of it, for it seems to disappear as if by magic.

The real secret to Baklava is speed. The ingredient list is actually fairly simple... nuts, a little sugar, spices and filo dough... all held together with a TON of butter... Then soaked in honey syrup. Easy... Lemme show ya.... You'll see...

Baklava

3 Cups Walnuts
2 Cups Almonds
1 Cup Pistachios
4 TB Granulated Sugar
4 tsp Cinnamon
2 tsp Mace
1 tsp Ground Cardamom
1/2 tsp Coriander
1/4 tsp Ground Cloves
2 tsp dried Orange Zest
2 lbs Filo (The Filo I buy contains 22 sheets per lb, so 44 sheets total)
1 lb Unsalted Butter
1 half-Sheet Jelly Roll Pan (it's the same size as the Filo)
1 large Pastry Brush

Honey-Lemon Sauce
1 1/2 cups Orange blossom Honey
1/2 Cup Lemon Juice
1 cup Water
1 TB Orange Blossom Water
1 tsp Rose Water

Grind all nuts and place in a medium sized bowl, add sugar, spices and zest.

OK, now is when I let you in on a little secret ingredient of mine. I did not place this in the ingredient list because they can be a little hard to find, and Baklava is just as good without them. I am referring to this.....

1 tsp Ground Rose Hips. (Just a little something extra)

After you have combined all your ingredients in the bowl, you have 2 options..... Stir with a spoon....

or cover with a lid, or plastic wrap with a rubber band to secure it, and shake the bejeezus out of it.

There, see? Filling is all done.

OK, let's set up the assembly station......
Melt Butter in a sauce pan or in a measuring cup in the microwave and grab a pastry brush. The bigger the better. It will allow you to apply butter to the 'leaves' at greater speed, thus reducing the possibility of the dough leaves drying out. (it takes 10 minutes to assemble Baklava)

Remove the Filo from the refrigerator and grab the half-sheet pan, set butter to the side of the pan then unwrap your Filo and unroll onto work surface.

Brush Pan with a little butter

Then lay down the first sheet,

brush with butter and lay down the second sheet....

Continue this until you have laid down 15 sheets.

Spread 1/2 of the nut mixture over the 15th sheet and drizzle with butter from the pastry brush.

Brush your next sheet on the stack, then lay it over (Butter side down) this will adhere it to the nut mixture a little better.

Brush the side facing up and lay down your next sheet, continue brushing with butter and laying down more sheets until you lay down another 12 sheets. (you will have to open your second roll of Filo to finish this off)

Spread the remaining nut mixture and drizzle with a little butter.

Again, butter your next Filo sheet, lay it (butter side down) and brush the up facing side too.

Continue laying sheets with butter until you run out of Filo sheets. (about 17 sheets)

Using a VERY sharp knife, score your baklava by cutting 1/2 way through it (not all the way) I like to use a diamond pattern, but square is fine too.

Bake at 350 for 35-45 minutes, then remove from oven and allow to cool for at least 30 minutes before starting the syrup.


Lemon Honey Syrup

Pour Honey, Lemon Juice and Water into a large sauce pan (honey foams when boiling)

Bring to a boil and cook for 15 minutes until reduced to about 2 3/4 cups of liquid.

Seriously, watch for boil over... If the foaming gets too high, simply remove from the heat momentarily until the foam subsides...

Then return to the heat and continue reducing.

After the syrup has been reduced enough, remove from the heat and let cool slightly.
Add the Orange Blossom Water and Rose Water, stirring to combine.

Place syrup in a container you can easily pour from.

Pour hot syrup over the cooled Baklava.

Allow 30 minutes to 1 hour for the syrup to be absorbed by the pastry, then cut all the way through with a sharp knife.

Serve to your aunts with a fresh flower. (aunts like flowers) :)

MMMMM Flaky Goodness.

Mangia!!
~~