Showing posts with label Pastries. Show all posts

Sunday, April 26, 2009

A Little Slice of Italy - Pancetta & Leek Ricotta Tart

My friend Dajana, in Italy, has some fantastic recipes. I have a special love for Italian cuisine, so when Dajana told me about this Pancetta-Leek-Ricotta Tart on BakeSpace, I was all over it. I had a problem though, my tart pan was much too big. And while the Tart was delicious!! It was a little thin, and ended up a little over done. It tasted SO good that it didn’t really matter to me, I ate the whole thing anyway.. :)

While out running errands on Saturday, I came across an 8.5 inch tart pan for only 3.99, so I bought it. This is a much better size than the 11 inch tart pan I had used before. Oh yes, I made it again, as soon as I got home. Trust me… It’s THAT GOOD!!

I did have to change it a little, I was out of Bacon and all I had was regular Pancetta, so I added Alder smoked salt to the filling in an attempt to give it a little bit of a smokey flavor. I made 2 additions as well, You see, Danielle was talking about her crispy Panko breaded chicken earlier on BakeSpace, so I decided to sprinkle some Panko on top of the tart for a little bit of a crunch, and I had a small amount of cremini mushrooms in my refrigerator that really needed to be uses, so I added them this time.

I don’t think the addition of mushrooms really improved the flavor in anyway, but I felt better about using them than just throwing them out on Monday. I hate wasting food. The Panko did provide and interesting textured crust without adding a whole lot of extra flavor or muddling with the deliciousness that is this tart. Seriously, you gotta try it.


I am going to give out my recipe for pate brisèe, but if you are not big on making your own pastry dough, by all means grab a box of ready-made pie crust in the refrigerator section, or use a 9 inch prefabricated “pie crust in a tin” from the freezer section, whichever you prefer.
I have already cut everything in half, this will make one 9-13 inch pie shell, I know the measurements look a little complicated, but as I said, I already cut it in half, thus what was 1/4 cup is now 2 TB

1 1/4 cups + 2 TB AP Flour
2 TB cake flour
1/2 cup un-salted butter, VERY cold, and cut into very thin slices
3/4 tsp Kosher salt
Approximately 1/4 – 1/3 cup very cold water (This will vary)

Slice your butter fairly thin, then place in the freezer.

Mix the flours and salt with a whisk together very lightly.


Add slices of butter and work the butter through the flour with your finger tips or a pastry cutter.

If butter becomes too warm in your hands, place bowl back in refrigerator. You still want to be able to see butter in the flour.
Add the ice-cold water and mix very fast with your hand just enough that the dough coheres.
Wrap in wax paper or plastic wrap and refrigerate for 30 minutes to 1 hour to let the gluten relax a little.

For the Tart Filling:
1 TB Olive Oil100 g (3.5 oz) Pancetta Affumicata (Smoked Pancetta or American Bacon) I just used 4 oz1 leek (see below)200 g (7 oz) Ricotta (13 TB or a little over 3/4 cup by Volume)2 eggs20 g fresh dill (chopped) (5 TB by volume or a heaping 1/4 cup)30 g Parmigiano-Reggiano (about 1/4 cup volume)Smoked Salt(Optional) 2 oz Sliced Mushrooms(Optional) Zest of 1 Lemon(Optional) 1/4 cup Panko(Optional) Additional 2 TB grated Parmegiano-Reggiano
Before I get started, I want to mention Leeks. I buy my leeks at Trader Joe's, even though they are technically more expensive per lb, however, I get more leek... Check this out. $2.69 at Trader Joe's (top) or $1.89 per lb in the Mega Mart (bottom). I get more leek for my money, even when the Mega Mart leek is cleaned up, I get about 1/2 the amount (white part only of course, cause the green parts are bitter) that I get with a Trader Joe's leek. Just some food for thought. If you are purchasing grocery store leeks, you may want to pick up 2 instead of 1.
Clean and slice the leek and mushrooms.
Chop the Dill
Cook diced pancetta with 1 TB of oil in a skillet at medium heat for 2-3 minutes.
Add sliced leek and cook for 2 minutes at low heat.
Add mushrooms and cook another 2-3 minutes.
Remove from heat and let it cool.
In a bowl, mix Ricotta, Eggs, Dill, grated Parmigiano-Reggiano, smoked salt and black pepper.
Here is where I added the Zest of one lemon, just because I felt like it...
Meanwhile, roll the pate brisee out on a lightly floured board and line your 8.5-9.5 inch tart pan.
By now, the Leek/Pancetta mixture should be cool enough to mix with the ricotta and pour into the Tart shell, leveling with a spoon.
If desired, sprinkle the top with the Panko and Parmigiano-Reggiano cheese
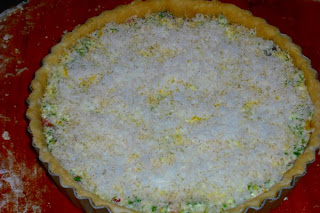
Bake in an oven preheated to 180°C (350 F) for about 30 minutes.
Serve warm.
Mangia!!~~

Saturday, November 29, 2008

A Tale of 3 Gingerbread Houses and a 5 year old

I was blessed to be able to spend Thanksgiving in Aliso Viejo this year with my godson, Sam, his parents and his "Nanna" and "Pappa". I thought is would be fun this year, since Sam is 5, almost 6, to get him involved in constructing a gingerbread house for the first time. Sam enjoys cooking... A lot... As I found out during one of my visits. I had decided to give his mom, my best friend, a night off for dinner. So I had hauled all of my pizza making equipment with me and a BIG batch of dough, with what seemed like a million toppings. He absolutely LOVED making his own pizza. It was, and I quote, "The bestest pizza ever!!" But I digress and that is another post, that I will have to put up, once I finish editing the pictures.

So armed with something resembling the pieces to a modular home:
Link
I arrived with all the accoutrement to facilitate construction of 3 gingerbread chalets.
The list of candy/cookie decor was as follows:

  • Necco Wafers - Both Multicolored and Chocolate (For Slate Looking Tiles)
  • Chocolate Non-Perils (They look like snow on the roof)
  • Peppermint Straws (Window Sills)
  • Red Hots (Window Trim)
  • M&Ms (Misc. Walkways and trim)
  • Spearmint Leaves (Bushes)
  • Mini Spice gumdrops (Misc roof ridge line and walkway borders)
  • Giant Smarties (Roof ridge line and walkways)
  • Belgian Waffle Cookies (Roofing Tiles)
  • Belgian Tea Cookies (Doors and Shutters)
  • Candy Canes
  • Starlight Mints
  • Old Fashioned Lemon Drops (Crushed and used to make window panes while baking the dough)
  • Extra Miniature and Tiny Gingerbread men & Women fitted with Toothpicks before baking
The recipe for the gingerbread house pieces is located here on BakeSpace.com.

I usually "glue" the pieces together using a dry caramel, I find it holds better than the Royal Icing that is typically used. I waited to assemble while he Sam was taking a quick nap in order to alleviate what would have in
evitably resulted in burns, I should know, I burnt myself twice with hot, sticky caramel so there was NO WAY I wanted Sam anywhere near the kitchen while I was doing that part.

I made a double batch of pseudo Royal icing:

2 boxes (8 cups) C&H powdered sugar
1 cup Crisco (butter may be used, but it doesn't make as white of an icing, and I wasn't going to be eating this anyway)
1/3 cup water (you cannot use milk or the frosting will not harden)
1 tsp Vanilla
Beat all ingredients together until fluffy.
Cover the surface with plastic wrap at room temp until ready to use.

After filling the 2 pastry bags (1 with a #4 writing tip and one with a #32 shell border tip)
and some quick instructions to Sam, his mother and his Nanna which resulted in my hands being covered with frosting, thus no pictures were taken during the process, the fun began.

Sam did very well, and while it was hard for him to squeeze the pastry bag, with some help from his mother, he was more than capable of decorating and having an absolute BLAST doing it.

He even helped me put the walkway, candy canes and "bushes" on the one I made for my friends autistic nephew. (below)

Here is a closeup of Sam's Gingerbread house.

And here is a picture of his Nanna's Gingerbread house.

Good fun and lasting memories were created for all of us. Lot's of laughter and scrambling to find fallen candy before Otto, my dog, could eat it. In my book, a much better activity for a Black Friday, than going shopping and dealing with craziness...

LOL
~~

Tuesday, November 25, 2008

Cranberries... Beyond the sauce

It is the mad baking rush for those of us traveling for the Thanksgiving holiday. At some point I will get around to posting the Gingerbread cookie and House madness I have been going through the last couple of days. But for now, a Thanksgiving tradition.. Well at least since 2000.

Carameled Cranberry Pecan Tart 

6 oz Pecans, chopped
3/4 cup sugar - Divided
3/4 cup light corn syrup
2 TB unsalted butter
3 large eggs
1/4 tsp salt
1 tsp vanilla
6 oz fresh cranberries, chopped
1 baked (10-inch) Tart Shell - I use 1/2 batch of Pate Brisee but a Pilsbury ready-made will work too.

Preheat oven to 350°F.
Toast pecans in a shallow baking pan in middle of oven for 5 minutes.
Leave oven on.
In a 2-quart saucepan melt 1/2 cup sugar over low heat until it begins to melt.
Continue cooking, stirring occasionally with a fork, to assure even melting, until sugar is melted into a deep golden caramel.
Tilt pan and add corn syrup; please do this carefully as it will bubble and steam - The caramel will harden but don't worry, it melts again.
Cook over moderately low heat, stirring, until caramel is dissolved.
Remove caramel from flame and add butter, stirring until melted.
Let caramel sit to cool until it stops bubbling.
In a heat proof bowl, whisk eggs with salt, vanilla, and remaining 1/4 cup sugar.
Add caramel in a stream, whisking constantly.
Spread pecans and cranberries evenly in tart shell and pour caramel over them, tapping pecans and cranberries down to coat thoroughly with caramel-y goodness.
Bake tart until filling is set, about 30 minutes.
Cool completely in pan on a rack before removing rim of pan.


Mangia!!
~~

Tuesday, October 14, 2008

BakeSpace Challenge #7 - Polish History Month

Mission: Authentic Polish Recipe - In Honor of Polish History Month

Solution: Tort Orzechowy - special equipment - 7 1/2 - 8 cup Brioche mold...

1 TB unsalted butter, melted
2 Cups finely ground Panko (Or other white bread crumbs)
3/4 cup Honey (I like Orange Blossom)
1/4 cup Brown Sugar
4 Large Eggs; Separated

1 cup Hazelnuts, Toasted and Ground Medium-Fine

Preheat oven to 350 degrees (325 convection)
Brush inside of brioche mold with melted butter.
Sprinkle 1/4 cup of the fine Panko into the mold and coat the inside of the pan and set aside.
Place honey in a large bowl over simmering water.
Once honey melts, add brown sugar and begin whisking
Add egg yolks 1 at a time, whisking constantly.
Once all egg yolks have been added, continue to whisk the mixture over simmering water until a light custard is formed (Mixture will be quite pale and thickened)

Remove mixture from stove.
Combine Hazelnuts and Panko, then fold this into the honey custard.
In a clean, preferably copper, bowl, whip egg whites to stiff peaks.
Fold into the rest of the batter, 1/2 at a time.
Carefully spoon batter into the brioche mold. (It's kind of like a nutty angel food cake batter)
Place in oven and bake for 40-45 minutes
Cake will be golden brown around the edges.

Let cool in pan for about 5-10 minutes
Unmold onto a rack, sprinkle with more nuts and honey when serving.

Mangia!!
~~

Thursday, July 24, 2008

BakeSpace Challenge #2 - 'Simply Irresistible' Caramel Eclairs

The Mission: Re-Create a recipe from your favorite movie, or a movie that wasn't all that great, but had great food.

The Movie: 1999 Simply Irresistible - Starring Sarah Michelle Geller and Sean Patrick Flanery (What's with the 3 names?)

The Recipe: Caramel Éclairs - is also available on BakeSpace.com

I had much trial and error on this one.
At one point I thought I might have bitten off more than I could chew. I even searched the internet to get an idea of what I should do. I was amazed to find all the Caramel Éclair recipes were based on Brown Sugar.
Now I am not trying to sound all sn
obby but honestly, Brown Sugar tastes nothing like Caramel. That is like saying that maple syrup tastes like honey. They are two uniquely distinct flavors.  So I began with the one thing I knew how to do, and that was to simply make the choux paste and hope I would get struck by some sort of inspiration from the food gods.

When it came time for the pastry cream I decided to caramelize the sugar for a basic pastry cream. Thus I tried making a wet caramel first, it came out too light, without any flavor, so out the window it went and I opted to make a dry caramel the second time.
This is the point where my brains dribbled out the back of my head evidently since I conveniently forgot about the humidity.

The caramelizing part was a beautiful sight to behold. I was rather proud of myself since I usually end up burning the sugar, which is why I tried the wet caramel first.
I poured my dark amber liquid over a foil lined pan and waited for it to harden so I could powder it in the food processor. It hardened alright, with a nice sticky layer all over the exposed top due to the moisture in the air.
First rule of ANY candy making.


NO HUMIDITY!!
With the inherent stickiness of my finished caramel, it was apparent that the food processor was out of the question.


So my pastry cream was delayed for another day. I broke up the sticky caramel and mixed my liquid ingredients together, placing the broken sticky shards in the milk, covered it, placed it in the refrigerator and hoped the caramel would dissolve over night. Luckily it did. So I made my pastry cream and set it to chill.


I then whipped up my heavy cream and folded it in. Hmmm… It was still a little loose for my taste and sinc
e these had to be able to survive for about 5 hours after being filled, I went ahead and decided to whisk in some gelatin to ensure the filling did not cause the éclairs to become soggy.

I still needed some sort of frosting or glaze for the tops.
My first attempt involved making more caramel with 2 oz of sugar, then adding a little butter, milk and powdered sugar to create a sort of “Crusting” glaze. It looked great, but tasted like cornstarch; in fact, you could actually FEEL the chalky c
ornstarch with your tongue.
It was nasty!
So I went back to the drawing board by re-watching the movie segment, I noticed everyone licking his or her fingers. This meant to me that they were not topped with a frosting, but more of a viscous glaze, similar to doughnuts, but thicker.
SO, that being said I made more dry caramel with 1/2 cup sugar. I added heavy cream, butter and salt, then on a whim I added a little coriander and the zest of 1 lemon creating
more of a caramel glaze that will thicken when cooled but not crust.
I re-warmed the éclairs in a 350 degree oven for about 5 minutes, I went ahead and dipped the tops in the hot caramel sauce and let them cool slightly.


And FINALLY.
I filled my pastry bag with the chilled caramel pastry cream/mousse and piped them full.
Then the best part. I got to eat one!
and while it did not “Explode out my toes” or make my toes curl, it was pretty darn tasty I must say.
The subtleties of the caramel flavor were sinfully delicious without being OVERLY sweet.
The Lemon/Coriander in the glaze played well with the hint of ginger in the pastry and the deep richness of the filling was offset by its light texture.

OK. Maybe my toes DID curl, just a little.

I have rearranged these steps of the recipe according to how I will do this in the future, now that I have a recipe and experimentation is over, it stands to reason that the pastry crème should be made first so it has time to chill while the rest of the dessert is being prepared.

-----Edited January 22nd 2009 due to broken link to published recipe


And here we go. This is the final recipe for the eclairs, the pastry creme and the caramel topping.

Caramel Pastry Crème (Slightly Cheating) – Technically Pastry Crème doesn’t have gelatin in it… That actually makes it a mousse
1 1/2 cups sugar
1/2 tsp Salt
2 1/2 cups whole milk
1/2 Vanilla Bean scraped
4 egg yolks
3 TB Corn Starch
1 Cup Heavy Cream
(optional) 1/4 oz Gelatin
(optional) 2 TB Warm Water

Place a large skillet over medium-high flame and add the sugar. (Please do not use Teflon pans, you will not be able to see the color of the sugar.
As the sugar begins to melt, tilt the skillet back and forth very gently to move the liquefying sugar around, this will keep the coloring even.
Once the sugar is fairly uniformly dark amber (about 10 minutes), remove skillet from heat and
onto a sheet of foil (about 12 by 18 in.) and let cool to room temperature, about 20 minutes.
Combine milk, salt, vanilla seeds and the pod in a medium saucepan over medium heat.
Break caramel into smaller pieces and whirl it up in the food processor or blender, into a powder.
Peel off foil and break caramel into chunks; put in a food processor or blender and whirl into a fine powder.
As the milk heats up, add small amounts of the caramel powder and stir until melted and smooth.
Do not let the milk boil, just keep it warm and continue adding the caramel powder and stirring until all melted and smooth.
Beat egg yolks and cornstarch together until egg yolks are thick and lemon in color.
Condition yolks with a couple ladles of hot milk/caramel mixture.
Once warm add the eggs to the saucepan and whisk until thickened.
Remove from heat and pour through a fine mesh strainer to ensure there are no lumps in the custard.
Cover on the surface with plastic wrap and store in the refrigerator up to 2 days.
When ready to use, whip heavy cream in a chilled bowl until stiff peaks.
Run a whisk through the pastry crème to loosen.
Fold whipped cream into pastry crème.
Check for stiffness, if pastry crème seems a little loose, cover and return to the refrigerator.
Bloom 1/4 oz Gelatin in a ramekin with 2 TB warm water for 10 minutes
Place ramekin in a small saucepan with a little water over low heat.
Once gelatin has become clear, remove from water bath and let cool slightly.
Remove pastry crème from refrigerator and begin whisking gently to check thickness.
Place bowl of pastry crème in an ice bath (to speed things up) or simply pour in the warm gelatin and whisk until it begins to stiffen.
If you are not using an ice bath cover the crème and return to refrigerator for 20 minutes.
Choux Paste:
1 cup Water
8 TB Unsalted Butter
Pinch of Salt
1 Cup Flour
1/2 tsp Ginger
4 large Eggs

Bring Water, butter and salt to a boil in a medium saucepan over medium flame.


Once water reaches a boil, add flour


and stir quickly until the dough ball starts to pull away from the sides of the pan.


Continue to cook for 1 – 2 minutes to assure that the dough is sufficiently cooked.
Remove from heat and let rest for about 10 minutes to cool slightly.
Begin preheating the oven to 400
Once cool, add the first egg and stir briskly with a rubber spatula or “spoonula”. (You can do this with an electric mixer and paddle attachment, and normally I love my appliances, but honestly, I am convinced this works better when done by hand)
The dough will fall apart and look really odd, but with continued stirring it will rebind into a solid mass again.


Repeat this with each of the other 3 eggs.
After the addition of the last egg, you should notice that the dough has become a smooth, shiny and slightly sticky paste.


Fit a large piping bag with a large round tip (I use and 806, although I think it would be fine to not use a tip at all), fill the bag with the choux paste.


Line 2 baking sheets with parchment paper and pipe 3 inch long strips of paste at least 2 inches apart.


Place in a 400 degree oven for 15 minutes.
Reduce heat to 350 and bake for another 10 minutes
Remove pans from oven and with hand protection, poke a whole in the end of each éclair.
Move pan back to oven for an additional 10 minutes to ensure the insides are dried out.


Move éclairs to a cooling rack.

Caramel Glaze:
1/2 cup sugar
1/3 cup heavy cream
3 TB butter
Pinch of salt (I used grey salt, don’t know why, just did)
Zest of 1 lemon
1/4 tsp Coriander

Melt Sugar in a tall sided sauce pan over medium flame.
When liquid and dark amber in color, carefully pour in the heavy cream… Careful, it will bubble up, the sugar is at 350 degrees so the water in the heavy cream will superheat and boil almost immediately.
Stir with a whisk over low until smooth then add the salt, butter and stir until melted.
Lastly remove from heat and stir in the lemon zest and the coriander.
This will keep as well covered and stored in the refrigerator.
DO NOT dip éclairs until just before serving or they will get soggy. (I learned this the hard way.)

Assembly:
If you prepared the caramel topping ahead of time, re-warm over low heat.
Dip the tops of warm éclairs into the caramel sauce and set on a rack to drip and cool.
Please be careful, this sauce is still VERY hot and it IS candy so it will stick to your skin while it’s burning.
Prepare a pastry bag with injection tip.
Fill 2/3 full with pastry crème.
Poke the tip through the steam hole of your éclair and fill with the pastry crème.
Eclairs will be fine if covered and placed in the refrigerator for 2 hours, any longer and you risk sogginess.
It is preferable to serve immediately.

Optional:
If you are feeling particularly fancy, you may prepare more caramel with 1/4 – 1/2 cup sugar.
After cooled to room temp, process in the blender of food processor again and sprinkle the granules over the top of the glaze right before serving for a little crunch.

Mangia!!

 ~~

Sunday, July 6, 2008

BakeSpace Challenge #1 - 5 Ingredient Entree

What is a BakeSpace Challenge you ask?
Think of it as a sort of Iron Chef Challenge, but different. Twice a month on the 1st and on the 16th a new challenge is announced. Create a recipe. What kind of recipe? Well that depends on the challenge... It can be anything from a list of ingredients to a food mentioned in a song (Savoy Truffle anyone?)
This is a new program we, the members of BakeSpace, have instituted in order to stimulate creativity within the community, but most of all, it's suppose to be fun...

1. We do not have a panel of judges, unless you have a family of 4 to cook for.
2. There is no point sy
stem, unless you want to count the "----> drools" posted to the forum after you have revealed your masterpiece.
3. The only time limit is the 2 weeks you have to complete your recipe, photograph it and post about it.

If you are interested in some fun with cooking, swing by BakeSpace and check us out in the Pantry Forums un
der BakeSpace TEST KITCHEN, were a fun group of people, I promise we wont bite.... Well, unless your hand is covered in chocolate or something..... That all being said, on with the blog......

BakeSpace Challenge #1:

Mission: Utilize these five ingredients in either 1 or 2 dishes - Onion, Chicken, Eggs, Spinach & Puff
Pastry

My solution to this challenge came fairly easily due to my habit of watching Hell's kitchen. I have been watching Beef Wellington leave the kitchen all season long, and with the mention of mushrooms, puff pastry and chicken... I knew exactly what I needed to do... Due to the stuffing of spinach and onions into the chicken breast, I have refrained from calling this a Chicken Wellington... Instead I believe that Duxelles Pate Chicken en Croute fits quite well. Even if it has a few more syllables.

On the whole, I will definitely be making this again... although I will save such a dish for dinner guests and not just simply make it for myself. The nice thing is that the pate and the stuffing can be made in advance and refrigerated. This makes preparation the day of, much faster than one would think.

Saute onions - Now you have to saute onions for both mixtures, so I did them both at the same time.
The Onions/Mushrooms in a skillet and the onions for the spinach stuffing:
Once the onions for the filling are done, add them to the spinach and complete the stuffing mix...


More than likely the mushrooms will still be
cooking, once the liquid from the mushrooms has evaporated, deglaze the pan with lemon juice and marsala, then add the cream, herbs and lemon zest. Toss this into the food processor with toasted almonds and puree to a pate.


In the mean time, start butterflying the chicken breasts... The wicked looking knife I am using is a great Japanese hybrid boning/fillet knife by Shun called a Gukoju, not so great for filleting fish, but fantastic for everything else.
Divide the stuffing between the 4 Chicken breasts, then either close them up with twine or use turkey trussing needles (Which I had to use, I didn't realize I was out of twine.)


By now the Pate should be done. Go ahead and remove the 1 sheet of puff pastry from the refrigerator and allow the pastry to warm a little before unfolding.
Heat a skillet and rub the chicken with olive oil, sear on all sides then remove to a plate to rest while preparing the pastry.
Roll out the pastry into a rectangle and divide into 4 equal squares, the remaining strip can be cut into decorations for the top.
Spread pate over the pastry leaving a border for sealing.


Fold pastry over and seal with egg white wash. Add decorations, using egg white wash as the glue, then give th
e whole thing another coat or egg wash. I sprinkled a little Murray River Salt from Australia over the leaves as a little extra decoration.
Bake at 400 for 18 minutes or until Pastry is puffed and GB & D (To Coin a Phrase)


Slice on the bias and serve with micro greens.


Conclusion - I thought it was delicious, although I may try this with arugala instead of spinach as the flavor is milder, or maybe use shallots or leeks instead of sweet onions. But on the whole I was really happy with it. The pate was divine on toasts.

But the absolute BEST part was that I still had a sheet of puff pastry left over... So.......

I made St. Germain Cream Horns for dessert with a St. Germain mascarpone filling and raspberries (both Golden and Red) with a little coulis from the left over berries.
St. Germain is a newer liqueur to the U.S. it is made from French ElderFlowers... It's a little on the cost prohibitive side (41 bucks a bottle) but luckily I found the little airplane size bottle for 3 dollars.
Great for adding that "little extra mysterious something that people can't quite put their finger
on" to a dessert.