Showing posts with label Yogurt. Show all posts

Thursday, July 26, 2012

Cool As a Cucumber - Minted Cucumber Soup

I really don't deal with heat all that well.  How I survived 13 years in San Diego and 2 years in Palm Springs, I will never know.  Though there were a couple times, in the Coachella Valley, when the temperature was above 115, that I seriously contemplated filling the bathtub with ice and taking a long soak. I think it stems from the heat exhaustion I experienced one summer while helping a family friend re-roof their house in the middle of August.  Looking back, I see that it probably wasn't the BEST time of year to take on a project like that, but what did I know, I was only 17. 

The point is, that I start becoming uncomfortably warm at 75 degrees.... by 80, I am pretty miserable.....  at 85 degrees Ugh!, at 90 degrees somebody just needs to shoot me now and put me out of my misery. 

Conversely, I run around in 45 degree weather wearing a T-shirt and no jacket.  So I guess my comfortable temperature zone has just shifted slightly to the lower registers.

Be that as it may, the temperature has been in the 80s for the last couple weeks, thus I have begun to crave foods that cool me down on the inside.  Salads are at the top of the list in weather like this however, I have found that I can only consume so much salad before it begins to shred the edges of my sanity.  Before the psychological damage is irreparable, I turn to things like Ceviche or Sushi (though sushi can be a little tricky at home).... Then there is the issue of JUST how much seafood one can stomach in a week.  That is when it's time for soup.  Yep, soup... 

I don't mean the hot, steamy, stick to your ribs kinds of soup that you consume during those cold months of the year.... I am talking about cold soups... Like Vichyssoise, Gazpacho and, of course, Minted Cucumber Soup. 

If you have followed this blog for any length of time, you will be fully aware of my love of Greek food...  In particular things like Sopa Avgo-Lemono (Egg-Lemon soup), which is also delicious when cold I might add, and that ever so evocative Tzatziki sauce that so lovingly adorns most Gyros.  Well, Minted Cucumber soup is really just a less viscous version of Tzatziki.  And that makes it Uber-Tasty.  Don't let the yogurt fool you, it sounds like it would be a heavy "Cream soup" texture, but it really isn't like that.  It's extremely light and refreshing.  The small amount of heavy cream sort of plays down the "lactic tang" of the yogurt, making a clear path for the clean brightness of the lemon juice and the cucumber. 

So the next time you need some cooling off, give this a try...  I am positive that you won't be disappointed.

Minted Cucumber Soup

24 oz Cucumbers
2 tsp fresh Dill, chopped
1 TB fresh Mint, chopped
1/4 tsp Kosher Salt
1/8 tsp White Pepper
1 TB Lemon Juice
1 TB Extra Virgin Olive oil
16 oz plain low fat Yogurt (preferably one without carageenan, locust bean gum, xanthan gum or pectin)
4 oz Heavy Cream

Peel the cucumbers and cut them into more managable chunks.

Slice each chunk in half lengthwise.

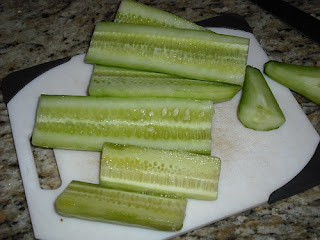
Scoop out the seeds with a spoon.

Deposit the seedless cucumber chunks into the bowl of your food processor or your blender.

Blitz the heck out of them until you have a nice watery puree, then move the puree to a serving bowl.

Finely chop the Dill and the Mint.

Add the chopped Herbs, Salt, White Pepper, Lemon juice and Extra Virgin Olive Oil.

Stir to combine.

Add the Yogurt and the Heavy Cream.

Whisk everything together well.

Cover with plastic wrap and chill in the refrigerator for 1-2 hours before serving.

Garnish if desired. (I like to save back a few slices of unpeeled cucumber and some mint tops to form a garnish)

Ahhhhhh....   The epitome of cool.

Mangia!!
~~

Sunday, June 7, 2009

Wonton Traverses The Khyber Pass - Aushak

I was first exposed to Afghan cuisine at a restaurant called Khyber Pass. This is my attempt at one of their dishes called Aushak. It's a delicious combination of flavor and texture. From the spicy leek wonton dumplings, to the hearty meat sauce (similar to a ragù) all offset by the minty chill of a yogurt sauce. Hey, any dish that has TWO sauces is all right by me... :)

The nice thing about this dish is that it can all be prepared ahead of time and stored. The Aushak freeze beautifully and the sauces will hold in the refrigerator for at least 48 hours. It may seem a little daunting at first, due to it's three parts, but they are simple to prepare, and your efforts will be greatly rewarded.

Aushak


Yogurt Sauce
1 cup Greek style yogurt
2 tsp crushed garlic
1/4 cup Fresh Mint; Chopped
1/4 tsp dried Dill
1/2 tsp salt

Place all the ingredients in a bowl,

Stir, cover, and chill.


Meat Sauce
1 Onion; finely diced
Olive Oil
3/4 lb Ground Beef (I used Ground veal cause it was what was in the freezer)
3 cloves of Garlic; finely diced
1 1/4 tsp ground Coriander
1 tsp Mace or 1/2 tsp Nutmeg
3/4 tsp ground Ginger
1/4 cup Cilantro; chopped
1/2 cup of Beef Stock or Water (you might not need it all)
4 TB Tomato paste
Salt and Pepper to Taste

Sauté the onions in olive oil until soft.

Add Beef, Garlic, Coriander, Mace, Ginger and Cilantro; sauté until cooked.

Add 1/4 a cup of the Beef Stock and simmer slowly until the Stock is reduced by half.

Stir in the tomato sauce, add salt and pepper to taste, and simmer for five more minutes.

Add more Stock if the mix starts to look dry.
It should be as thick as a Ragù alla Bolognese (thick but not dry).

Cover and set aside in refrigerator.
The meat will absorb the flavors while resting

Dumplings
1 bunch of Green Onions, Green Parts ONLY and chopped finely
2 cups sliced Leeks; white and light green parts
Olive oil
1/4 cup Cilantro; chopped
1 tsp dried Chili Flakes or 1 inch Red Pepper Paste
1 tsp Kosher Salt
1 tsp Black pepper
1/2 pkg Wonton Skins
1 egg, lightly beaten and mixed with a teaspoon of water (wonton glue)

Sweat leeks and green onions gently in oil until soft but not brown.

Meanwhile, combine cilantro, salt, pepper, and red pepper flake.

When leeks are soft, add them to the cilantro mixture and toss.

Place a teaspoon of filling on a wrapper, dab the edges of the wrapper with a thin layer of egg, fold the wrapper onto itself to form a triangle, and press firmly to seal.

Dust dumplings with flour and place on a flour sprinkled baking sheet.

Cover the baking sheet with plastic wrap until ready to cook.
You can also freeze the aushak on the tray, then move them to a freezer bag and return to the freezer for several months.

Bringing it ALL together
Bring a large pot of water to a boil.
Place Beef sauce over low heat to rewarm.
Drop Aushak into boiling water, cooking for 1 minute if fresh and 2-3 minutes if frozen.
Drain Aushak and move to a plate.
Spoon warmed meat sauce and chilled yogurt sauce over them, in any configuration you like, from complicated, like above, or simple like below.


Mangia!!
~~

Aushak on Foodista

Saturday, March 28, 2009

I'm so Dizzy, My Cheese is Spinnin' - Mozzarella Mania Part 3

Fresh Mozzarella part 3
If you are just joining you might want to check out:

Fresh Mozzarella part 1 - Say Cheese!!!!


Fresh Mozzarella part 2 - Whey to Go, Curds!!!
Link

This is the best part of the WHOLE process… Making the cheese balls.
Now I had issues with this part and I had several theories as to why, but I will go into that at the end. Suffice it to say that I should have picked up some litmus paper or an pH probe. I think my cheese was not quite acidic enough.
This was what my curd looked like, kind of a large disk of cheese curd.

The first thing that needs to be done, though, is to make the brine:

2 cups Whey
2 cups distilled water
1 TB kosher or pickling salt

Stir to combine then cover and refrigerate until ready to use.


OK, the "spinning" curd part
By now your curd should be at least 5.2 pH or lower, preferably in the 4.9 arena.
I can see you looking at me like, “HUH?? How am I suppose to know that?”

I will explain. To check for “spinnability” heat 2 cups of water to 185 degrees.
break off a tiny bit of the curd and dip it in the hot water and wait a little bit.
Scoop it out with a spoon and see if you can make it stretch a little without breaking.
If it stretches, it’s ready… If it breaks, your curd is not acidic enough, cover and let it sit another couple of hours and try again.

Pretty cool, huh? Wanna know why? Aw, heck I’ll tell ya anyway….

Food Science Geek Tangent - Proteins 101….. If you really don’t want to know, go ahead and skip forward, I will not be offended, I promise.….

This “spinning” of cheese curd is closely akin to making a meringue. I am not trying to confuse, just bear with me, it will make sense in the end…

Meringue is made with egg proteins (Albumen) that are whipped until they “stretch” to encapsulate air and water, thus creating foam. If you want a stable Meringue, you add acid such rubbing a copper bowl with Vinegar or sprinkling in a dry acid like Cream of Tarter. This helps to “stabilize” the albumen during the whipping process.

What does stabilize actually mean?

In an acidic environment, protein molecules become more flexible and “stretchy” if you will. Thus, with added acid, your albumen can stretch further before breaking, in effect “stabilizing” it’s ability to hold a foam without collapsing. The result? Fluffy Meringue!

Or in our case, the Milk protein (Casein) in the curd can stretch enough to form layer upon layer of folded mozzarella goodness.
...OK, Tanget over...


Back to cheese:

If your curd is ‘spin’able, then it is time to heat up a lot of water, while that is happening, break up the curds into small chunks, to facilitate even warming.


Also prepare a bowl with about 2 cups of cold water and a few ice cubes.

I like to divide my curd into 4 oz piles and work with 1 pile at a time (4 oz is about the size of a lemon)
Place the curd in a shallow dish.

Pour 191 degree water over it and let is sit for about 1 minute.

Using a spoon, collect the curd to 1 side then press on it with the back of the spoon, it should kind of merge into 1 large curd.
Keep collecting curds and pressing them together until you have a large mass which will begin to stick to the spoon.

Begin folding it over onto itself and pressing it together with the back of the spoon… repeat a couple times.
Pull the curd from the hot water (it will still be hot, so where gloves) and start folding and pressing, and folding and pressing. (I need a second pair of hands to take pictures)
The curd will become shiny on the outside, that means it is done.
Drop it into ice water to firm it up.

Empty the water from the dish and re-heat your distilled water to 185 degrees…. Place aother 4 oz in the bowl and repeat the steps above to make your second, third and fourth mozzarella balls. (you will get about a pound of Mozzarella from 1 gallon of milk.)
When they are all chilled in the ice water, go ahead and move them to the brine.

Store in the refrigerator for 3 hours before eating.

Mozzarella is best consumed within 3 days of this process…..
It will keep for about 10 days though, it’s just better the first 3.

Things I learned from this process….
First of all, I will not try to do this during a work week, this is a weekend project, but OH YES!! I WILL be doing this again….
I wrecked my 1st ball because my water was too hot and the curd melted into nothingness….
The second one, I ate before it even went into the salt brine… LOL
The third and forth, I got a little carried away and kept folding the cheese after it was getting too cool, so I lost my shiny coating on the outside. Still tasted good though…
Why did I go to all this trouble of making homemade mozzarella?
For this-----

Pizza Margharita!!!


the BESTEST EVER Pizza Margharita, I swear!!!
Mangia!!!!

Friday, March 27, 2009

Whey to Go, Curds!!!! - Mozzarella Mania part 2

Fresh Mozzarella Part 2

Before we begin you’re gonna need some equipment….
  • 2 Stainless steel stock pots (4 quart and 6-8 quart)
  • Colander
  • A long knife
  • Cheese cloth
  • Temperature gage
  • Slotted spoon
  • Stainless steel measuring spoons
  • Glass Measuring cups
And it ALL need to be sterilized… I cannot emphasize this enough.

Place about 1 quart of water in each stock pot and heat them to a boil.


Place measuring cups, spoons, knife blades and anything else that you will be using in the pots and cover with the lids… let steam for 5 minutes…. For the colander, a good steaming is in order, place the colander in the pot and place the lid on top of the colander to get it steamed well.

You have got to be able to control the bacteria here. Wipe all counter surfaces and the sink with a mild bleach solution… Maybe I am a little paranoid, but the curd will be aging in this recipe, it’s not one of those, “add citric acid and use the microwave” types. So prepare your environment well to ensure the proper bacteria (the ones YOU are adding to the milk) are going to be the ones that grow and flourish.
If my mom was right, and cleanliness is next to Godliness, then making cheese is a religious experience. I cannot stress the cleanliness and sterilization enough… If you think it’s clean, go ahead and clean it again, better safe than sorry.

OK, now that I have succeeded in scaring everyone away from making cheese with my own “Pathogen Paranoia”.

Let’s begin… You will need the following ingredients…

1 gallon un-homogenized pasteurized milk (no Ultra-Pasteurization or Homogenization)
1/4 tsp Vegetable Rennet
3 TB Whole Milk Yogurt
3 TB Cultured Buttermilk
2 TB Crème Fraîche Salt
Lots of Distilled Water

Warm the milk to 90 degrees in your sterilized stainless steel pot over LOW heat, with the cover on. This must be done at very low heat to ensure it down not scorch, since the milk needs to remain covered and as sterile as possible before inoculation.

(I used the diffuser that I use when I am slow cooking tomato sauce)

Meanwhile, in a small glass measuring cup, mix your vegetable rennet with 1/4 cup distilled water.
In another glass measuring cup, mix the Yogurt, Buttermilk, and if you are using it, the Crème Fraîche.

When the milk hit’s 90 degrees, add the yogurt/buttermilk mixture and stir to disperse the culture throughout the milk.

Wait approximately 15 minutes.
Then add the rennet mixture, stirring well with the slotted spoon to ensure it is mixed thoroughly.

Cover the milk and let it sit for 45 minutes to 1 hour (Mine took 1 hour)
You will know the curd is ready when you get what is called a “clean break”, that is when you can stick your finger in and the curd splits without clinging to your finger like syrup.

Using a long knife, cut the curds in a crisscross pattern, than at an angle to achieve a ¾ inch curd, or at least close to it.
(I tried taking a picture, but everything was so 'white', that you could not see the lines where I had cut... Sorry)

Begin reheating the curds & whey to 90 degrees again, stirring gently and breaking up any larger curds into small pieces so they are as uniform as possible.


After re-warming and stirring, let the curd rest again for 15 minutes so proteins in the curds to “Squeeze” more whey out of themselves.

Pour off some of the whey and save (you will need about 3 cups)

Using the slotted spoon, scoop the curd into another stock pot filled with 2 quarts of cold distilled water.

After they have cooled for about 15 minutes, pour the curds into a cheesecloth lined colander and let them drain.

Let them drain for about 10 minutes...

Pick the assembly up and place it in the smaller stock pot and place the lid on top of the colander and store the cheese at room temperature for the bacteria to grow and acidify the curds – about 8-10 hours (I let mine sit for 18)

Chill the reserved whey in the refrigerator (Although you can also leave this out overnight if you would like to acidify it as well)

Tune in tomorrow for the exciting conclusion -- I’m So Dizzy, My Cheese is Spinnin’

or check out to part 1 of the series-- Say Cheese!!!!