Showing posts with label Fudge. Show all posts

Tuesday, December 28, 2010

Rocky Road (Candy)... Take Me Home... To The Place... I Belong

I really didn't blog about candy all that much this year.  Oh, there was Fudge a plenty (which I blogged about last year) and of course, the Honey Caramels, which I covered this year.  Then I decided to do a recap on Divinity with the more traditional Black Walnuts.  But two of the Christmas treats I forgot to mention, both this year and last, were Great Grandma Ruby's Silver Drip (Which I will get to in a later post) and Grandma Reva's Rocky Road.  No, I am not talking about the Ice Cream flavor.

When I was a child, Rocky Road was the paramount Christmas candy.  What kid doesn't love marshmallows?  Combine that with Chocolate Fudge and Nuts and you have a candy that is destined to disappear as fast as you can make it.

Now that I am older, I am not so much into marshmallows, so after one piece I am pretty much done for the year, but many many other members of my family enjoy this delectable candy, immensely.  Thus it is still a holiday staple 'round these parts.  

The base fudge is the same as the gelatin fudge I blogged about last year, which has been profusely laced with both Walnuts and Mini-Marshmallows, making it all lumpy & bumpy... Ergo - Rocky Road.

Rocky Road Candy

3 oz Unsweetened Baker's Chocolate
3 cups Granulated Sugar
1 TB unflavored Gelatin
1/2 'Scant' cup Corn Syrup (I am figuring this at about 120 ml instead of 124 ml)
1/2 tsp Kosher Salt
1 cup Whole Milk
1 1/4 cup (20 TB) (10 oz) Unsalted Butter (This is definitely NOT a low fat dessert)
1 1/2 tsp Vanilla Extract
4 oz chopped Walnuts (or Almonds)
4 oz Mini-Marshmallows

Chop the Chocolate with a sharp, heavy knife.

In a large, heavy bottomed pot, whisk the Sugar and the Gelatin together.

Add Corn Syrup, Salt, Milk and Butter.... along with the chopped Chocolate.

Apply Medium heat to the whole "mess" and stir while everything comes to a boil (this prevents scorching)


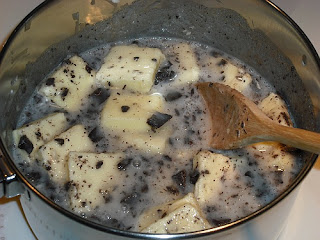
When the mixture comes to a boil, cover with the lid to wash the crystals down from the the side of the pan.

Remove cover after 5 minutes and insert a candy thermometer.

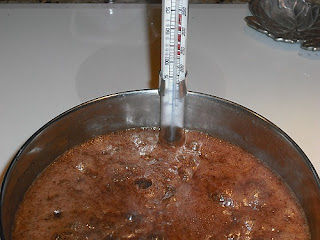
Cook the mixture to 235 degrees (soft ball)

Meanwhile, pour vanilla into the bottom of a mixing bowl.

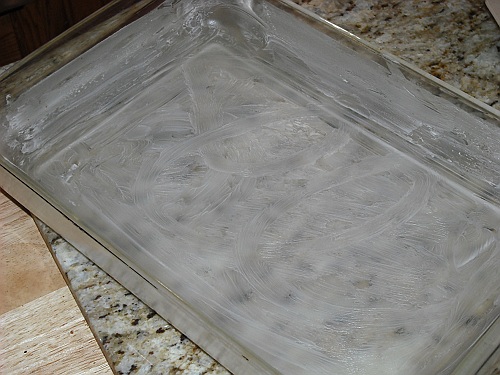
And "butter" a 13 x 9 baking dish.

When the mixture reaches 235 degrees, remove from heat, remove the thermometer and pour the "syrup" over the vanilla (in the mixing bowl)

Let this sit for 25 minutes. (don't worry about the "110" degree thing as is standard with most fudge)
After 25 minutes (regardless of the temperature) begin beating the fudge at medium-low speed, for 15 minutes (sometimes it takes a minute or two longer)

When the mixture looses most of it's shine, stop beating and remove from the mixer stand, then stir in the nuts......

Then fold in the Mini-Marshmallows. (They will melt into the candy, just a little)

Pour the mixture into the prepared baking dish and spread somewhat evenly. (This will be a little hard, since it's all lumpy)

Let set for 3 hours, until fully set before cutting into squares and prying out of the pan with a bench scraper (it just works easier)

While you are waiting, you can let your niece (or nephew) lick the bowl.

And Serve......

Or store in a metal container, lined with waxed paper in the refrigerator for up to a month. (It never lasts that long)

Mangia!!
~~

Sunday, December 13, 2009

Secret Family Recipe; Read on Back of Box - Hershey's Cocoa Fudge

This is the fudge of my "knee high to a grasshopper days" or at least the one I remember the most clearly. It was from the back of the Hershey's Cocoa can!

Yes, I even remember when Hershey's came in a can, and you had to pry the metal lid off with a spoon... Yea, then they switched to a cardboard 'can' with foil lining, but the top and bottom were still metal and you had to pry the lid off of that one too... Yeppers. Then about 10 years ago they switched to a plastic container with a really boring plastic lid... and thus went the bygone good old days.....

Even more sad is the fact that this recipe is no longer printed on the back of the Hershey's Cocoa container and has not been for years. Total bummer... a whole generation is growing up, never knowing the joy of having to stand in line in the kitchen to take their turn stirring the fudge pot... Yep, there are WAY too many No-Cook fudge recipes out there. All based on sweetened condensed milk, and all ya gotta do is heat it just to a boil and dump it in a pan and toss it unceremoniously into the refrigerator for 4 hours...

(sigh) it's just not the same... your not forming sugar crystals when you do that, which is what fudge is... teeny tiny itsy bitsy sugar crystals... That is why so much stirring is required, to keep large crystals from forming. The constant agitation breaks up the formation so you end up with a whole pot full of tiny crystalline goodness that not only feels like silk on your tongue, but melts almost immediately in your mouth.

I have to admit, this fudge does take a lot of elbow grease, but most great rewards require great effort and your efforts will be rewarded. As far as I know, this fudge DOES have to be stirred by hand and will not work if you attempt it with an electric mixer. And after having made it myself, I fully realize why my mom quit making it after she developed arthritis.

I have tried to convert to metric weights, I just hope they are correct, depending on humidity 2/3 cup of cocoa powder may weigh more... But I tried.

Hershey's Cocoa Fudge

3 cups (600 g) Granulated Sugar
2/3 cup (75 g) Hershey's Cocoa (or other Natural Cocoa Powder, not Dutch processed)
1/8 tsp Kosher Salt
1 1/2 cups (355 ml) Whole Milk
4 TB Unsalted Butter
1 tsp Vanilla Extract

Line 8 or 9 inch square pan with foil, then butter the foil. (or cheat like I did and use a square silicone baking pan)

In large heavy saucepan stir Sugar, Cocoa and Salt together;

Stir in milk, with a wooden spoon.

Cook over medium heat, stirring constantly to prevent scorching, until mixture comes to a full boil.

Remove spoon, place the candy thermometer (without touching the bottom of the pan) and boil without stirring, to 235 degrees F (114 degrees C) on a candy thermometer (soft ball stage - or until syrup forms a soft ball in cold water which flattens when removed)

Remove pan from heat and add the Butter & Vanilla extract, then let it cool to 110 degrees F (43 degrees C), without stirring... Seriously.... Again, just like the Gelatin Fudge... No Touchy!!

Stir with wooden spoon (no Kitchen Aid or Oster Kitchen center, just a good old "butt swattin when you've been a bad boy" wooden spoon.... OK, you can use a bamboo one too)

And Stir.... And Stir..... did I mention Stir?? Good, then stir some more.....

Until fudge thickens & loses some of its gloss; looking kind of like chocolate frosting, then quickly spread into prepared pan and let continue to cool to room temperature. (Nope, I don't add nuts to this one... Just pure unadulterated fudgy cocoa goodness)

Meanwhile, the cook gets to scrape all the yummy bits from inside the pan... YAY! Now that I'm all growed up and stuff, it is *I* who gets to eat the scrapings from the pan... AWESOME!!!

Cut into squares. (Unless you used a silicone pan like I did, then you must remove the whole thing from the pan before you cut; Although my cuts were a little off on this one)

Wrap loosely in aluminum foil or in a waxed paper lined tin and store in the refrigerator.

I LOVE this fudge... It is my total favorite kind... (sigh) Heaven, I'm in Heaven....

Mangia!!
~~

Tuesday, December 8, 2009

Jingle Jell Fudge - Gramma's Gelatin Fudge

This was not so much a memory Christmas candy for me as it was for my parents, until my mom explained that Gramma used this base recipe and mixed in mini-marshmallows to make her Rocky Road candy. Then all the pieces started falling into place, cause I remember the Rocky Road candy.

As luck would have it, this recipe can be found in the 1966 version of the Eastern Star Cookbook "Olde Family Favorites". My mom has the copy that she purchased just after her and my dad married in '66. It's a little tattered and worn, but it has been used A LOT. Oh, and as a bonus, while thumbing through the book, I found the Lemon Bar recipe that my mom use to make when I was a kid...

Eureka!!

The one that I guessed at, and tried to make several months ago, (here) and failed in re-creating. LOL So there is another project for the future. Oh and I was right, there were three layers. But that is another post......

Back to fudge. This fudge contains gelatin, which I cannot seem to find any information on WHY there would be gelatin in fudge. Especially since the candy is heated well beyond the point where Gelatin begins to break down (209 degrees) and has little or no gelling effect. My guess is that since this is made with Half & Half, the protein ratio may be off a little and even though the gelatin is breaking down, it is still breaking down into other protein/amino acids and adjusting the protein/fat ratio to what it would have been if it were made with milk... Just a guess...

In the grand scheme of things though, it really doesn't matter. All that does matter is that this fudge is extremely creamy smooth and delicious. And THAT is what is important, right? Right!

Old Fashioned Gelatin Fudge


3 oz Unsweetened Chocolate (recommend using Baker's Chocolate for this)
3 cups Granulated Sugar
1 TB unflavored Gelatin
1/2 'Scant' cup Corn Syrup (I am figuring this at about 120 ml instead of 124 ml)
1/4 tsp Kosher Salt
1 cup Half & Half
1 1/4 cup Unsalted Butter (Oh yeah, you KNOW this is gonna be good)
1 1/2 tsp Vanilla Extract
1 cup chopped Walnuts

Chop the Chocolate and set a side for a couple minutes while you......

Stir the Sugar and Gelatin together in a medium sized heavy bottom sauce pan.

Add the Chocolate, Corn Syrup, Salt, Half & Half, and Butter and bring to a boil over medium flame.

Add thermometer and continue cooking to the Soft Ball stage (235 degrees F)

Add Vanilla Extract to the bowl of your stand mixer.

Pour the hot mixture into the mixer bowl over the vanilla extract.

Let the mixture set for 25 minutes or 110 degrees whichever comes first. (Yep, I am serious, let it sit undisturbed - NO touchy)

Keep your self busy for at least the first few minutes by buttering a 9x9 inch square pan, then go relax with a cup of coffee for awhile... ;)

After the 25 minutes begin beating the fudge until it becomes firm and looses it's shine (this takes about 6-15 minutes depending on whether you are using a glass or metal bowl)

The fudge will begin to lighten as it gets closer to being done.

Once it looses it's shine and becomes thick, quickly stir in the nuts.

and press into the buttered pan.

Let it cool completely, then cut into squares. (I like them small, so I get 64 pieces from a 9x9 pan)

Carefully loosen the fudge from the sides of the pan and scoop out with a metal bench scraper or similar tool.

Enjoy with another nice steaming hot cup of coffee.

Mangia!!
~~

Wednesday, July 22, 2009

Fudging Penuche Fudge

Today (July 22nd) is Penuche Fudge day. It completely skipped my mind due to my excitement for the start of the new season of Hells Kitchen.(oops)Normally I would have made this last night so I could take it to work this morning, but … Hey, better late than never, right? For anyone who is not familiar with this New England confection, Penuche fudge attempts to recreate the flavor of the Mexican Panocha, Piloncillio or Panela (being the pressed Raw Sugar “cones”)


This form of semi-refined sugar is similar to "jaggery" in India (which is derived from Palm sap instead of Cane). It's high in natural molasses, thus Brown Sugar is a key ingredient for Penuche Fudge in place of the White Granulated Sugar normally used to make chocolate fudge.
Sadly it seems that a lot of recipes flying around the net now days contain very little Brown Sugar, being comprised primarily of Confectioners’ Sugar. These are often called “No-Cook alternatives”… I hate to be the bearer of bad news, but Penuche fudge doesn’t really work like that… I am not trying to be a fudge snob or anything, but the flavor of Penuche requires Brown Sugar and cooking to softball, or it ends up being more of a Vanilla Fudge than anything else… You just can’t fudge penuche... ;)

Penuche Fudge

2 cups Light Brown Sugar
1 cup Dark Brown Sugar
1 cup Whipping Cream (Heavy Cream works even better)
3 TB Unsalted butter
1/8 tsp Salt
1 tsp Real Mexican or Bourbon Vanilla Extract (Tahitian is too Floral)
1 cup chopped Pecans
Combine Sugars, Cream, Butter and Salt in a stainless or copper sauce pan (DO NOT USE a NON-STICK Pan)

Place over LOW heat and stir until the mixture begins to boil, then remove spoon and add thermometer. 

Cook until the syrup reaches 238 degrees (Soft ball

Meanwhile - Line your 8x8 pan with waxed paper.

Chop the pecans....

Remove from heat, add the vanilla and let it set until it cools to 110 degrees.

Pour mixture into a mixing bowl; beat mixture on low speed until the luster is gone and penuche has a matte finish (this can take quite awhile... 15-20 minutes, depending)

Mine took way longer, but my kitchen was over 90 degrees so I had to break out the frozen chicken to cool the bowl down cause I had hit the 30 minute mark. (at which point the mixer was getting hot too, thus keeping the syrup warm - Vicious cycle)... LOL

Once it reaches a matte finish... Quickly fold in the vanilla and pecans,

Then press into your wax paper lined 8 x 8 pan

To add a little shine to the top, you can brush the surface lightly with more light cream.
If you do not possess a candy thermometer, you can do this the old fashioned way (the way my Grandmother and Great-Grandmother did it)
Place a bowl of cold water near the stove, check the sugar syrup by dropping a small amount into the cold water.

Let is cool slightly, then fish it out, pressing lightly with your fingers... Soft ball will give when squeezed.

And when set down on the counter, it will hold it's shape for a few seconds before slowly spreading.

Now a warning... I should have probably mentioned this at the beginning... NEVER try to make candy on a humid day. I was reminded of this as I flipped past the Weather channel. Evidently the current humidity level in San Diego is 84%... YIKES! This is too high for candy making, but I was already boiling the syrup, so I trudged forward anyway... We shall see what happens come the dawn... I am still waiting for it to set (It's still really warm in my apartment), but I am posting this anyway. Hopefully I will be adding the picture of the cut pieces tomorrow morning... I have high hopes, because the residual syrup set up well on the beater...
Now I must depart for I have a cup of coffee waiting for me... And I get to lick the afore mentioned beater... ;) 

07/23/09 - OK, Picture added this morning... Yes, it did set up... Not QUITE as firm as I would have liked, but firm enough and extremely creamy and delicious. So I'm not going to complain. It could have been much much worse considering the high humidity. I am one happy camper, as is the IS/IT department at work... They all have a sugar buzz goin. HA HA !!
Mangia!!
~~

Penuche on Foodista