I was originally planning on posting this on CorningWare411, but I realized that I would pretty much prepare this in the same fashion regardless of whether I baked it in stoneware, Pyrex or fore mentioned CorningWare. Thus, this most humble of comfort foods shall reside on Culinary Alchemy instead. :)
Cobbler, the un-pie or would that be semi-pie? Perhaps partial pie? Somewhat sloppy, a little goopy, but oh, so heavenly spooned over Ice Cream. Yeah.... Childhood memories abound of picking the wild blackberries that grew along the length of the driveway (our driveway was kind of looooooong) and over in the neighbor's back pasture (Sorry, Mr. Uyetake). Those that were not immediately conveyed directly into eagerly awaiting mouths by purple fingers, would make their way into mom's kitchen. She would peruse the bounty and announce, "Looks like cobbler for dessert.", at which point we would all perform the dance of joy. (I am just kidding about that last part, but we WERE extremely happy)
Mom's preparation was at once simple to prepare, yet complex in ingredients. I say this simply because she not only used flour to thicken the berries, but quick tapioca as well. Quick tapioca is a little different in texture than the normal large, medium, and small pearl varieties. It's broken up into crystals about the size of Demerara or Raw Sugar. My assumption is that it allows it to thicken things quicker because it has no outer "skin" like the pearls do. Then again, I may be wrong. All I know for sure is that it works really well. So well, in fact, that I use it in my Marionberry pies too.
Mom's "covering" came in two forms. It was always a sweet biscuit dough (shortcake), but sometimes she dropped it from a spoon into the prepared berries (like making dumplings) while other times she would roll it out and cut disks to lay on top of the berries. Either way, it was always delicious. There is nothing quite like a berry juice soaked biscuit. I will even go so far as to say that cobbler might even better than pie. (Maybe)
 4 pints Blackberries
1 TB Quick Cooking Tapioca
Juice of 1/4 Lemon
1/2 cup Granulated Sugar
1/4 cup AP Flour
2 TB Unsalted Butter
Shortcake Biscuits (Sweet Biscuit dough)
2 cups AP Flour
1 TB Baking Powder
1 tsp Salt
1/2 cup Sugar
4 TB Unsalted Butter
1/2 - 2/3 cup Whole Milk (This will depend on the humidity of your flour)
First you need some beautifully fresh and juicy Blackberries.
 Wash and drain the berries. (I only do a few at a time, cause I don't want them to get smushed in the the colander. In the grand scheme of things I suppose it doesn't really matter, but it's a habit.)
 Place them in a bowl that will be big enough for tossing.
 Sprinkle with the Quick Cooking Tapioca. (don't toss yet)

 Squeeze the lemon wedge over the berries and toss briefly, then set aside to allow the tapioca to absorb any latent moisture.
 In a small bowl combine the Sugar and Flour and whisk together briefly, then set this aside as well.

In a medium bowl, whisk AP Flour, Baking Powder, Salt and Sugar together.
 Add the Butter, cut into small pieces.
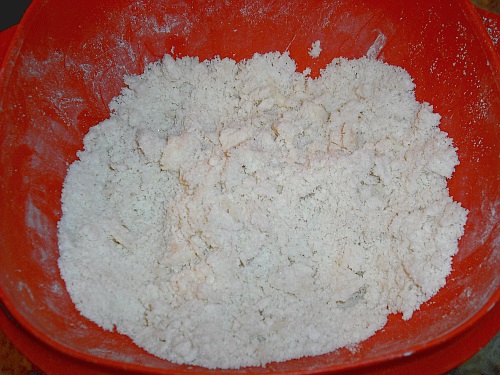
 Begin working the Butter into the flour mixture, either with fingers or a pastry cutter, until you have a cornmeal consistency.
 Add 1/2 cup of the milk to start.
 and begin stirring everything together with a fork until all the flour is moistened and a dough forms that "follows the fork around the bowl". You may need the remaining milk, but you may not. (Basically, add just enough moisture so that a soft dough forms that will cling to the fork and not the bowl)
 Roll the dough out on a WELL floured surface....
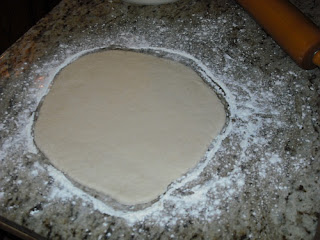 Cut 2 inch rounds.


 Pour the berries into a 10x10 CorningWare baking dish. (you can use a 9 x 9 Pyrex too)
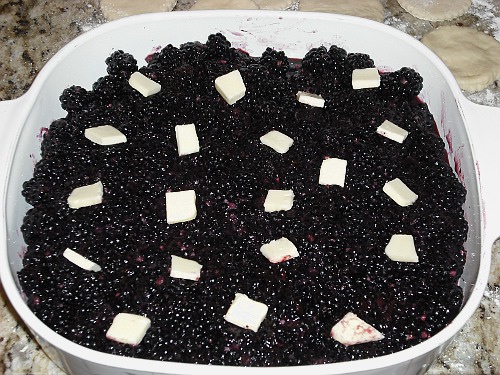
 Dot with 2 TB of Butter, cut into tiny pieces.
 Lay the Sweet Biscuit rounds on top of the berries, leaving a little room in between for the berry juice to bubble up and coat the sides of the biscuits too.
 Bake in the oven for 20-25 minutes.
 Remove from the oven and let cool on a rack for 15 minutes.
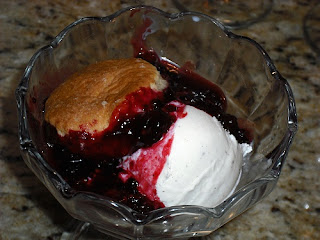
 Spoon liberally over Vanilla Bean Ice Cream and gobble it down. ;)
 Mangia!!
~~
Cobbler, the un-pie or would that be semi-pie? Perhaps partial pie? Somewhat sloppy, a little goopy, but oh, so heavenly spooned over Ice Cream. Yeah.... Childhood memories abound of picking the wild blackberries that grew along the length of the driveway (our driveway was kind of looooooong) and over in the neighbor's back pasture (Sorry, Mr. Uyetake). Those that were not immediately conveyed directly into eagerly awaiting mouths by purple fingers, would make their way into mom's kitchen. She would peruse the bounty and announce, "Looks like cobbler for dessert.", at which point we would all perform the dance of joy. (I am just kidding about that last part, but we WERE extremely happy)
Mom's preparation was at once simple to prepare, yet complex in ingredients. I say this simply because she not only used flour to thicken the berries, but quick tapioca as well. Quick tapioca is a little different in texture than the normal large, medium, and small pearl varieties. It's broken up into crystals about the size of Demerara or Raw Sugar. My assumption is that it allows it to thicken things quicker because it has no outer "skin" like the pearls do. Then again, I may be wrong. All I know for sure is that it works really well. So well, in fact, that I use it in my Marionberry pies too.
Mom's "covering" came in two forms. It was always a sweet biscuit dough (shortcake), but sometimes she dropped it from a spoon into the prepared berries (like making dumplings) while other times she would roll it out and cut disks to lay on top of the berries. Either way, it was always delicious. There is nothing quite like a berry juice soaked biscuit. I will even go so far as to say that cobbler might even better than pie. (Maybe)
Blackberry Cobbler

1 TB Quick Cooking Tapioca
Juice of 1/4 Lemon
1/2 cup Granulated Sugar
1/4 cup AP Flour
2 TB Unsalted Butter
Shortcake Biscuits (Sweet Biscuit dough)
2 cups AP Flour
1 TB Baking Powder
1 tsp Salt
1/2 cup Sugar
4 TB Unsalted Butter
1/2 - 2/3 cup Whole Milk (This will depend on the humidity of your flour)
First you need some beautifully fresh and juicy Blackberries.


See, it's all broken up, no pearls here!


Making the Biscuits......
Preheat the oven to 425 degrees.In a medium bowl, whisk AP Flour, Baking Powder, Salt and Sugar together.


Bringing it all together.....
Sprinkle the reserved Sugar/Flour mixture over the berries and toss everything together.


~~


