Showing posts with label Green Olives. Show all posts

Saturday, December 24, 2011

1970's Retrospective - Olive Cheese Nuggets

I think this is one of the most lasting recipes to ever come out of the 70's.  All three of us boys make them, and we never seem to make enough to satiate the holiday crowd.  For these have become my family's New Year celebratory icon.

I have always found it somewhat amusing that when someone is exposed to them for the first time, they always express incredulity that these tiny nuggets of heaven could be good. Then, with something that could only be construed as fear, or panic, they pop one into their mouth, and then another, and then another...

Before you know it, they are hiding in the corner with the plate in their lap, shoveling these little savory bits of cheesy goodness into their mouths and screaming for more...   LOL 

This makes a lot if you are using the small Manzanilla olives, not quite as many if you use the Queen olives. While the Queens are significantly larger, they come stuffed with Garlic or Almonds or Jalapenos or even Anchovies. So take your pick, it's up to you, get creative... Find your favorite combination.

I particularly liked the Onion/Vermouth soaked olives; but was terribly UNimpressed by the Feta stuffed as well as the Blue Cheese stuffed... They conflicted too much with the Cheddar Cheese.

Olive Cheddar Nuggets

4 oz (113g) (1 cup) shredded Sharp Cheddar Cheese, room temperature
2 oz (56g) (1/4 cup) Unsalted Butter (Softened)
3.5 oz (100g) (3/4 cup) AP Flour
1/8 tsp Kosher Salt
1/2 tsp Smoked Paprika
A pinch of Cayenne pepper
34-ish Pimento stuffed Manzanilla Olives or 18-20 Queen Olives (stuffed as you like)

With an electric mixer, blend softened Butter with shredded Cheese until fluffy.

In a separate bowl, whisk Flour with Salt, Paprika and Cayenne.

Slowly add the Flour mixture to the Butter/Cheese mixture......

Stirring until a soft dough is formed.

Wrap the dough in plastic wrap and chill for 1 hour

OK, this is the hard part.....
Preheat the oven to 400 F (205 C) degrees.
Dry your olives well, or you will have a hard time doing this; the dough will not stick to the olive at all.  They will soak up the excess brine and become gooey.

Take a small amount of dough (about a 1 1/2 tsp) and wrap it around the olive, to completely encase it.

Set the nuggets on a parchment lines baking sheet.

At this point, they may be covered in plastic wrap and stored in the refrigerator for up to 24 hours, however, they must be brought to room temperature before baking (1 hour on the counter)

Bake for 12 - 15 minutes. (usually 12 minutes with Manzanilla Olives and 15 minutes for Queens)

Serve to your incredulous guests, but watch carefully to make sure no one snitches your serving tray.
Mangia!!
~~

Saturday, November 26, 2011

Devilishly Delicious - Grandma's Deviled Eggs

There are many, many, many recipes for Deviled Eggs.  In fact, I have about 7 different iterations in my repertoire that I have made for various occasions.  (Tarragon Mustard is REALLY good) But 'tis the season for celebrating family foods.  Thus I am presenting to you, one of our Thanksgiving staples....   Grandma's recipe for deviled eggs.  (Yes, I am aware that they kind of look like eyes)  LOL  But they are still tasty.

Grandma's Deviled Eggs

As many large Eggs as you are willing to boil.....
Kosher Salt
Black Pepper
Best Foods (Hellman's) Sandwich Spread
Sweet Paprika
Manzanilla Green Olives (the little ones)

First you need to boil and peel eggs... This, in and of itself, can be a pain in the proverbial booty.
This is how I boil eggs to ensure that a) they peel correctly without the membrane sticking and b) that I don't end up with green sulfurous yolks.

Place eggs in a stock pot and cover with cold water.

Place over medium-high flame and bring to a boil.

Cover and remove from the flame, letting them sit in the hot water for 10 minutes. (only 10 minutes)

While they are hangin' out in the hot water it is time to prepare an ice bath.

Using a spider or a slotted spoon, move the eggs from the hot water to the ice bath.  This will shock the eggs and do two things...

It will stop the cooking immediately (this is good in 2 respects as it ensures that your whites will not be rubbery and your yolks will not turn green with sulfur compounds)

It shocks the interior membrane between the shell and the white, making releasing of the shell a much more pleasant eggs-perience. :)

Once the eggs have completely chilled, it's time to crack and peel.  I personally am a tap and roll kind of guy.  Meaning, I tap them on the counter, all the way around the egg, then kind of roll it with a little pressure to break the shell into tiny bits.

Once I start peeling, because the shocked membrane adheres to the shell and not the white, I usually find that most of the shell comes off in 1 piece.

Continue in this way until you have a whole slew of beautifully peels eggs.
Now the fun part.
When it comes time to split the eggs in half, I grab the sharpest knife I own...  My filleting knife. (with an edge as fine as frog hair)

Slice each egg down the center, lengthwise, and pop the yolks out into a bowl and set the whites in an "deviled egg" container, or on a plate. (I forgot to shake the eggs and center the yolks before boiling)

Once you have halved all the eggs and removed all the yolks, go ahead and smash the yolks with a fork into a fine "meal".

Now it's time to add the secret ingredient... Best Foods sandwich spread (it saves a step, cause the pickle relish is already in it)

This is the bad part, there is no set amount... But to give you a ball park figure, I boiled 19 eggs and used 1/2 of the 15 oz jar.

Mix everything together well along with Kosher Salt and Black pepper, then transfer the filling to a pastry bag fitted with a star tip.

Fill each egg....

Sprinkle with Sweet Paprika

Slice manzanilla green olives in half.

Top each egg with a green olive half.

Voila!

Mangia!!
~~

Wednesday, August 18, 2010

You Say Tomato and I Say Toemauto - Bruschetta with Rustic Tapenade

To be truthful, I don't say either.... At least when it comes to my Bruschetta (that's bru-SKET-ta, not bru-SHET-ta) Which means I should probably clear up a common misconception while I am at it.

What exactly is Bruschetta? It's simply toasted bread that has been rubbed with garlic and drizzled with olive oil, then sprinkled with a little sea salt and pepper. A super simple and easy appetizer, though it started as a way to test the freshly pressed Olive oil. Simply roasting bread over the coals, rubbing with garlic and drizzled with freshly pressed oil to check the quality.

The nice thing is, that you can add all sorts of toppings to it, but those are the proverbial "icing on the cake". The most common topping I see is a heaping pile of chopped tomatoes, onions, basil and more olive oil... which smells divine and looks even better, however being cursed with an intolerance for fresh tomatoes, I am forever denied this mini salad on toast. And I definitely must avoid the jars labeled "Bruschetta" on the grocery store shelf.

It always cracks me up when I see those mixes of tomatoes, onions an herbs marketed as bruschetta in a jar. Periodically, just to be weird, I will pick one up and examine it closely, then exclaim fairly loudly, making sure everyone in the aisle can hear, "I don't see any toast in this jar!!" I think this might be why I had to leave Southern California; I was frightening the natives.

A-hem --

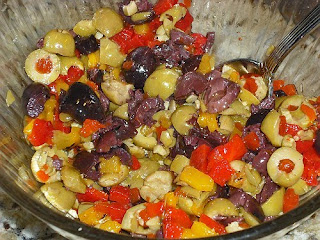
Anyway, socially alienating personality quirks aside, in order for me to achieve Bruschetta Nirvana, it became necessary for me to devised another form of "Bruschetta Icing" as it were. A little Fire Roasted Red Pepper, a few olives and I had myself a nice rustic tapenade (minus the Anchovy) which seems to work well for me... Heck, you can even add a little Chevre if you like.

Bruschetta with Rustic Tapenade

1 Baguette
a couple cloves of Garlic
Extra Virgin Olive oil (you are gonna want the good stuff for this one)
1/2 cup Manzanilla Green Olives
1/2 cup Kalamata Olives
1/2 cup Diced Fire Roasted Peppers
More Extra Virgin Olive oil
Sea Salt
Black Pepper
optional - Chrevre

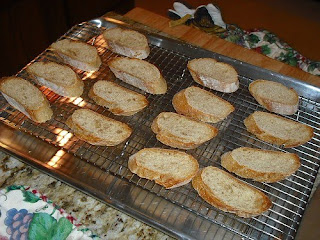
Slice your baguette at an angle (this gives you more surface area on a slice) about 3/4 inch thick.

Lay the sliced out on a rack, set in a jelly roll pan.

Place in a 400 degree oven for about 15 minutes or until "toasted"

Meanwhile....

Chop the Fire Roasted Peppers and olives.

Place everything in a small bowl, and drizzle with olive oil, tossing to coat.

Remove the "soon-to-be-Bruschetta" from the oven and rub each piece with garlic (I used a whole head with the top cut off, cause I was in a hurry and it's a heck of a lot faster)

Drizzle Extra Virgin olive oil all over the slices then season with Sea Salt and Black Pepper.

Now anoint each Bruschetta with a spoonful of the olive mixture and drizzle with a little more olive oil.

Serve....
If you like, add a few crumbles of Chevre, then return to the oven for 5 minutes.

Just until the cheese becomes a little soft.

Then serve... Yeah, I put WAY too many on the plate... But I was hungry so I wasn't thinking... LOL

Mangia!!
~~

Friday, August 7, 2009

Pizza with Pizzazz - Pesto Pizza with Artichoke, Mushroom & Garlic Stuffed Green Olives

Just in case no one has noticed, from the myriad posts preceding this one, such as:

Eggs-periencing Divinity - Pizza alla Eggs Benedict
Of Pizza,Things and a Canceled Trip to Palm Springs
Pizza With a Peel
Move Over Bagel, Now There's Something Flatter - "Bagel and Lox" Pizza
A Plethora of Pizza
Food Forward - Roasted Potato and Pancetta Pizza
I'm so Dizzy, My Cheese is Spinnin' - Mozzarella Mania Part 3

I LUV Pizza. Not Pizza Hut, Not Domino's, Not Round Table, Not even Shakey's (Are they even around anymore?). I LUV Homemade pizza. And while I am usually a stickler for homemade crust, for you must start with a good foundation, as well as trying to use the freshest ingredients possible... right down to making my own Mozzarella and growing San Marzano Tomatoes and Basilico Nepolitano (Basil from Napels) for Pizza Margherita. I am not above using the Trader Joe's Pizza dough from the refrigerator case or using a good pesto from a jar (as long as it's made with Pine Nuts and Olive oil instead of Cashews and Canola/Soy oil).

Thus was the case this evening, for it has been a somewhat stressful and sleepless week (more on that in another post), and now it's so hot in my apartment that I am considering just setting out my pizza stone out on the counter and letting it come to room temperature for Pizza Cook-age. OK, MAYBE I am exaggerating a little bit... in all honesty, not by much. Be that as it may, I am tired of waiting to make pizza, so I am heating my stone up to 550 degrees, ther by raising the ambient temperature of my kitchen to 642 degrees... And I will enjoy my pizza, right before I have heat stroke. HA!

This whole pizza is the product of either a package, a can, or a jar, well, that is aside from the mushrooms. All items, even the Pecorino Romano, were purchased at Trader Joe's. Now I am not saying that it takes the whole jar, after all, you need to be the judge about how heavy you want your toppings. This is a very personal choice, and part of the reason that there really isn't a recipe for pizza. The inevitable fact is, though, that all these jars/packages/cans will have to be opened, so I am simply referring to them as a whole.

Pesto Pizza

1 pkg Trader Joe's Pizza Dough
1 jar Pesto Genovese
Cremini Mushrooms
optional - 1 jar Roasted Red Peppers, sliced
1 can Artichoke Hearts, drained and sliced in half
1 jar Garlic Stuffed Green Olives, drained and sliced in half, maybe in thirds
optional - 1 jar Sun Dried Tomatoes in Olive oil
1 Pkg Shredded dry Mozzarella (Which I forgot to put in the picture)
Pecorino Romano, grated or shredded
Cracked Black Pepper

Divide the dough into 2 small rounds, and roll fairly thin.
Coat a peel with corn meal and lay rolled dough on top, jerk the peel to ensure the dough will slide.
Spoon on Pesto and spread to within 1/2 inch of the edge.

Sprinkle with Pecorino Romano for a base.


Add Mushrooms and the optional Roasted Red Peppers (I was out, darn it), then sprinkle lightly with Mozzarella.

Lay down Artichoke halves (stems toward the center) and Olive halves,

then sprinkle with more Mozzarella and top with Pecorino Romano.

Hit it with some Cracked Black Pepper.
Slide onto a heated pizza stone coated with cornmeal and bake for 10 minutes.
Remove pizza and let sit for 5 minutes for the cheese to set.

Slice ----
and enjoy!!

I know I sure as heck did, even in the sweltering heat... The idea for this came from a skillet pasta dish I use to make using Rotini. It was such a great pasta dish; in fact, I made it for my parents during one of their visits to San Diego, and got them hooked on it. This is the first time I have combined these flavors for a pizza, but it definitely won't be the last... LOVED IT!!!!

Mangia!!
~~