Brewing Beer; Lesson 2 -
Most Americans are familiar with Hefeweizen due to small breweries like Widmer and Pyramid, though there are others that make Hefeweizen as well. That cloudy, pale golden beer of lower alcohol content, capped off with a lemon wedge... A delicious beer during the hot summer months. What most Americans are NOT familiar with is that Wheat Beer does not stop at the cloudy glass of pale gold liquid. Oh no my friends... for there is the Darker side of Hefeweizen, otherwise known as Dunkelweizen.
Dunkelweizen tends to be a little higher in alcohol, about 5.5 - 7%. It's still cloudy due to the yeast and proteins from the wheat, but unlike it's pale golden sibling, Dunkel is copper to dark amber in color. It also blends Malty Chocolate flavors with the signature Banana/Clove of the yeast. For me, this is a HefeWeizen for the cooler seasons of the year. A great Autumnal beer, right up there with the Oktoberfest brews.
Before I begin, I am going to recommend an excellent book on Home Brewing,
The New Complete Joy Of Home Brewing by Charlie Papazian. Informative, yet whimsical, Charlie breaks everything down for you and takes you through the process from start to finish. Whether you are an extract brewer, a full mash brewer or a hybrid brewer, this is the book for you. There is a newer
3rd Edition available at Amazon, but I am still using the 2nd.
There are a few other links I need to set you up with.... Those are yeast suppliers.... Both
White Labs in San Diego, CA and
Wyeast in Odell, OR (
cultivated in the shadow of Mt. Hood)
Online Hop Suppliers.....
Fresh Hops,
HopTech and
Hops to You.....
and basic Malt extracts and/or Grain suppliers at at
Valley Vinter and Brewer,
Midwest Supplies or
Home Brew It
Just in case you do not have a brewer's supply shops in your area
OK let's get this brew in the fermentor!!
But first..... You need to sanitize everything with an iodine solution... this includes not only the carboy, but all the hosing, caps and fittings.... Anything that will touch the beer "after" it has been boiled and sterilized.
You will also need at least 2 stainless steel pots... I am using a humongous 22 quart pot and an 8 quart stock pot. This is so I can not only steep, but also have a clean vessel to heat up additional water if needed as well as a pot to sparge into. Very handy....
Since I am doing a hybrid method using both cracked malted grain and a 50/50 mix of Barley and Wheat malt extracts it is necessary for me to steep the grains. This will activate the 2 enzymes in the grain that will begin breaking down the starches into Dextrines and Fermentable Sugars.
I am using a 50/50 (
yet again) mix of cracked Munich and White Wheat in a mashing bag to assist with later filtration. (
the grains must be cracked to increase surface area for the enzymes to work on - Just cracked though, not turned into flour)
Heat some water in the smaller stainless steel pot.
When it reaches 130 degrees pour in the cracked malted grains.
As the grains absorb the heat from the liquid the temperature will drop to between 115 and 122 degrees; steep for 15 minutes, maintaining the temperature at 122 degrees.
This first step is called "protein rest". I like to call it the "proto phase" cause this is the step that activates the proteolytic enzymes in the grains. These enzymes break down the longer chained proteins into much shorter amino-proteins. These proteins are needed for healthy yeast, and healthy yeast makes great beer. (
I will expand on this a little later when I cover the life cycle of yeast)
In a separate pot, heat some more water to 170 degrees. This water will be added to the grains at the end of the protein rest in order to bring the temperature up to 150 degrees.
Hold the grains at 150 degrees for about 30 minutes. This is the enzyme activation phase I. At this temperature the diastic enzyme Beta-Amylase hits it's peak working temperature and begins breaking off Maltose and Maltriose sized molecules from the ends of the starches. This Maltose (
2 glucose molecules) & Maltriose (
3 glucose molecules) will be fermented by the yeast.
Add a little more 170 degree water to bring the temperature up to 158 degrees and hold it there for 15 minutes. This is enzyme activation phase 2 and the diastic enzyme Alpha-Amylase hits it's peak working temperature. It will begin to beak down the remaining starches into dextrins (
which are molecules of 4 or more glucose molecules) that will add "body" to the finished beer. The more dextrins in your beer the "chewier" it will be. The Beta-Amylase will continue working at this temperature as well, it will just work slower.
After the 15 minutes is up, you will have a lovely mixture of grain, water, proteins, maltose and other fermentable sugars as well as nonfermentable dextrin. At this point you need to filter out the "spent" grains. If they remain in contact with the water & enzymes for too long, tannin from the hulls will begin to seep into the liquid, and while a little tannin is OK for beer, you don't want too much... Your not making Cabernet Sauvignon, that needs the tannic acid as a preservative while it ages in a cave somewhere.
This is why I like the Mashing bag, it makes removal of the grains all that much easier... So grab ends of the bag and stretch it over another pot.
Pour the 158 degree wort over the grains. (
the grains and the bag together kind of act as a filter) After this, pour a little more hot water over the grains to ensure you have complete extraction of the sugars, proteins and dextrins from the grains. This process is known as "Sparging".
Now we have Wort... And spent grains. So call up any friends who own cows, pigs, sheep or goats and tell them you have some free feed for them. LOL
Now if you took this malted liquid and placed it in a pressure chamber, dropped the pressure so that water would boil at 150 degrees, you could condense your wort into Malt Extract, complete with active diastic enzymes... But since this small amount isn't enough to make 5 gallons we need to add Malt extract (
reconstituted of course)
So place the wort you made into your largest pot, add about 3 1/2 gallons of water and heat it to 175 degrees.
While you are waiting for the wort/water to come up to temperature, go ahead and measure out your hops. Since this is a weizen beer, the hop amounts will be minimal. I used liberty (
a noble hop) for the boiling hops (
to create bitterness) and Saaz for the
finishing, though they will lend their flavor, not so much of an aroma. I would need a 3rd hop to be added to the wort 1-2 minutes before the end of the boil to extract aromas. Since this is a Weizen, I am not going to be doing this.
All tucked into hopping bags for easy extraction and sparging (
cause you sparge hops as well)
When the water reaches 175 degrees begin stirring the mixture with one hand, and pouring the malt extract in with the other. (
this prevents the heavier syrup from falling to the bottom of the pot and scorching)
Once the extract has been sufficiently incorporated, bring the whole thing to a boil and drop in the bittering hops.
You will need to boil for 1 hour. This not only extracts the resins from the hops, creating a faint bitterness, but also sterilizes the brew and shuts down any enzymatic action completely. You will want to watch the boiling wort very carefully, cause boiling wort is like boiling honey... It will boil over... Seriously... You need to watch it or you may end up with a sticky mess all over the kitchen
Once the wort has been boiling for 45 minutes, it's time to add the flavoring hops for the last 15 minutes of the boil. (
If I was using aroma hops, I would add those the last 1-2 minutes)
Also, if you are using a wort chiller (
a coil of copper pipe through which cold water is ran while it's submerged in the wort to cool it down) place the wort chiller in the boiling wort for the last 15 minutes to sanitize it.
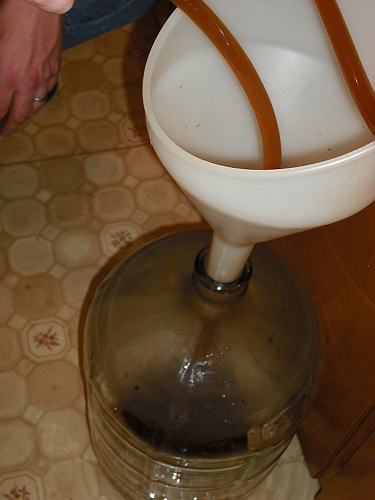
Once boiling has been completed, remove the pot from the heat, remove the hopping bags and place them in a large funnel.
Place the funnel in the top of your sanitized carboy and pour about 2 quarts of cold water over the hops to sparge them.
While the Wort was hot, I added the Elderberry juice.... I decided on juice because elderberry seeds contain tannins, and I wanted to keep that to a minimum. If you are going to use chopped fruit, add it to the hot wort after the boil is complete and steep for 15-20 minutes while the wort is 150-180 degrees. (
Never boil fruit as this will develop the pectin) Juice is a little faster as it can be simply be stirred into the wort and you can continue chilling. Look Ma! No steeping!
Add a little cold water to the Wort to assist in cooling. During the hour long boil, you will have lost about 2 -3 quarts of water.
Connect the water source to the wort chiller and turn on the cold water to chill the wort to 75 degrees as fast as possible (
alternatively, you can make an ice bath in the sink and chill the wort in the pot.)
Once the Wort is chilled to about 75 degrees....
you need to siphon it into the carboy, making sure to incorporate as much oxygen as possible. (
this will be used by the yeast during respiration)
So make sure when you are siphoning that you splash the wort as much as possible. (
this is the ONLY time you will incorporated oxygen into the beer)
Fill the carboy with fresh water to bring it up to 5 gallons.
Then, use a thief to take a sample and, using a hydrometer, check the specific gravity of your wort.
Be sure to write this number down, because you will take the gravity again later and compare the numbers to determine alcohol content. My specific gravity was 1.058 at 75 degrees.
Taste the wort that was used to test the gravity... This will teach you to identify what is in your wort versus what your finished beer tastes like... (
Very important for future reference)
Return any extra wort back to the fermentor.
At this point you may "pitch" the yeast into the carboy.
WPL300 is White Labs' Basic German Weizen Yeast, as opposed to WPL320 which is American Weizen yeast or WPL351 which is a special Weizen yeast from Bavaria.
Place a stopper on top and roll the carboy back and forth on the floor to ensure the yeast is well mixed into the Wort.
Place a copper tube in the top, with a length of hosing to be used for the Blow-off (
this usually occurs during the first 3 days)
Move the carboy to a quiet location, out of drafts where the temperature is fairly consistent and place the tube into a quart jar that is 1/2 filled with water, ensuring the end of the hose is completely submerged in the water (
this will prevent bacteria from getting into your wort) This acts as a temporary fermentation lock, but will allow the kraeusen to be expelled.
When the beer is "Blowing-Off" it will produce a bunch of foam and dead yeast at the top, which will be spewed out through the hose and into the quart jar. Trust me, you do NOT want this "kraeusen" in your fermentation lock, cause it's a pain in the butt to clean out and can possibly stick, not allowing any CO2 to escape... This can cause undo pressurization of the fermenting vessel and slow fermentation or worse, kill the yeast.
Once the beer is done with this process... Usually withing 3-4 days, remove the blow-off tube and replace it with a fermentation lock (
this allows CO2 bubbles to escape but will not allow anything to get in)
Now you just have to wait for 7-10 days before "racking" the beer into a different carboy.......
Which I will cover in the next post ...... Yeast and You
Cin Cin!!
~~


5 comments:
Looks like you have lots of special equipment to do this with. I was hoping it was a really simple process using mostly things that I have around the house. Guess I will just keep enjoying the delicious local micro-brews and help keep them in business! I hope this batch turns out to be the best beer you have ever tasted. Good luck.
The wort chiller isn't really necessary, you can use a sink full of water and ice to accomplish the same thing, it just takes a little longer. The mashing bags aren't really necessary either, cause you can simply use a mesh strainer for sparging. But the Thief, Hydrometer, Carboy (though you can use a 5 gallon plastic bucket with a lid) and Hosing for both siphoning and creating a Blow-off tube are going to be necessary. OH, and a fermentation lock to keep your beer from getting infected with bacteria. Eventually you will need bottles, caps and a bottle capper... I have never tried to cork beer, so I don't know if you can use wine bottling equipment.
I am enjoying "watching" you make your beer.
Yo dude, so cool of you to blog this! As you know, Jim brews beer too, but he only has used the "kits". So I'm sending him your beer blog series in hopes that he'll experiment more... I've told him to feel free to ask questions, that you're a personal friend of mine ;)
I would be more than happy to answer ANY questions... :) I would eventually like to start doing full mash brewing but I don't have big enough equipment for that much grain, so I have to supplement with extracts right now... LOL
Post a Comment