Showing posts with label Chocolate. Show all posts

Sunday, January 29, 2012

Oh, Oh, Oh It's Magic, Ya Know - Magic Shell

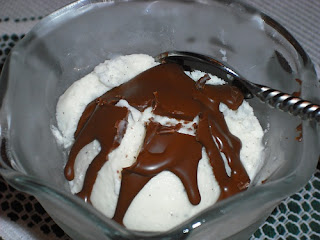
I have a guilty pleasure.  OK, I have several, but I am only going to talk about 1 of them right now.  I love Magic Shell.  You know, the chocolate sauce you squeeze over your ice cream and it hardens into a protective shell you have to crack open to reach the ice cream?   Like the "Dilly Bars" or the Dipped Cones they have at Dairy Queen?  (Though DQ doesn't taste the way it use to when I was a kid)   But it's true.  I love it over Vanilla Ice Cream... I love it over Chocolate Ice Cream.... I even love it over Coffee Ice Cream.

Did you know you can make it at home?  It's really easy, and only needs 2 ingredients.  Yes, there are more ingredients in the store versions; including,but not limited to-- cocoa powder, lecithin, and sunflower oil.  Honestly there isn't anything particularly BAD in it, per se, but I like the fact that I can whip it up at home for about 1/2 the cost.  The bonus of making your own is the possible flavor combinations.  White Chocolate and Mint oil?  Bittersweet Chocolate with a hint of Orange oil?  Maybe Milk Chocolate with Smoked Salt?  None of those strike your fancy?  How about spiking it with a little Brandy, Drambuie, Rum or Chambord? (only about 2 tsp)

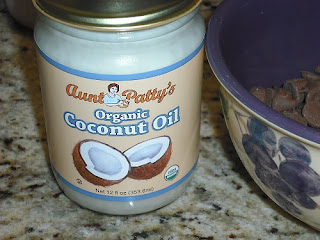
Yep, the possibilities are pretty much endless.  They key is the Coconut oil, which solidifies at 76 degrees.  Don't panic about the coconut oil, it's actually better for you than you have been led to believe.  True, coconut oil contains saturated fats, but these are medium and small chained fatty acids that are processed by the liver and used immediately for energy, they will not end up around your middle nor do they necessarily contribute to high cholesterol levels.... In fact a couple of studies have shown that Virgin Coconut oil may actually help reduce serum cholesterol.

Don't have coconut oil?  I have not tried it, but I am sure you could use a NON-Hydrogenated Shortening.  I believe Spectrum Naturals makes one.  Though your ending syrup may be a little hard at room temperature, 30 seconds in the microwave  and a little shake of the bottle should correct that.

I suggest avoiding butter in this application.  True it would probably work, but it's a little iffy.  Coconut oil and Non-Hydrogenated shortening do not contain water.  Butter, on the other hand, is up to 15% water and could possibly cause the chocolate to seize or become grainy.  Another disadvantage to butter is that the saturated fat in butter is not as healthy for you as that of the coconut oil. Butter contains longer chained saturated fatty acids which WILL appear around your mid-section and contribute to higher serum cholesterol levels.  And, well, let's face it, you're already going to be eating Ice Cream.  I'm just sayin'

Which brings me to your chocolate choices.  In this case, use anything that you would eat out of your hand.  Whether Chocolate Chips or chopped Chocolate bars.  I used Semi-Sweet Chocolate Chips mixed 1/2 & 1/2 with 63% Bittersweet Guittard chips.  Cause that's just the way I roll.  :)

Magic Shell

8 oz (227g) (1 1/3 cups) Chocolate, either chopped or in chips
2.4 oz (70g) (1/3 cup) Coconut Oil
optional 2 tsp Liqueur of your choice

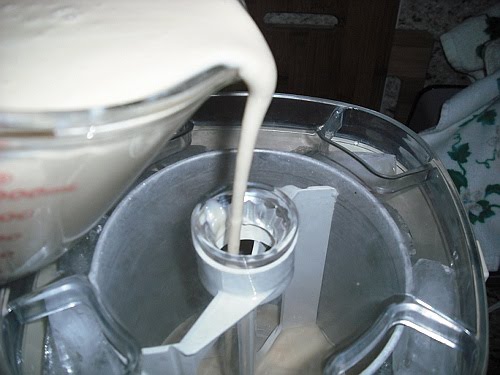
Place all the ingredients in a sauce pan over low heat, and melt until smooth. (You don't have to heat it much, the Coconut oil melts at 85 degrees and the Chocolate melts at 100 degrees)

Pour into a squeeze bottle.

Adorn your Ice Cream and the Ice Cream of those around you....  

Consume with relish. (Not pickle relish, I mean relish as in"enjoy")  LOL

Thanks to my friend Aleta for pointing out the original blog post at Skip to my Lou on FB... !  I am lovin' it.  It really is "Crazy Good and Super Easy"!  Of course, it's also kind of dangerous... LOL

Mangia!!
~~

Friday, November 5, 2010

Crème de la Crème - Andes Crème de Menthe Cookies

I was thinking the other day that I really needed to work on another cookie post.  Cookies are not necessarily my forte, but Christmas is coming soon, which means cookie season is around the corner.  Yeppers, a big plate of miscellaneous cookies is an excellent thing to have lying around during the holiday season  (Chocolate truffles will be a later post)  and cookies always make great edible gifts as well.  I mean... WHO doesn't love cookies?

So this half-baked idea of writing another cookie post has been bouncing around in my head for about a week.  Fast forward to last night...   I was meandering through Safeway when spied the display for Andes mints.  They were on sale.  I use to love them when I was a kid, but not so much anymore.  However... Next to the display was one of those mail in rebate coupons stating "If you buy 2 you can mail in the receipt and the UPC labels and receive a coupon for a free box".  I thought that was pretty cool, and decided to grab a couple boxes, along with the coupon for the mail in offer.... I figured they would make great stocking stuffers for the kids.

Then Lo and Behold!! on the back of the mail in offer was a cookie recipe for Andes Surprise Pillow Cookies.   Hmmmmmmmmmmm  interesting... Even though cookies are not my strong suit, I adore any cookie that has something deliciously yummy inside... Like Sprytes Rolo Cookies or the Barry White Cookies that were a spin off of Spryte's Rolo Cookies... Then there were the Peanut Butter Cup Cookies... Oh yeah!   Good Stuff..

So I decided to give them a whacky whirl and see how they came out.  Won't lie to ya, after following their directions, I am already trying to figure out a better way to do it... Moving the second sheet of dough over the first (you will see what I am talking about) is a pain in the buttocks.  Other than that, the cookies were quite delicious.... even though I no longer care for those mints.

But I know a certain niece that will be EXTREMELY happy when I take her some tomorrow.  She adores Crème de Menthe Pie, so I am positive that she will love these cookies.  So while she is happily chomping down on little pillows of deliciousness, I will be bottling my first serious attempt at making Beer (and yes, that post is forthcoming. I still have 127 photos to finish editing... whew!)   LOL

Andes Crème de Menthe Cookies

(Andes Surprise Pillow Cookies)

1 cup (8 oz) (227 g) Unsalted Butter
1 cup (7 oz) (197 g) Granulated Sugar
3 cups (15 oz) (425 g) AP Flour
1 tsp Baking Powder
1/2 tsp Kosher Salt
1 Large Egg
1 tsp Vanilla Extract
49 Andes Mints (2 boxes)

Before you begin, it's a good idea to prep the mints... This means a lot of tedious unwrapping.  I suppose you could use them as is, but I don't think the wrapper would be particularly tasty.
So unwrap 49 of the mints.

This will leave you with 7 for your own consumption (one of the benefits of being the chef

OK, now that the mints are taken care of, let's make some cookies; Preheat the oven to 400 degrees and, like most cookie recipes, you need to start by creaming the Butter and Sugar until light and fluffy.

While the butter and sugar are creaming, whisk the Flour, Baking Powder and Salt together in a small bowl and set aside.

Add the Egg to the Butter/Sugar mixture and beat again, until fully emulsified.

Add Vanilla and mix again.

Now begin adding the Flour mixture to the Butter/Sugar/Eggs and mix until a soft dough is formed.

I found that the dough was climbing the beaters, so I went ahead and mixed the flour in by hand with a spatula.

It worked just fine, but it takes a little more elbow grease than the mixer does.

Divide the dough into 2 equal pieces (about 445g each)

Roll out the first piece of dough on a well floured surface into a 14 x 9 rectangle.

Begin laying out the mints in 7 rows of 7.

Making sure they are as evenly spaced as possible.

Then roll out the remaining half of the dough, using a piece of parchment so you can move it later, into a 14 x 9 rectangle.

Very carefully, move the resulting sheet over to the minted sheet and lay it down over the top. (this was the hard part I was talking about, cause the dough breaks REALLY easy)

Peel back the parchment and begin lightly pressing the dough together.

Cut with a pastry wheel, pizza cutter or a really sharp knife.

Move the cookies to a baking sheet with 2 inches between each cookie.

They said bake for 7-10 minutes (I needed the full 10 minutes) or until the cookies are lightly browned on the edges.

Move cookies to a rack and allow to cool. (the chocolate inside is REALLY hot, so don't get overzealous and burn the roof of your mouth like I did)

Once cooled they are safe to eat and enjoy!!!

Mangia!!
~~

Tuesday, August 31, 2010

A Whopper of a Gelato Recipe - Malted Milk Gelato

Facebook can be dangerous. OK, Only dangerous when your friends are posting about Ice Cream and Gelato. Such sinful combinations from avant-garde Ice Creameries such as Ruby Jewel in Portland, which serves up a "Caramel with salted chocolate and fresh vanilla bean sundae with dulce de leche and chili-rosemary pecans" I mean, seriously?!?

That could SO be my last meal, and I would die a happy man.

Well, then again, there is the Blackberry Tea, and the Honey Lavender. 1 scoop of everything on the menu please... OK, make it 2.

One thing I noticed on their menu was a Malted Chocolate. OK, I can make that one and feed my need for Ice Cream or rather, Gelato. Granted my recipe is really only Malted, sans chocolate, but that's OK with me... it's really the Malt I am after anyway. I adore Malt.

Science time! I haven't done this is awhile, so bare with me.

Malt is a godsend to Bakers. Producing higher rises in yeasted products as well as providing more "browning" power and a subtle yet highly flavorful "sweetness". Yeast love Maltose, or Malt; the "sugar" that is produced by grain when it begins to sprout and the amylases enzyme begins to break down the starches in the grain. The Maltose resulting from this process is a disaccharide consisting of 2 Glucose molecules where as Sucrose, or table sugar, is a disaccharide of Glucose and Fructose. Maltose is 1/2 as "sweet" as pure glucose and about 1/3 as sweet as Sucrose (table sugar)

Malt is also the foundation of beer, allowing brewmeisters around the world to provide us with copious amounts of fermented "grain juice" in a plethora of styles. Some more "artful" than others, but it's beer none the less. For it is the maltose produced by "mashing" that gives the little yeasty beasties something to chow on and produce alcohol. In the same way, Malt, when added to baked goods, allows a different strain of yeast beast to bulk up and burp up, not alcohol, but carbon dioxide (along with several other flavor compounds that lend acidity to the dough)... providing rise. Thanks be to Malt and Yeast!

Malt comes in 3 forms... Diastic and Non-Diastic and Extract.

Diastic Malt is, in essence, the "Baking Malt" as it still contains the amylases enzyme that breaks down starches into sugars. This is advantageous for baked goods. Not only have you added Maltose to give the yeast a "shot in the arm" but the enzymes will continue to break down the starches in the Wheat (or other) flour to produce more sugars for the yeast. A very beneficial arrangement to be sure, if one wants a beautifully risen loaf of bread.

Non-Diastic Malt, on the other hand, contains no enzymes, though it can still be added to baked goods to impart it's distinctive flavor, feed the yeast and aid in browning. It is also easier for the home cook to find. This is your typical "Malted Barley Flour" in the mega mart. Though both Diastic and Non-Diastic are sprouted barley that has been dried out and ground into "flour". It is the Non-Diastic Barley Malt that is combined with Wheat flour, milk solids and sucrose sugar to create such beverage favorites as Carnation Malted Milk Powder, Ovaltine Malt and Horlicks.

Then there is the Malt Extract, which is a slightly different animal all together, and comes in both liquid (syrup) and dry powder. This is where my beer brewing knowledge comes into play. Barley (preferably) is soaked in water until the grain begins to sprout, this starts the amylases working on the starch and breaking it down into Maltose. The grain is then heat dried, which stops the sprout from consuming the Maltose and growing, but allows the enzymes to continue breaking down the starches, producing more and more Maltose.

(Just for a little more background, a starch is a long chain of glucose molecules, which is how plants not only store food {amylose and amylopectin}, but maintain their structure; for glucose is also used by plants to manufacture the cellulose in plant cell walls.)

Once the Maltose content hits a certain level, its time for "Mashing", meaning the sprouted grain is then boiled (at a specific temperature) to break down even more starch and dissolves or extracts the maltose from the grain. At this point you have a maltose saturated solution (after the grain has been filtered out) called "Wort". Now if you were gonna make beer, you would go ahead and add brewer's yeast to this liquid and let them create a nice Lager or something (you have to add some unmalted roasted grain during the mashing process to make Stout/Porter) But, if you continue to cook the wort down and reduce the water content, you can create Liquid Malt Extract (syrup) or even better, remove all the moisture all together and make Malt Extract Powder; which is what I am going to use to make my Malted Gelato.

Whew! OK, Science lesson over.

On with the Gelato!!!

To make this as Ice Cream, switch the Heavy Cream and Half & Half - Meaning use 1 cup of Half & Half with the Malt Extract Powder and use 2 cups Heavy Cream when cooking the custard. Also, run the ice cream machine for a longer period of time, until it climbs to the top of the dasher, to ensure you have incorporated enough air.

One final note, if you cannot find Malt Extract Powder, and are using either Carnation Malted Milk Powder, Horlicks, Ovaltine Malt or you have decided to go with Chocolate Malt and are using Nestle Milo or Ovaltine Chocolate Malt, I would reduce the sugar to 1/4 cup and mix it with the egg yolks. All of the products listed above contain varying quantities of sucrose sugar already.

Malted Milk Gelato

1 cup (236 ml) Heavy Cream
3/4 cup (100 g) (3.5 oz) Malt Extract Powder
1/2 cup (100 g) (3.5 oz) Granulated Sugar; divided
2 cups (473 ml) Half & Half
pinch of Kosher Salt
1 tsp Vanilla Extract
5 Large Egg Yolks

In a large bowl, combine the Malt Powder and 1/4 cup (50 g) of the sugar.

Add the Heavy Cream and whisk to combine, then set aside.

Pour Half & Half into a medium saucepan, add a pinch of Kosher Salt and the Vanilla Extract; place over medium heat and bringing the cream up to about 160 degrees.

Meanwhile, in a small bowl, whisk the egg yolks with the remaining 1/4 cup (50 g) sugar, until pale.

When the Half & Half is hot, add a ladle full (or 2) of the hot liquid to the egg yolks, while whisking constantly in order to condition the yolks and prevent scrambling them.

Once the Yolks have been heated through, pour the Yolk mixture into the sauce pan.

Return the saucepan to the stove and continue cooking, while whisking constantly, until the mixture reaches about 185 degrees; or the mixture coats the back of a spoon.

Remove the custard from the flame and pour through a fine strainer into the Malt/Heavy Cream mix.

Whisk everything together and then place in an ice bath, stirring occasionally until the mixture is chilled.

Cover with Plastic wrap on the surface and chill at least 8 hour. (the colder the custard is, the smoother the final product from the churn)

Prepare your ice cream maker.... Whether a frozen bowl type or one that needs ice and rock salt... Then turn it on and get it spinnin.

Remove the mixture from the refrigerator and break it up slightly with a whisk.

And pour in the custard while the machine is running. (this is an important step, it prevents lumps)

Churn until smooth and frozen.

Depending on your ice cream maker, this may take any where from 20 to 30 minutes.... For a more gelato consistency, I stop the churn when it reaches almost to the top of the dasher, this keeps it from incorporating too much air, like ice cream. For ice cream, I let it climb over the top of the dasher to ensure it has been properly aerated.

Remove the dasher and spoon the gelato into a container, then freeze for at least 8 hours.

Now is the time to fold in any chocolate bits or broken whoppers, if you like.

(I don't care for "stuff" in my gelato/ice cream, especially chocolate pieces and such, for I find the waxiness of frozen chocolate displeasing; thus I forwent any additions at this point)

BUT, I do enjoy things on top of my Gelato.

A little Chocolate Syrup and a few broken Whoppers fit the bill quite nicely.

However, I have an even MORE grandiose plan for this deliciously creamy and "malty" frozen treat. Let's just say, that the "Black & Tan" is getting a make over... Stay tuned........

Mangia!!
~~

Malted Gelato on Foodista