Showing posts with label Sea Foam. Show all posts

Monday, January 17, 2011

I See Sea Foam - Sea Foam Frosting

Few things on the planet are as delicious as Sea Foam (Hokey Pokey, Cinder Toffee, Sponge Toffee, etc.)  But, when you combine the deliciousness of Sea Foam and the fluffy marshmallowy goodness of 7 minute frosting.  Stop the bus, cause I am getting off here!

Sea Foam Frosting is sometimes referred to as Penuche frosting.  Whatever you want to call it, it's just yummy.  I have given up on using pasteurized whites for this, simply because I find that with only 2 egg whites and so much 235 degree syrup, the temperature is well above the 140 degree mark, so the whites are getting "cooked" plenty well enough. The nice thing about this is that fresh whites whip up higher than pasteurized ones do.  Thus, a more fluffy frosting.

Now if you will excuse me, I have to go bury my face in the bowl.   :)

Sea Foam Frosting

1 1/2 cups Dark Brown Sugar, Packed
1/3 cup water
Pinch of Kosher salt
2 Egg Whites
up to 1 tsp Vanilla (I usually leave it out)

Place Dark Brown Sugar, Water and salt in a medium saucepan over medium flame. (it doesn't look like there is that much in the pan, but when it starts to boil, it will foam a lot)

Stir the mixture until it comes to a boil then place a thermometer in the mix an let it boil until it reaches 235 degrees (you need to cook the brown sugar a little longer than the regular granulated sugar used in normal 7 minute frosting)

Place the egg whites in the bowl of an electric mixer with a whisk attachment, and wisk them to stiff peaks.

When the syrup is at temperature, remove the thermometer and turn the mixer on medium, slowly pour the dark syrup into the egg whites, being careful not to hit the whisk or the side of the bowl. (you don't want shards of sugar crystals in your frosting)

When all the syrup has been incorporated, beat for 1 more minute, then switch out the whisk for the paddle attachment (it just works better at this point)

Continue beating for at least 7 minutes, or until the frosting cools to room temperature.

What you will have is a delicious fluffy brown sugary frosting (similar in texture to marshmallow cream)

Use the frosting immediately.  No crumb coats or anything like that, as this frosting cannot be refrigerated and must stay at room temperature.

Just pile it all over whatever cake you have "lion" around.

In this case, a Baker's Cut-up cake design for my nephew Weston's 4th birthday.   These were the cake patterns my mom and grandma used while I and my brothers were growing up, yielding things like fish, turtles, giraffes, rocking horses, penguins, elephants, & various other animals like my nephew's lion.   LOL 

This one is made from Chocolate cake, with Sea Foam Frosting and a mane of Toasted Coconut;  almost like a Violet Crumble in reverse (chocolate covered in sea foam, as opposed to sea foam toffee covered in chocolate)   Add a few licorice legs and a tail with a seafoam frosted marshmallow, a gum drop nose, ear and tongue and your good to go.

Mangia!!
~~

Thursday, December 9, 2010

Space(Bag), The Final Frontier - Sea Foam and a Vacuum Cleaner

Every once in awhile I kind of step off the deep end.  I have to blame it on Heston Blumenthal, the original Culinary Alchemist. In my defense I had no idea who he was when I started this blog back in 2008.  I was working on writing a cook book called "Culinary Alchemy" (which I really need to get back to finishing).  Somewhere along the lines, I found BakeSpace and chose "culinaryalchemist" as my member name; then when I started this blog I just ran with it.... Then I found out about Heston.  oops...  I will concede that Mr. Blumenthal is THE Culinary Alchemist.  LOL

Anyway, I was watching his "In Search of Perfection" show on the Planet Green a few months ago and he was making a Black Forest cake.  One of his little tricks was making aerated chocolate.  OK, I will admit that the idea of using a Space Bag and a vacuum cleaner along with a nitrous powered Si whip was an appealingly idea that spoke to my inner mad scientist.  Thus I was glued to the television screen like a a teen age boy watching a Victoria Secret commercial.  (OK, maybe that was a bad visual; Sorry)  It was something I REALLY wanted to try at some point in the near future....  I had a few Aero candy bars when I was in London, so I figured I could make them at home, cause I miss them.

Fast forward 3 months and now it is the Holiday season.  I have a Space Bag, and of course I have a vacuum cleaner and an Si Whip but I have yet to actually step into the kitchen and perform a little aerated chocolate magic.  However, since I need to make Sea Foam candy for my aunt this year (cause it's tradition now) I got to thinking (which is always slightly dangerous).  If the Space Bag can be used to lower the atmospheric pressure and allow the "Nitrous" to expand, then why couldn't it be used in conjunction with the CO2 that is produced during the Sea Foam process?   Since my High School Chemistry teacher wasn't available (Ms. Collins was an awesome teacher)  I decided to just throw caution to the wind and go for it.... There was only one slight problem gumming up the works.  With Chocolate, which is only at about 105 degrees, all I needed was a plastic container to place the chocolate into.  Sea Foam is 300 degrees, thus I needed something metal or glass in order to withstand the heat AND it had to have a lid.  Oh bother!

Luckily, this evening, I found a 9x9 square glass pan with a vented lid at Ross for a song...  AWESOME!  So laughing maniacally to myself (I think I scared several people while in the checkout), I purchased the baking dish and hurried home to begin my candy machinations.   Muah ha ha ha!!!

The recipe is the same as the Sea Foam recipe I posted last year, though the method is a little more bizarre.  But I subscribe to one simple philosophy in the kitchen..... NO FEAR!!!!

Sea Foam and a Vacuum

1 cup (200 g) Granulated Sugar
3/4 cup (146 g) Light Brown Sugar
1/2 cup (8 TB) Corn Syrup
1/4 cup (4 TB) Water
1 tsp Vanilla Extract
1 TB Baking Soda
Aluminum Foil
a little butter
1 Medium or Large Space Bag
1 Vacuum Cleaner (with a hose attachment)
1 Dish Towel (to protect the bag from the heat of the glass pan)

Combine Granulated Sugar, Brown Sugar, Corn Syrup and Water in a large sauce pan. (The larger the better)

Bring to a boil over medium low heat,

then cover for 2 minutes.

Remove the cover and insert a candy thermometer.

Continue boiling until the syrup reaches 300 degrees F (149 C)

Meanwhile, line the 9 x 9 pan with Aluminum foil.

Rub liberally with Butter and set aside.

Place a folded towel into the space bag to protect it from the heat of the pan.

Make sure your vacuum cleaner is nearby.
When the syrup is at 300, remove it from the heat and stir in the vanilla.

OK now this is the fast part, so you will have to be quick.

Sprinkle the baking soda over the syrup and quickly stir it in (with a spatula, not a whisk - I goofed) to fully incorporate it. (the candy will begin to puff up and change color in the process)

Spoon it into the prepared baking dish.

Slap the cover on it and move it quickly to the Space Bag, on top of the towel. (the longer this takes, the hotter the pan will get and you may burn yourself)

Seal the bag up and apply the vacuum cleaner, sucking out all the air. (you really need to be quick, as soon as the candy begins to cool it becomes more viscous, the more viscous the less expansion you will get)

You will notice that the candy will continue to expand as the air is removed.  (The syrup expanded and raised up, sticking to the lid.)
Seal the "vent" on the bag quickly and let the candy sit until completely cooled and hardened.

Remove from the bag and remove the candy by the aluminum foil.
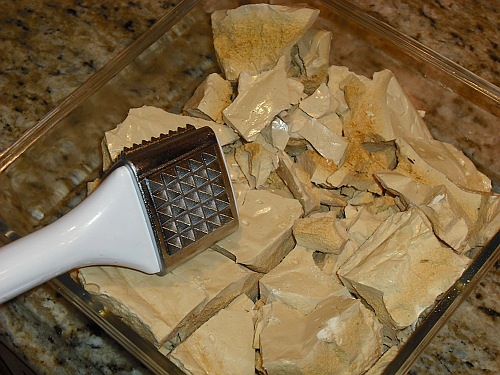
Peel off the foil and smack the candy block with a meat mallet to break it up.

Voila!  Sea foam candy!

It came out very well.  Mush more tender and crispy; not quite as "crunchy" as it normally is.  I was so impressed with the results, that this is now officially my new process for making Sea Foam.

Heston Blumenthal, you ROCK!   Thanks for the inspiring idea!!!!  Eventually I will do this will chocolate.   Any excuse to get all crazy in the kitchen.  LOL

Mangia!!
~~

Sunday, December 27, 2009

I See Sea Foam By The Sea Shore - Sea Foam Candy

'Tis the season for homemade candy gifts for loved ones. The question, however, is whether the weather is cooperating and remains dry. And yes, today the east wind is howling out of the Columbia River Gorge and things have become very VERY dry indeed... Which is awesome for candy making! Woo Hoo!

My Auntie Patsy LOVES Sea Foam candy (for those living on the west coast of the U.S. of A). Sea Foam has many, many names though. It is known as Fairy Food or Angel Food Candy in Wisconsin and Sponge Candy in New York, Pennsylvania and Canada. Other parts of the globe refer to it as Cinder Toffee, Sponge Toffee, Honey Comb, Puff Candy, Hokey Pokey or Yellow Man. It is even sold commercially under the names of "Violet Crumble" in Australia (Though it doesn't contain violets in any way shape or form) and "Crunchie" in Britain.

Ingredients vary slightly from place to place. Most use Brown Sugar, Corn Syrup (Whether light or Dark) and Baking Soda... Those are the basic ingredients. Sometimes it's made with Honey; other times vinegar or Molasses are added to increase the acidity. Me, I use a combination of Granulated Sugar, Brown Sugar and light Corn Syrup with a little vanilla and the "ever present in order for this to work", Baking Soda. It ain't too pretty, but it sure is tasty.


Sea Foam Candy

1 cup (200 g) Granulated sugar
3/4 cup (146 g) Light Brown Sugar
1/2 cup (8 TB) Corn syrup
1/4 cup (4 TB) Water
1 tsp Vanilla Extract
1 TB Baking Soda.

Line a 9x9 baking pan with aluminum foil, then lightly butter the foil and set aside.

In a LARGE (and I DO mean large) saucepan, cook the sugar, corn syrup and water over medium flame till the sugar dissolves and the mixture comes to a boil.

Insert a thermometer, reduce heat to Medium-Low and continue cooking, without stirring, until it reaches hard crack stage. (300 F, 149 C) Be a little careful, cause it can scorch... Low and slow is the key to cooking the syrup to the proper temperature without burning it.
If crystals begin building up on around the rim, simply brush the crystals down with a pastry brush dipped in warm water.
Once the syrup reaches 300 degrees, remove from the flame, stand back a little (cause it will sputter a little) and add the vanilla, then the Baking Soda (This is when the fun begins, so pay close attention)

The mixture will foam up FAST so stir it only briefly (5 seconds - to distribute the Soda as thoroughly as possible) with a spatula and pour into the prepared baking pan. (making it IMPOSSIBLE to take a picture in the middle of this)

Let it sit for two hours to allow it continue to puff and harden.
After it has cooled, you can break it into chunks and dip in melted chocolate if you like, to help make it look a little "prettier".

I am not doing that, cause it's all about the Sea Foam, not about the chocolate...

That delicious brown sugary molasses toffee flavor with a delicately crispy texture is what it's ALL about baby!!

Mangia!!
~~