Showing posts with label Brown Sugar. Show all posts

Tuesday, July 9, 2013

First Apples of the Season - Yellow Transparent Crumble

Sorry I have been absent for so long...   Corningware411 has been keeping me uber busy and there have been some "challenges" going on since returning from the Snake River.

But that is not what this post is about... This post is more exciting than that; for it has finally happened!  The very first apples from my parent's trees have arrived.  The time is NOW for the Yellow Transparent.  A very small apple with very BIG flavor...

The only problem with them is that they cook down into applesauce very easily, so though they are one of the most flavorful of tart apples, they don't hold up well in pie. (that title really belongs to the Newtown)  But if you don't mind slightly saucier apples, they work great for things like Buckle, Crisp, Crumble, Grunt, Slump, Pan Dowdy and Brown Betty.  Oh yes...  and that is exactly what I am gonna do....  Wait!  I am not making all of them, just the Crumble.

I think of all of the above, the Crumble is my favorite.  The oatmeal in the topping makes me feel like it's somewhat healthy.  True, it's a stretch, but that's my story and I'm stickin' to it.

If you are using Yellow Transparent apples for this, you will need 2 extra cups, simply because they cook down so much.  With most other apples, except maybe Gravenstein (which it's still a little early for), you will only need 4 cups.

Yellow Transparent Apple Crumble


1/3 cup AP Flour
1 cup Rolled Oats
1/2 cup Brown Sugar
1 tsp Cinnamon
1/2 tsp Salt
4 TB Unsalted Butter
6 cups Yellow Transparent Apples, diced (or 4 cups of Newtown/Winesap/Stayman/Suncrisp)
1 TB Lemon Juice

Preheat the oven to 375F degrees and butter an 8 or 9 inch round baking dish.

Combine Flour, Oats, Brown Sugar, Cinnamon and Salt in a small bowl, tossing to combine.

Add the Butter....

and work it into the mixture with your fingers until crumbly.

Peel, slice and dice the apples, then toss with lemon juice to prevent browning.... (some apples brown significantly faster than others, as is apparent with the Yellow Transparents).

Pour apples into the dish.

Sprinkle the crumble topping all over.

Bake for 30 minutes.

Cool to room temperature before serving. (I actually like it warm, over Ice Cream.  Alas, I was out.... Poor planning on my part)


Be that as it may, the tart apples are an excellent foil for the sweet crunchy bits on top.
It may not be very pretty, but it sure is tasty!  Even without the Ice Cream.


Mangia!!
~~

Friday, February 1, 2013

Out of The Mouths of Babes - Blood Orange Cardamom Upside Down Cake

Children never cease to amaze me.  Just about the time I think they have been completely brainwashed by cartoons and video games they pop out with sudden flashes of insight regarding things you would never think they are paying attention to.

Such was my experience with my 8 year old nephew, Wyatt, at New Seasons Market.  He had been staying out here, so when I took him home I swung into the Happy Valley store on Sunnyside road to pick up a few things before depositing him at his abode.  New Seasons always has little brightly colored bits of paper with suggested recipes lying around the produce section; at least the Happy Valley store does.  When we first walked in, I took a quick look at some of their suggestions.  While I am a fan of golden beets, the red beat salad with cannellini beans just didn't sound all that appetizing to me.  Unbeknownst to me, my nephew was doing some perusing of his own. 

He walked up and handed me a bright orange piece of paper that read "Orange Cardamom Upside Down Cake".  I looked at him and asked, "What's this?"

He rolled his eyes and said, "It's a cake recipe Uncle Shane.  Duh."

I mouthed an "Oh" at which point he piped in with, "You should probably make it with blood oranges though, cause they taste better."

I looked at him a little strange at this point, wondering where, when and how he knew anything about blood oranges.  But before I could say anything he continued, "The recipe uses a cake mix, but I am sure you can make something much more delicious, cause cake mixes are gross."

At this point I started looking around for a hidden camera.  Who was this 8 year old adult person talking to me in the grocery store?

I regained a small amount of my composure and simply asked, "Do you know what cardamom is?"

To which he replied, "Of course.", adding, "It makes food taste better." with no small mount of self-satisfaction.  "But you have to wait to make it when I come and visit the next time."

AH-HA!   And there it is.

So here is the recipe from New Seasons Market, with some much needed changes. After all, my nephew speaks the truth.  Cake mixes are gross.  By "gross" I mean filled with all sorts of unnatural products that no human should really be eating.  Like DATEM, Monosodium Glutamate, Palm Kernel Oil, Hydrogenated Soybean oil.....  You get the idea.    An Upside down cake is a fairly simple type of cake, so using a cake mix is kind of silly anyway.  Think, "Making Cookies" with just a little more liquid, and you have the idea.

Blood Orange Cardamom Upside Down Cake

Topping: (or what will be the topping, but starts out as the bottom)
4 TB Unsalted Butter
3/4 cup Brown Sugar
1/2 tsp ground Cardamom
1/4 tsp Kosher Salt
4-5 medium Blood Oranges
optional - small can of Mandarin Oranges

Cake:
1 1/2 cups AP Flour
1 tsp Cardamom
1 tsp Baking Powder
3/4 tsp Kosher Salt
1/4 tsp Baking Soda
 6 TB Unsalted Butter, room temperature
1/3 cup Brown Sugar
1/3 cup Granulated Sugar
2 large Eggs
1/2 cup Buttermilk
1 tsp Orange Blossom Water
1/2 tsp Vanilla
zest of 1 Blood Orange

You will want to cover the bottom of a 9-inch spring-form pan with foil to ensure there is no pan leakage in the oven (the bottom seam is not exactly water tight - a fact I learned the hard way)

Place the butter in a small sauce pan and melt it over medium flame.

Once melted, add the brown sugar and salt, stirring to combine.

When the mixture is all nice an bubbly, add the Cardamom and stir again.

Pour the mixture into the prepared spring-form pan and spread around with a spatula.

Zest one of the oranges before you begin.

"Supreme" all the Blood Oranges. (slicing off the peel and cutting between the membranes to remove the segments)

Lay them either in concentric circles, or in a slightly overlapping circular pattern, the later will crate a sort of "Flower Petal" look.  (If you like, you can use 4 Blood Oranges and add optional mandarin oranges around the edge, just for contrast)
OK, now on with the cake. So preheat the oven to 350F degrees.
Combine AP Flour, Cardamom, Baking Powder, Baking Soda and Salt in a small bowl, and whisk to combine.

Combine Butter, Brown Sugar, and Granulated Sugar in the bowl of an electric mixer and beat until light and fluffy.

Add the Eggs, one at a time, beating well after each addition.

Measure out the Buttermilk and add the Orange Blossom Water, Vanilla and Orange Zest.

Add half of the flour mixture, blending well, followed by the buttermilk mixture and continue beating.

Add the remaining flour mixture and beat until nice and thick.

Carefully spoon the batter into the spring-form pan, spreading gently with a spatula if necessary.

Bake for 35-40 minutes.

Immediately turn the pan upside down onto a cake plate.

Remove the pan and Voila!

One Blood Orange Cardamom Upside Down Cake!

Tasty and kind of Perty.  :)
 
Mangia!!
~~

Saturday, July 2, 2011

Which side is YOUR Scotch Buttered on? - Butter Scotch Syrup

There is a lot of confusion out there regarding Butterscotch, Caramel, and Toffee, so hopefully this will help a little bit.

Butterscotch - Brown Sugar and Butter (sometimes cream) cooked to Soft Crack stage. (It's not from Scotland and doesn't necessarily contain Scotch whiskey either)

Caramel - White Sugar (sometimes with a tiny amount of water) that has been heated to 300 degrees and begins to "Caramelize" or Brown due to a Maillard reaction.

Toffee - White Sugar and Butter (sometimes cream) cooked to Hard Crack stage. (It really is English)

With regards to that ever delicious Caramel Candy and Caramel syrup....  well depending on how they are made, they may or may not be real Caramel.  Unless the Sugar is actually "caramelized" before the addition of other ingredients (Cream and Butter in varying amounts) then they are not really caramel.

Case in point - Evaporated Milk caramels - The proteins in the milk are browning at a much lower temperature than is necessary to caramelize the sugar, thus the sugar acts only as a sweetener, because the milk would scorch if cooked past 300 degrees.  This is also why cream is used when making real caramels, because it is much lower in milk proteins, being mostly fat.

But back to Butterscotch.  Being that Butterscotch is simply a mixture of brown sugar and butter, and not the caramelization of sugar, this leaves a whole gamut of dessert deliciousness at your disposal....  From syrup and sauce to soft, chewy bits all the way to it's original confectionery form which resembles a Werther's Original.  This leads me to WHY it's called Butterscotch.  "Scotching" is the name for the process of pre-scoring hard candy after it has been poured, allowing for easier cutting once the candy has completely cooled.  I know, it's as confusing as the "Swiss" steak not coming from Switzerland, but being the name of the process of repeatedly puncturing it (swissing) to tenderize it.

Geographic misnomers aside, making Butterscotch is ridiculously simple and a great addition to your dessert repertoire. I am forgoing the original hard candy form, and seeking a softer side of Butterscotch with a sauce/syrup.  Trust me, there is a madness to my method, which will become apparent later.  As a result I will be using a little corn syrup to ensure it does not become too hard as this would be detrimental for Phase II of my master plan.  But even if you don't take this syrup to the culinary extreme that I have planned for it, it's GREAT over ice cream.  :)

Butterscotch Syrup

1 cup packed (200g) Light Brown Sugar
1/2 cup packed (100g) Dark Brown Sugar (to offset my usage of corn syrup with a little extra molasses)
1/2 cup (118 ml) light Corn Syrup
1/4 cup (59 ml) Water
4 TB Unsalted Butter
1/2 tsp Kosher Salt
1/2 cup (118 ml) Heavy Cream
optional 1 TB Lemon Juice
optional 1 TB Scotch Whiskey

Combine Brown Sugars, Corn Syrup, Water and Salt in a heavy bottomed sauce pan set over medium flame.

When the Brown Sugar has dissolved, add the Butter and stir until melted.

Add the Heavy Cream and continue stirring until the mixture comes to a slow boil.

Boil for approximately 10 minutes (no thermometer) or until the syrup, dropped from the spoon, holds a short thread.

If you are using the optional Lemon Juice and Scotch, whisk them in now.

Pour the mixture into a heat proof container and allow to cool.

If refrigerating, sauce may need to be warmed slightly. (makes about 2 cups)

Mangia!!
~~

Thursday, December 9, 2010

Space(Bag), The Final Frontier - Sea Foam and a Vacuum Cleaner

Every once in awhile I kind of step off the deep end.  I have to blame it on Heston Blumenthal, the original Culinary Alchemist. In my defense I had no idea who he was when I started this blog back in 2008.  I was working on writing a cook book called "Culinary Alchemy" (which I really need to get back to finishing).  Somewhere along the lines, I found BakeSpace and chose "culinaryalchemist" as my member name; then when I started this blog I just ran with it.... Then I found out about Heston.  oops...  I will concede that Mr. Blumenthal is THE Culinary Alchemist.  LOL

Anyway, I was watching his "In Search of Perfection" show on the Planet Green a few months ago and he was making a Black Forest cake.  One of his little tricks was making aerated chocolate.  OK, I will admit that the idea of using a Space Bag and a vacuum cleaner along with a nitrous powered Si whip was an appealingly idea that spoke to my inner mad scientist.  Thus I was glued to the television screen like a a teen age boy watching a Victoria Secret commercial.  (OK, maybe that was a bad visual; Sorry)  It was something I REALLY wanted to try at some point in the near future....  I had a few Aero candy bars when I was in London, so I figured I could make them at home, cause I miss them.

Fast forward 3 months and now it is the Holiday season.  I have a Space Bag, and of course I have a vacuum cleaner and an Si Whip but I have yet to actually step into the kitchen and perform a little aerated chocolate magic.  However, since I need to make Sea Foam candy for my aunt this year (cause it's tradition now) I got to thinking (which is always slightly dangerous).  If the Space Bag can be used to lower the atmospheric pressure and allow the "Nitrous" to expand, then why couldn't it be used in conjunction with the CO2 that is produced during the Sea Foam process?   Since my High School Chemistry teacher wasn't available (Ms. Collins was an awesome teacher)  I decided to just throw caution to the wind and go for it.... There was only one slight problem gumming up the works.  With Chocolate, which is only at about 105 degrees, all I needed was a plastic container to place the chocolate into.  Sea Foam is 300 degrees, thus I needed something metal or glass in order to withstand the heat AND it had to have a lid.  Oh bother!

Luckily, this evening, I found a 9x9 square glass pan with a vented lid at Ross for a song...  AWESOME!  So laughing maniacally to myself (I think I scared several people while in the checkout), I purchased the baking dish and hurried home to begin my candy machinations.   Muah ha ha ha!!!

The recipe is the same as the Sea Foam recipe I posted last year, though the method is a little more bizarre.  But I subscribe to one simple philosophy in the kitchen..... NO FEAR!!!!

Sea Foam and a Vacuum

1 cup (200 g) Granulated Sugar
3/4 cup (146 g) Light Brown Sugar
1/2 cup (8 TB) Corn Syrup
1/4 cup (4 TB) Water
1 tsp Vanilla Extract
1 TB Baking Soda
Aluminum Foil
a little butter
1 Medium or Large Space Bag
1 Vacuum Cleaner (with a hose attachment)
1 Dish Towel (to protect the bag from the heat of the glass pan)

Combine Granulated Sugar, Brown Sugar, Corn Syrup and Water in a large sauce pan. (The larger the better)

Bring to a boil over medium low heat,

then cover for 2 minutes.

Remove the cover and insert a candy thermometer.

Continue boiling until the syrup reaches 300 degrees F (149 C)

Meanwhile, line the 9 x 9 pan with Aluminum foil.

Rub liberally with Butter and set aside.

Place a folded towel into the space bag to protect it from the heat of the pan.

Make sure your vacuum cleaner is nearby.
When the syrup is at 300, remove it from the heat and stir in the vanilla.

OK now this is the fast part, so you will have to be quick.

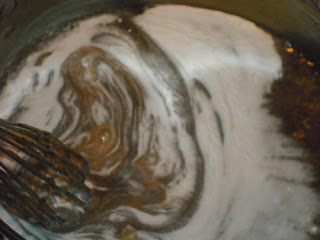
Sprinkle the baking soda over the syrup and quickly stir it in (with a spatula, not a whisk - I goofed) to fully incorporate it. (the candy will begin to puff up and change color in the process)

Spoon it into the prepared baking dish.

Slap the cover on it and move it quickly to the Space Bag, on top of the towel. (the longer this takes, the hotter the pan will get and you may burn yourself)

Seal the bag up and apply the vacuum cleaner, sucking out all the air. (you really need to be quick, as soon as the candy begins to cool it becomes more viscous, the more viscous the less expansion you will get)

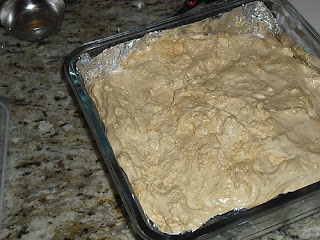
You will notice that the candy will continue to expand as the air is removed.  (The syrup expanded and raised up, sticking to the lid.)
Seal the "vent" on the bag quickly and let the candy sit until completely cooled and hardened.

Remove from the bag and remove the candy by the aluminum foil.
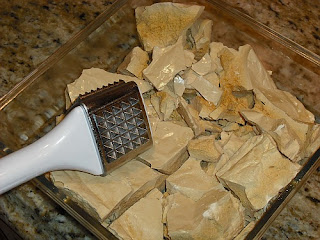
Peel off the foil and smack the candy block with a meat mallet to break it up.

Voila!  Sea foam candy!

It came out very well.  Mush more tender and crispy; not quite as "crunchy" as it normally is.  I was so impressed with the results, that this is now officially my new process for making Sea Foam.

Heston Blumenthal, you ROCK!   Thanks for the inspiring idea!!!!  Eventually I will do this will chocolate.   Any excuse to get all crazy in the kitchen.  LOL

Mangia!!
~~