Showing posts with label Birthday. Show all posts

Wednesday, September 21, 2011

Hoppy Birthday Little Bro! - Tres Leches Cake with Sugared Hops

It's that time of year again.....   My little brother just aged another year.  And just like last year, he decided on a Tres Leches cake.  Last year, when I made it for him, I kept the decor on the utilitarian side however, in lieu of the fact that he has become quite the biermeister over the last year, I decided that a little celebration of his beer making prowess was in order.

In the quest to improve his beer, he decided to grow his own hops this year.  Cascade, Willamette, Saaz, Hood, and Kent Golding to be exact.  SO, when he wasn't looking, I denuded his Hop plants of a few leaves and the one lonely hop flower that was overlooked during harvest. (It's OK, he's already harvested this year's crop and the plants will begin dying back in another couple weeks).

A little reconstituted Meringue Powder from Wilton, a Paint Brush and some Granulated sugar...

...and you have the perfect cake decorations for one who, for all intensive purposes, is a hop-head. (Yes, he is an IPA, NWPA fanatic)


HOPPY BIRTHDAY LITTLE BRO!!
~~
Sunday, January 23, 2011

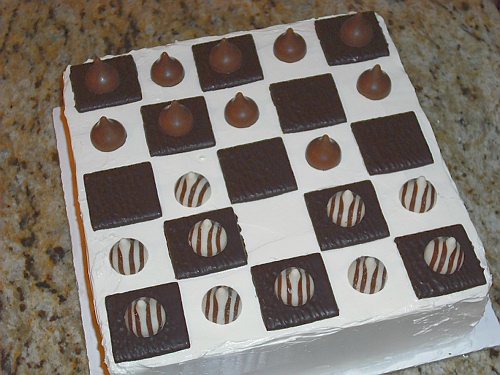
It's Your Move - Chocolate Mint Checker Board Cake

Back in the olden days of my youth, the only January birthdays in my family were myself and my younger brother (as opposed to my young-est brother)  Yep, I am the oldest of the three, and as of Tuesday last week, I just got older.  (sigh

We grew up, eventually, and my youngest brother (as opposed to young-er) married a January "baby".  Cool, one more January birthday in the middle of winter...  Then my younger brother (as opposed to young-est) had 2 kids, BOTH of which were born in January.  So now, all of the sudden,  we are celebrating birthdays from the ides of January onwards, being the 13, 18, 24, 25, 29.

But we have trimmed down on the Birthday cakes a little.  I had brownies, my younger brother wants Cherry Pie and my sister in-law wants Rolo-cookies.   LOL  But there is still one nephew left, and this was his cake.

Normally he's a chocolate and cherries kind of kid.  So I assumed that he was going to ask for a Black Forest Cake, like last year (The same as his older brother had in October).  But he surprised me by asking for a Chocolate and Mint cake (Evidently he has developed a taste for York Peppermint Patties)  So this is what I came up with, sort of a York Peppermint Patti in reverse, using the same "base cake" that I use for the Fleur de Sel Caramel cake that I found in the Bon Appètit magazine a couple years ago.

Chocolate Mint Checker Board Cake

2 cups (14 oz) Granulated Sugar
1 3/4 (8.5 oz) cups AP Flour
3/4 (2.5 oz) cup Natural Cocoa Powder
1 1/2 tsp Aluminum Free Baking Powder
1 1/2 tsp Baking Soda
1 tsp Kosher Salt
2 large Eggs
8 TB Unsalted Butter, melted
1 cup Hot Water
1 TB Espresso Powder
1 cup Whole Milk
1 tsp Vanilla Extract
Mint Italian Buttercrème
Mint Chocolate Buttercrème filling
1 box After 8 Mints
15-20 Hershey's Kisses (Milk Chocolate or Caramel filled)
15-20 Hershey's Kisses (White Chocolate ones)

The best way to go about this cake is to have everything in the ready, cause it all comes together REALLY quickly in the mixer, SO...... Preheat the oven to 350 degrees.

Butter the bottom only, of two 9-inch square cake pans, line bottoms with parchment paper then Butter and Flour the parchment; set aside.

So, sift Sugar, Flour, Cocoa Powder, Baking Powder, Baking Soda, and Salt into the bowl of your mixer.

Whisk the Eggs.

Melt the Butter.

Mix the Espresso Powder and Hot Water together.

And measure out the Milk and add the Vanilla...

 OK, Your ready to go. Let's Make Cake!

Start the mixer on Low speed (so you don't have a flour bomb going off in your face)

Add the milk first. 

Then, once everything is nice and damp, add the beaten eggs.

Once the eggs have been incorporated, add the melted butter mixing until just blended.

Increase the speed to medium and beat for 2 minutes; until it becomes slightly "fluffy" looking.

Lower the speed of the mixer and add the espresso/Hot water;

beating until blended (the batter will be really thin).

Divide the batter between the pans (about 3 1/4 cups in each pan).

Bake cakes until tester inserted into center comes out clean, 30 - 35 minutes.

Cool cakes on a rack for 10 minutes, then cut around cakes with a knife or offset spatula and turn out onto racks, peeling off parchment to cool them completely.

Then wrap in plastic wrap and store in the refrigerator while you make Italian Buttercrème.

NOW it's time to assemble.....

Schmear a dollop of the buttercreme on a cake board.

Lay down the first layer and top with the Chocolate/Mint Buttercrème filling.

Place the second layer on top.

Then apply a thin crumb coat of the mint buttercrème to the entire cake.

 Chill for 1 hour to set the buttercrème (cover the remaining buttercrème with plastic wrap and leave at room temperature) before applying the final coat.

Spread the final layer of buttercrème over the cake, making sure the top is nice and flat.

Lay down the mints to form a Checker board pattern.

I am gonna take a moment here and talk about mints.
I figured that the Giradelli mints would work just fine.

I know they have the stamp on the one side, so I figured I would just flip them over.

Well, I guess not.

That is why I decided on After 8 Mints.

Once you have placed your mints, simply apply a the Kisses/Hugs in a chess or checker set up. (white on one side, and milk on the other)

And there you have it.  Any one fore a game of Chess?

Mangia!!
~~

Saturday, June 26, 2010

Meeska... Mooska.... Mickey Mouse! - The Mickey Mouse Club House

OK, I think I have kept you all on pins and needles long enough.... Especially since my nephew's 2nd Birthday party was today. So it's OK for me to let the proverbial "mouse" out of the bag.

All those Rice Krispie treat bits and baubles were the pieces necessary to construct... Well, I will let the picture speak for itself.

Welcome to the Mickey Mouse Club House!

Originally, we were going to make the whole thing out of cake, but we decided that the head part would be just a little bit too unstable. So I suggested Rice Krispie treats for the ears.... After mulling it over several times, we decided to just use a simple sheet cake base, turn it into Mickey's Front yard and make the club house as an edible cake topper. I think it worked out pretty well....

Though the Rice Krispie Treats were a little on the bumpy side; so I made some crusting butter cream. (I probably should have just left well enough alone, I think I just made more work for myself than was needed - I was "over thinking" it)

Frosted all the pieces and let them dry.

Then smoothed them out with a paper towel.

Then I made a ton of Marshmallow Fondant. (DD! You Totally Rock!)

Divided it and colored it Blue, Yellow, Red and, even though I missed photographing it, Black... I also left some of it white for Mickey's glove.

I also made gumpaste window and door frames as well as a gumpaste slide (though when traveling, the foot fell over and broke the slide) Grrrrrrr.

My big goof-up was that it was all a little too big for the cake....

so Mickey's hand had to be set behind the cake, on the table instead of being ON the cake where it belonged. It was the leg and the foot that were the problem, I made the leg about and inch too long and the foot should have been about 3/4 of the height I made it. Oops!

My brother Chris, Marshall's dad, added all the finishing touches.... graham cracker sand, green coconut grass and some stepping stones, to complete the look.

Marshall, was VERY excited about his birthday cake.

Then the excitement ebbed and he was ready to eat it. LOL


Mangia!!
~~

Saturday, February 14, 2009

Spiderman Episode III - Spidey Gets Lit

In this, the final installment of the spidey saga, we find our hero, tossed in a box and transported to the far away land of Aliso Viejo.
Where..... (Queue sinister music)

Spidey Gets Lit

That right, but before spiderman was transported to Aliso Viejo, he got dusted. I figured since spidey's outfit/costume/uniform or whatever you want to call it, is made of spandex or some such type of material, it should have a little shine. So I had purchased Royal Blue and Christmas Red Luster dust (This was why a good Crusting ButterCream was so important).

So, super soft paintbrush in hand, a little luster dust was applied to the stars of the uniform.... (it doesn't really show up in the pictures at all, but I tried, in 2 different lighting conditions)

I should reveal that I had attempted to make Spiderwebs using a recipe that ddpie posted for me on the BakeSpace Forum....
It was a recipe for Gummi Bears, so I tried to reduce the un-flavored gelatin, hoping that would make it more flexible. But it was an exercise in folly... For with less gelatin, it was so runny that it was pooling as soon as it came out of the squeeze bottle... I tried waiting a little longer, but as it cooled, it just became clumpy & gloppy...
So I gave up and simply ate the mistakes... (The mistakes DID taste good; just like a gummi bear; which I will have to remember for the future)

At this point, sans webbing, our hero was transported to Aliso Viejo, and lit...

Mmmm Good Cake!!!!

And thus ends the tale of our hero....

The End!!!

I know, kind of anti-Climatic wasn't it...??

Mangia!!
~~

Thursday, February 12, 2009

Spiderman Episode I - Spidey Gets Baked

It is that time of year again, my Godson's birthday. he will be 6 this weekend. Since his first birthday, it has been my pleasure to make his birthday cake every year. Everything from an Inchworm, to Elephant, to Zoo Train, to the space shuttle last year (My first MMF experience, and it had wheels.) This year he decided on Spiderman. Yes, a person, albeit fictional, but none the less, a human subject for a cake. I am much better at animals and inanimate objects, I will be honest. So I was suffering from extreme lack of inspiration.

I thought about just doing his masked head. Seemed like a good idea until I realized I would be presenting a 6 year old with Spiderman's head on a plater for his birthday. Thats a little disturbing.

Then I thought of making a building and buying an action figure to climb it. That seemed like it might have worked until I realized I was going to have to drive, with said cake, to Aliso Viejo or Redondo Beach. OK, I will be honest, California may have a lot of freeways, but upkeep seems to be incomprehensible to CalTrans. Inevitably, it would end up looking like it went through the San Francisco earthquake by the time I got there.

So I "cheated", I went and bought one of THOSE pans, you know the ones, the little Hello Kitty, or Superman or Dora the Explorer... A pan I will more than likely NEVER use again but will have to store for the rest of my life, because as soon as I DO get rid of it, someone is going to ask if I still have it, because for some strange reason, only known to archangels... they need to make a Spiderman cake.

Life is funny like that.


Oh Yeah, and what's with the JAZZ Hands........ ???

Anyway, I will be presenting Spiderman in 3 parts, cause I loved the movies, and yes.... I AM that geeky.

Tonights heart pounding episode...

Spidey gets baked...


This is the cake, fresh from the oven (Chocolate)

The cake baking was pretty uneventful... I shortening'ed up the pan, cake floured it and baked the cake. It did rise a little too much in the center, but that was easily trimmed away before I unmoulded it and Voila!!!! I only lost a little of the crumb on the fingers, but I kind of suspected that would happen.

OK, I refuse to follow directions. Yes, to some that is no big surprise. According to the convenient instructions printed on the back of the pan liner, I am suppose to use frosting for his eye pieces.... No, Uh uh.
I was going to use gum paste, but I found out, at 9:00 pm, that my paste had turned to stone. So I ran to the store and grabbed some Marzipan, came home,
rolled it out to about 1/32 so it would be malleable enough to mold over the eyes.

Made a quick pattern of the eyes from the pan, and cut them out with a knife.

(Store any unused marzipan in a ziploc bag in the refrigerator for 2 weeks or in the freezer for 3 months)

I did 2 pieces per eye, so the center can be covered with silver leaf and the outer rim can be painted black.

Yes, He looks more like Venom than Spiderman.

Here the inner pieces are silver leafed. I am waiting for the rims to dry before painting black tomorrow evening.

ooooOOooooo.... S - H - I - N - E - Y ! ! ! ! !

Stay tuned for our next exciting episode...

Spidey Gets Creamed
(ButterCreamed that is)

~~