Showing posts with label Tillamook Cheese. Show all posts

Saturday, May 11, 2013

Going Nuts for Tillamook Vintage Cheddar - Cheddar & Walnut Wafers

So, Tillamook Cheese Factory, in Tillamook Oregon, has released a new product.  Vintage White Sharp Cheddar.

Not to be confused with the Vintage White "Extra" Sharp or the Vintage White "Medium" that has been available for several years now.  The Vintage White Sharp is aged for 9 months, as opposed to the Extra Sharp, which is aged for 2 years or the Vintage White Medium that is aged for only 100 days (~3 months).

Why am I so excited about this new product?  Well, I know that annatto seed is perfectly harmless, but it has always bugged me that cheddar cheese is dyed orange on the left coast.

Vermont doesn't dye their cheddar, New York doesn't dye theirs either.  So WHY on earth do the cheese companies on the Left coast dye the cheddar orange?  It just reminds me of processed American cheese (yuck!).  We are capable of discerning between Cheddar, dry Mozzarella and Monterey Jack, even if they are all the same basic color in their natural state.  The excuse that I hear the most often is that milk color varies slightly (depending on cow breed and time of year) and the annatto dye ensures that the cheese will always be the same color.  Poppy cock!  I say.  That is a silly excuse.  There is a natural variation in cheese color with Brie, Gruyere, Pecorino Romano, Saint Andre, Gouda, Emmentaller, Gorgonzola and so on. I think it's time that the cheese manufacturers built a bridge and got over it.

Luckily, Tillamook Cheese factory has done just that and finally decided to leave out the annatto dye and call it "Vintage" White.  Maybe, someday, we left coasters will get SO use to our cheddar being white that, 50 years from now, the orange dyed stuff will be considered "Vintage" instead.  One can only hope.  What makes me the most happy though, is that it's the same price as their "regular" orange Sharp Cheddar.  I finally get my blessedly WHITE cheddar cheese without having to darken the door of a specialty cheese shop and spend a small fortune. 

Woo Hoo! Ain't it purty?

To celebrate the mouthwatering deliciousness that is Tillamook Vintage White Sharp Cheddar, I have decided to go nuts, walnuts that is, and bake up some delicious cheddary wafers of utter decadence.   They are similar to a savory shortbread, but with a delicate crispy crunch that is truly satisfying.

Cheddar and Walnut Wafers


186g (6.5oz) (1 1/2 cups) AP Flour
60g (2.1oz) (1/2 cup) Walnuts, finely chopped
1/2 tsp Grey Salt
1/4 tsp Black Pepper
1/8 tsp Cayenne Pepper
113g (4oz) (1/2 cup) Unsalted Butter, cut into chunks
142g (5oz) (1 1/4 cups) Tillamook Vintage White Sharp Cheddar, shredded
1 large Egg Yolk
2 TB Heavy Cream

In the bowl of a food processor, combine Flour, Walnuts, Salt, Pepper, Cayenne and chunks of Butter.

Pulse until pea sized lumps still remain.

Add the shredded Sharp Cheddar and pulse again.

Until well combined and the mixture is like fine crumbs.

In a small bowl, whisk the Heavy Cream and Egg Yolk together.

Pour through the feeding tube of the food processor.....

Pulse until a soft dough begins to form.

Turn out onto a sheet of plastic wrap and flatten into a disc then wrap and refrigerate for 30 minutes to 1 hour.

Preheat the oven to 400 degrees while rolling the dough to 1/4 inch (~6mm) on a lightly floured surface.

Use a 1 1/2 well floured round cutter to cut out shapes.

Place about 1 inch apart on an ungreased, unlined baking sheet (please note that no parchment is needed)

Prick the circles with a fork in a cross pattern (to prevent a large bubble forming in the center)
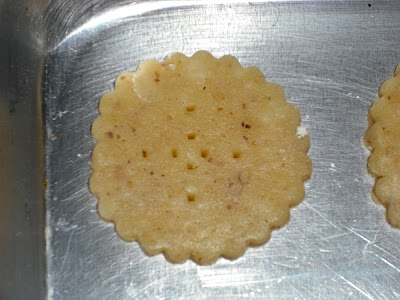
Bake for 14-16 minutes, turning at 7 minutes, until they are golden brown.

Move to a rack immediately and allow to cool completely. (If you can)

Consume with delight!  and Wine! (a nice Cabernet Sauvignon or Shiraz/Syrah)

Mangia!!
~~

Wednesday, March 10, 2010

Extreme Make-Over; Macaroni Edition - Macaroni y Formaggio al Forno

I love Mac & Cheese, and I don't mean the "Blue box" either.... I do not subscribe to cheese flavored powder in any way. This is mainly because I never had it as a kid, so I don't consider it a "comfort food" like so many Americans do. Now, Top Ramen on the other hand, that is one of my comfort foods, but more on that later, or I guess that would be previous since I have already done a few posts on kicking up your Ramen.

Focus, Focus... OK, Macaroni and Cheese... I have several recipes that I have contrived such as Bleu Macaroni and Macaroni alla Nawlens (cause it has Andouille in it) as well as a 5 Cheese extravaganza (Although sometimes it's a train wreck) and a delicious Smoked Gouda Mac that was originally a low fat recipe. (Yeah, THAT needed to be changed right away to the full fat version.) I even took Macaroni south of the border with a Chipotle Cheddar version... But they have all failed in one main area. The problem with most Mac and cheese is that it is based on a Béchamel.

Don't get me wrong... I LOVE Béchamel, and I understand WHY Béchamel is used, but it really absorbs the flavors of the cheese and down plays all that aged goodness. You can only add so much cheese to Béchamel before it becomes grainy or curdles due to the higher concentration of protein between the cheese and the milk making it more heat sensative. The solution is simple less Milk & Flour.... MORE FAT....

Oh yeah baby, THAT is what I'm talkin bout! So here without too much further rambling is a Mac and Cheese recipe based on a small amount of Heavy Cream, Butter, and most importantly, Crème Fraîche... Why Crème Fraîche? Because it doesn't curdle like sour cream, cream cheese or Mascarpone would in the oven and it has a slightly "Cheesey" flavor already. The result, a deliciously creamy Macaroni y Formaggio al Forno with ALL the flavor and, of course, ALL of the guilt..... This ain't "healthy" by any means; but in this capacity, it's really a starter, not a main dish. A little goes a long way.

Penne y Formaggio al Forno

5 oz Provolone
6 oz GOOD Sharp Cheddar (I used a 3 year old Vintage White; Orange Cheese is just wrong)
4 oz Parmigiano-Reggiano, grated; Divided
1 1/2 oz Panko
2 TB unsalted Butter
1/2 Cup Heavy Cream
4 oz Crème Fraîche
1 lb Elbow Macaroni or Penne (I only used Penne cause I forgot I was out of elbow Macaroni)
1/4 tsp White Pepper
a pinch of fresh grated Nutmeg

A word of warning... Not that I am asking you to take a second mortgage out on your house so you can buy a super fancy 100 year old Cheddar; but "cheap" cheese produces bad Macaroni & Cheese. I'm just sayin... ;)

Set a large pot of water over high heat so it can come to a boil while you are grating all the cheeses so your ready.

Set aside 1 oz of the Parmigiano-Reggiano and mix it with the Panko.

Place Heavy Cream and Butter in a small sauce pan, melting it over low heat.

You should be able to drop your pasta now, boil for 1/2 the time called for on the package.

Begin preheating the oven to 325 degrees.

Once the Butter and Cream are melted and homogeneous, add a handful of each cheese and whisk until melted and smooth.

Add another handful of each of the Cheeses and whisk again until melted and smooth.

Add the Crème Fraîche and whisk again. (it will look a little runny)

Add all of the remaining cheese; stirring until blended and smooth.

Drain the Pasta.....

Add the pasta to the Cheese mixture

and stir gently to coat all the noodles

Add white pepper and a hint of Nutmeg and stir again.

Immediately pour the mixture into an 8 x 8 casserole dish. (Hooray for old CorningWare!)

Sprinkle with Panko/Parmigiano-Reggiano mixture.

Bake for 20 minutes or until is begins to bubble.

Switch the broiler on and place under the element for 3 minutes to finish of the top crust.

Then indulge in cheese happiness.

Oh yeah!

Mangia!!
~~

Wednesday, October 28, 2009

I'm a Hound For Huckleberries - Huckleberry Sauce and Brussels Waffles

It's that time of the month folks. The BakeSpace Challenge for October 2009.

This month we are cooking with local ingredients, somewhat following along the lines of the somewhat trendy philosophy of "Locatarianism". A Locatarian limits the range of their food foraging to within 100 miles of their abode. Considering my new local in the Pacific Northwest I assumed that I would have very few difficulties coming up with something... HA!!! That is until key ingredients to the dishes I had planned started falling out of my 100 mile radius... Simple things that, with modern delivery methods, are available all year long, but aren't grown even remotely close.

Examples.... Lemon, Orange, Lime and Grapefruit... California and Florida are WELL beyond the 100 mile marker. I even had to watch the flour and sugar... OK, I will admit it... Sugar was impossible... It comes from Hawaiian Cane (I know people who are allergic to Beet Sugar). The worst thing though, was not being able to use chocolate... :( It was a sad day....

Then it hit me, like a big bag of "duh"! I have been pining away for the succulent, bright tartness of the Pacific Northwest Huckleberry for 13 years... I should be centering my dish around that!!! (Sometimes I am a little dense) And what better way to showcase a delicious huckleberry, than by applying it to the top of... Oh yeah, you guessed it... One of my favorite foods... WAFFLES!!!

So here is my Brussels (Belgian) Waffle Recipe, revisited with as many local ingredients as possible, all topped off with a delicious Huckleberry fruit topping. I did not photograph the waffle process, because I have already done it before, the only difference is that I substituted 1/2 cup of Bob's Red Mill Unbleached Wheat Flour with 1/2 cup of Spelt Flour from Azure Farms. The eggs were local from the lady down the street and the Honey came from a friend of my parents, Star, who has a winery and manufactures her wines using local wild flower honey.. :) Of course I had to go ahead and use Tillamook Butter (They use to only make cheese)


1 package active dry yeast (OK, yes it was Fleishman's which is from Canada although I am closer now than before) ;)
1/2 cup warm Goat milk (105 to 110 degrees)
2 cups Bob's Red Mill Unbleached flour
1/2 cup Azure Farm's Spelt Flour
1/3 cup C & H Pure Cane Sugar
1/2 tsp Pacific Sea salt
2 Eggs from the lady down the street, separated
1 1/2 cups lukewarm Goat milk (105 to 110 degrees)
1 tsp Vanilla extract (ok, this came from Madagascar)
8 TB Tillamook Unsalted Butter, melted and cooled

Topping:
2 cups Pacific Northwest Huckleberries (frozen - Cause picking season is over)
1 TB Cornstarch (It's Argo, I have no idea where it comes from)
1 TB Local Wild flower Honey (from Leaning Star Winery - She use honey to make her wine)
Pinch of Pacific Sea salt
1 TB Tillamook Butter

OK, Go ahead and make the waffle batter and bake the waffles...... I will revisit the topping afterwards.

Sprinkle yeast over the 1/2 cup warm milk in a small bowl; set aside about 5 minutes to wake up.
In a large bowl, whisk flour, sugar and salt together.
Lightly beat the egg yolks with a fork in a small bowl
In another small bowl or glass pitcher mix 1 1/2 cups warm milk with vanilla
Add melted Butter, then add the beaten egg yolks.
Add butter/milk/yolk mixture to the flour/sugar mixture, beat until smooth.
By now your yeast should be good and bubbly; Stir it down to get it well dispersed though the milk.
Then stir the yeasted milk into the batter.
Beat egg whites until soft peaks form; fold gently into batter.
Cover and refrigerate overnight. If you want to make them now you can leave it out on the counter for about 1 1/2 hours until doubled in volume, but the flavor is better if refrigerated overnight.
Preheat an electric waffle maker.
Remove from refrigerator and stir down batter.
Spoon about 1/2 cup batter into each waffle grid and use the back of a spoon or an icing spatula to spread over the grids a little.
Close iron; cook until waffle is well-browned and the waffle is no longer steaming (about 4 to 5 minutes).
Transfer cooked waffles to a wire rack and keep warm in an oven, set to 200 degrees, until all the batter has been cooked.

Makes 10 waffles. (that's 5 double squares by American Belgian irons)

Huckleberry Topping

This is the same way I make my filling for a Huckleberry Pie, which is really more of a tart as I refuse to actually cook the huckleberries, it ruins their texture especially once they have been frozen...

2 cups Pacific Northwest Huckleberries (frozen - cause picking season is over)
1 TB Local Wild flower Honey (from Leaning Star Winery - She uses honey to make her wine)
1 TB Cornstarch (It's Argo, I have no idea where it comes from)
pinch of Pacific Sea Salt
1 TB Tillamook unsalted Butter


First divide the berries evenly, placing 1 cup in a sauce pan and 1 cup in a bowl (set the bowl aside).

Add Honey and Salt to the Berries in the sauce pan and allow them to juice up for 10 minutes.
Pour the juice off into another bowl and make a slurry with the juice and the cornstarch.

Add the slurry back to the saucepan and place over medium flame;

cooking, while stirring, until thick and bubbly.

Remove the sauce pan from the flame and fold in the remaining berries from the bowl.

Then fold in the butter until melted.

Serve over your Waffles whith Whipped Heavy Cream..... AWESOME!!!!

Mangia!!
~~

Wednesday, July 29, 2009

Public Service Announcement From "Processed Cheese Free America"

This is Cheddar......


This is Cheddar on Sourdough.....


Any Questions?

I mentioned this, back on my "Lets Talk A Little Turkey" post. So it is time to visit that tried and true sandwich loved by so many.... Yeah Baby! I'm talkin' 'bout Grilled Cheese. My particularly favorite grilled cheese sandwich involves Sharp Cheddar cheese, which, while not quite as smooth when melted as say oh, "American Cheese" or even Mild Cheddar, gives you that punch of flavor as only good sharp cheddar can.

There are 4 things, in my opinion, that can take a Grilled Cheese to a whole new level:

  • Sourdough Bread
  • Prepared Horseradish
  • REALLY Soft, slightly melted Butter
  • Raw Cast Iron

There is just something special about grilling a sandwich in raw cast iron pan that cannot compare to any other form of cookware. Even enameled cast iron doesn't do the job as well. I think it has to do with the seasoning on the pan itself. Even a well seasoned cast iron pan is pitted. I think it facilitates better browning.

Awesome Grilled Cheese

Begin heating a Cast Iron Pan over medium flame, with a little pat of butter to season it before hand and to let you know when it's ready for your sandwich (when it foams, you know the skillet is ready)

OK, Brush both pieces of Sourdough with melted butter.

Spread with Horseradish on both pieces, I am pretty sure I use about 2 tsp (it might be a Tablespoon)

Lay down the cheese...

Press the two halves together, and brush the top facing slice with more melted butter.

Lay into the hot pan, buttered side down and brush the facing sourdough with the butter.

After about 1 1/2 -2 minutes, flip the sandwich over.

Grill for another 1 1/2 minutes.

Slice in half on a slight diagonal and serve warm... With Tomato soup... mmm Comfort Food!!!

Horseradish is an excellent accompaniment to the sharp cheddar, it goes even better with extra sharp. For a little extra zing - I sometimes mix the horseradish with a little Brown Mustard. So how do you like YOUR grilled Cheese??

Mangia!!
~~