Tuesday, March 31, 2009

Gooey vs. Fluffy - A Cinnamon Roll Throwdown?

Gooey

vs
Fluffy


This is the family buttermilk cinnamon roll recipe passed down by my grandmother. It is a good example of dough's versatility. What you choose to fill it with will determine how they come out. My mother and I load it down with extra butter and Dark Brown sugar. The added weight of the butter & sugar produces a much heavier and gooey ‘sticky roll’. My grandmother, on the other hand, uses less butter and light brown sugar. This puts less strain on the dough allowing for a much higher rise, thus producing a lighter and fluffier cinnamon “roll”. Which is made even more incredible when she frosts them. Neither my mother nor myself use any frosting since our finished product is covered in carmel-y goodness already.

1 TB Active Dry Yeast
2 TB warm water (110F /44C)
2 cups Buttermilk
3 TB Butter
2 tsp Salt
3 TB Sugar
1/2 tsp Baking Soda
4 cups AP Flour
up to another cup Flour for kneading and rolling

Gooey Filling:
1/2 cup Unsalted Butter (Room Temp)
1 box Dark brown sugar
2 TB Ground Cinnamon

Fluffy Filling:
1/4 cup Unsalted Butter (Room Temp)
8 oz Light Brown Sugar
1 1/2 TB Ground Cinnamon

Dissolve the yeast in the warm water and set aside.

Scald the buttermilk, then add butter, salt, and sugar, stirring to combine and set aside to cool.

After buttermilk is cool add yeast and baking soda to buttermilk.

Then pour into bowl and let sit for 5 minutes to check for bubbles (this will ensure your yeast is alive)

Mix in flour

Mix until it begins to hold its shape

Then turn out onto a floured board and begin to knead for 10 minutes (it's gonna be REALLY sticky)

or until dough is smooth and elastic then let rest for 20 minutes.

Divide dough in 2 equal portions;

Roll out half of the dough on a floured board to about an 8 x 10 rectangle.

Choose how to fill your rolls....

Gooey Filling:
Smear with 1/4 cup (4 TB) butter then spread 8 oz of Light Brown sugar over the buttered dough, sprinkling with cinnamon.

Rollup

& slice into 8 slices.

Smear little bit of butter in bottom of a 9 inch round pan and place slices in pan.
Press down a little then cover.

Repeat with other half of the dough.
Let rolls rise for 1 hour.
Bake at 350 for 25 to 30 minutes.

Remove from oven, cover with a plate

And flip them over immediately or they won’t come out of the pan. (Even if it's non-stick)


Fluffy Filling:
Smear with 2 TB Butter, spread 4 oz of Light Brown sugar over the buttered dough then sprinkle with cinnamon.

Roll up & slice into 8 slices.
Smear little bit of butter in bottom of a 9 inch square pan and place slices in pan.
Press down a little then cover. (please notice how much room there is in the pan)

Repeat with other half of the dough.
Let rolls rise for 1 hour. (although I goofed and this is at 40 minutes)

Bake at 325 for 30 minutes.

Cool in pan on wire rack.
Simply drizzle glaze over the top while warm or with Cream Cheese frosting when cooled.

Spending SO many years making them gooey made it a little more challenging for me to make them fluffy... In this case, I actually goofed and only let them rise about 40 minutes instead of the full hour.. oops... But they are still much fluffier than the gooey version.

(Personally, I still like the gooey the best)

Mangia!!!

Monday, March 30, 2009

Look! I'm a REAL Vegetable! - Butter Seared Finocchio with Parmegiano-Reggiano

An inspired recipe from La Cucina Italiana. I love this magazine and I love fennel, so anytime I find a new recipe utilizing this very under appreciated vegetable, I get excited. "Shaved" fennel has become all the rage lately, which is all fine and dandy, but this humble vegetable deserves more from life than to be play second fiddle as a garnish. It's refreshing to see a fennel recipe where IT is the center of attention.

You may need 2 pans to accommodate all of the fennel pieces, increasing butter accordingly to get a nice golden sear on the fennel. A mix of herbs to heighten the flavor, it's really up to you. Personally, I like it with just Butter and Parmegiano-Reggiano... Sort of a Finocchio al'Alfredo.

3 TB Unsalted Butter
2 Medium Fennel Bulbs, trimmed (keep the core intact)
Kosher Salt
Freshly ground Green Pepper
1/2 cup Grated Parmigiano-Reggiano or Grana Padano cheese
1 TB finely chopped fresh herbs such as Sage, Chives, Savory or Italian Parsley


Heat butter in a large skillet over medium heat until melted.


Cut each Fennel bulb into eighths.

Add fennel in a single layer, cut-side down.

Sprinkle with generous pinch salt, cover and cook, turning pieces occasionally, until browned and tender, about 15 minutes total. (5-7 minutes per cut side)

Remove pan from heat and plate.

Sprinkle fennel with cheese,

Sprinkle with herbs if you like and serve immediately.

Delicious!!! The Parmigiano-Reggiano brings out the sweetness in the fennel, making it taste very fruit-like.

Mangia!!

For more Fennel recipes, please visit....

Finocchio and Apple Salad

~or~

Finocchio Redeux

Sunday, March 29, 2009

When Rabbits and Bees Attack - Italian Cream Cheese Frosting

Honey Nut Carrot Cake - The Decorating; Part 2

The cake Section is here:
When Rabbits and Bees Attack - Honey Nut Carrot Cake

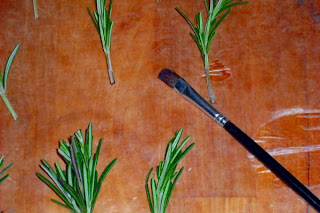
I must apologize for not mentioning the Rosemary sprigs in part 1.

It's very simple really. Take 1 egg white and a few drops of water, mix with a fork to break up the white a little.

Strip away some of the needles and "Paint" with egg whites.

Sprinkle sugar over them

and let set out on wax paper, over night to dry. (You cannot refrigerate these with the cake or they will draw moisture and get all kinds of gooey - I know, I did this on accident once)

So it's time to make the frosting. Normally, Carrot Cake SCREAMS for Cream Cheese, but I decided I would flex my butter and mix it up a little this time. This is a recipe for "Italian Cream Cheese Frosting" that I picked up eons ago from somewhere, it originally contained sugar, but since the Carrot cake is based on Honey, I thought it would be nice to stay in the same flavor range.

I assume that this is referred to as Italian Cream Cheese because the added butter tones down the tang of the American Cream Cheese, thus giving a more "Mascarpone" flavor to the frosting. Call it a hunch. Like I said, I picked this up when I was still living in Portland 12 years ago, I had never heard of Mascarpone back then. It was not until 8 years ago when I made my first Tiramisu that I even knew such a thing existed.

I have this down to a simple formula with the honey (taking my lead from previous experiences with honey and frosting) I usually make a triple batch of what is below, to frost a 2 layer 9 inch Carrot cake. After all, the only reason Carrot cake exists is to transport Cream Cheese Frosting into your mouth without getting your fingers dirty.


Honey Italian Cream Cheese Frosting
8 oz pkg of Cream Cheese
4 TB Unsalted Butter
1/2 tsp Vanilla
Pinch of Salt
1/4 cup Orange Blossom Honey (You can use 1/3 of a cup if you want it sweeter, but remember, Honey is twice as sweet as Granulated Sugar)

Make sure your butter and cream cheese are at about 65 degrees (it whips better that way)
Place Cream Cheese, Butter, Vanilla and Salt in a bowl and beat with an electric mixer until blended.

Add honey; beating till light and fluffy.

Apply a crumb coat and chill for 30 minutes


Reserve 1/2 cup for decor purposes and dye it orange

After chilling, apply the remaining frosting liberally, and I DO mean liberally.


Press walnuts or Pecans into the sides of the cake. Then chill for 30 more minutes.


Pipe small mound on the top of the cake and chill until ready to serve.


To Serve - Remove cake from refrigerator 1 hour before serving. Poke the sugared rosemary sprigs in the top of the orange mounds. Viola... Carrots... !!!

Slice and enjoy (Please, don't eat the rosemary)
.

Saturday, March 28, 2009

I'm so Dizzy, My Cheese is Spinnin' - Mozzarella Mania Part 3

Fresh Mozzarella part 3
If you are just joining you might want to check out:

Fresh Mozzarella part 1 - Say Cheese!!!!


Fresh Mozzarella part 2 - Whey to Go, Curds!!!
Link

This is the best part of the WHOLE process… Making the cheese balls.
Now I had issues with this part and I had several theories as to why, but I will go into that at the end. Suffice it to say that I should have picked up some litmus paper or an pH probe. I think my cheese was not quite acidic enough.
This was what my curd looked like, kind of a large disk of cheese curd.

The first thing that needs to be done, though, is to make the brine:

2 cups Whey
2 cups distilled water
1 TB kosher or pickling salt

Stir to combine then cover and refrigerate until ready to use.


OK, the "spinning" curd part
By now your curd should be at least 5.2 pH or lower, preferably in the 4.9 arena.
I can see you looking at me like, “HUH?? How am I suppose to know that?”

I will explain. To check for “spinnability” heat 2 cups of water to 185 degrees.
break off a tiny bit of the curd and dip it in the hot water and wait a little bit.
Scoop it out with a spoon and see if you can make it stretch a little without breaking.
If it stretches, it’s ready… If it breaks, your curd is not acidic enough, cover and let it sit another couple of hours and try again.

Pretty cool, huh? Wanna know why? Aw, heck I’ll tell ya anyway….

Food Science Geek Tangent - Proteins 101….. If you really don’t want to know, go ahead and skip forward, I will not be offended, I promise.….

This “spinning” of cheese curd is closely akin to making a meringue. I am not trying to confuse, just bear with me, it will make sense in the end…

Meringue is made with egg proteins (Albumen) that are whipped until they “stretch” to encapsulate air and water, thus creating foam. If you want a stable Meringue, you add acid such rubbing a copper bowl with Vinegar or sprinkling in a dry acid like Cream of Tarter. This helps to “stabilize” the albumen during the whipping process.

What does stabilize actually mean?

In an acidic environment, protein molecules become more flexible and “stretchy” if you will. Thus, with added acid, your albumen can stretch further before breaking, in effect “stabilizing” it’s ability to hold a foam without collapsing. The result? Fluffy Meringue!

Or in our case, the Milk protein (Casein) in the curd can stretch enough to form layer upon layer of folded mozzarella goodness.
...OK, Tanget over...


Back to cheese:

If your curd is ‘spin’able, then it is time to heat up a lot of water, while that is happening, break up the curds into small chunks, to facilitate even warming.


Also prepare a bowl with about 2 cups of cold water and a few ice cubes.

I like to divide my curd into 4 oz piles and work with 1 pile at a time (4 oz is about the size of a lemon)
Place the curd in a shallow dish.

Pour 191 degree water over it and let is sit for about 1 minute.

Using a spoon, collect the curd to 1 side then press on it with the back of the spoon, it should kind of merge into 1 large curd.
Keep collecting curds and pressing them together until you have a large mass which will begin to stick to the spoon.

Begin folding it over onto itself and pressing it together with the back of the spoon… repeat a couple times.
Pull the curd from the hot water (it will still be hot, so where gloves) and start folding and pressing, and folding and pressing. (I need a second pair of hands to take pictures)
The curd will become shiny on the outside, that means it is done.
Drop it into ice water to firm it up.

Empty the water from the dish and re-heat your distilled water to 185 degrees…. Place aother 4 oz in the bowl and repeat the steps above to make your second, third and fourth mozzarella balls. (you will get about a pound of Mozzarella from 1 gallon of milk.)
When they are all chilled in the ice water, go ahead and move them to the brine.

Store in the refrigerator for 3 hours before eating.

Mozzarella is best consumed within 3 days of this process…..
It will keep for about 10 days though, it’s just better the first 3.

Things I learned from this process….
First of all, I will not try to do this during a work week, this is a weekend project, but OH YES!! I WILL be doing this again….
I wrecked my 1st ball because my water was too hot and the curd melted into nothingness….
The second one, I ate before it even went into the salt brine… LOL
The third and forth, I got a little carried away and kept folding the cheese after it was getting too cool, so I lost my shiny coating on the outside. Still tasted good though…
Why did I go to all this trouble of making homemade mozzarella?
For this-----

Pizza Margharita!!!


the BESTEST EVER Pizza Margharita, I swear!!!
Mangia!!!!